Object Header Filter Parameters
Object Header Filter parameters are used by the Get SAP Objects action to filter retrieved SAP objects based upon their header values. When the Get SAP Objects action is run, only those objects whose header values match the filter are retrieved.
To set the value of an Object Header Filter parameter, open the Property Editor and click the field to the right of the parameter's ‘Object Header Filter’ action property. The Object Header Filter Editor dialog is displayed in the lower portion of the Workflow Editor, showing the name of the parameter being edited. Note that the workflow diagram may not be edited while this dialog is displayed.
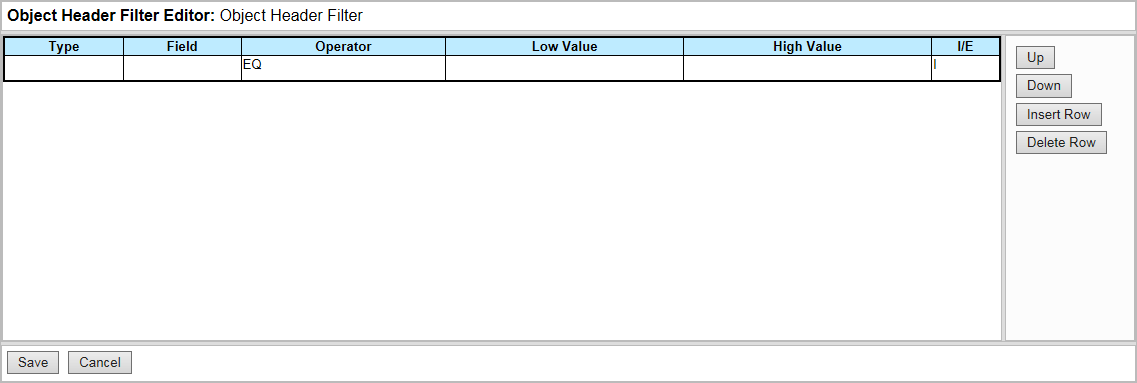
Complete the cells in the Object Header Filter Editor table as follows.
- Select an object type to filter from the ‘Type’ cell. The following object types are supported.
| PROG Program FUNC Function STRC Structure TABL Table DYNP Screen |
GUIS Toolbar and Menu |
- In the ‘Field’ cell, select an attribute to filter for the specified type. The attributes that are available depend upon the object type chosen in Step 1.
- Select a comparison operator in the ‘Operator’ cell. The following operators are available:
|
BT between |
GT greater than |
- Enter a comparison value in the ‘Low Value’ cell.
- If the BT operator is used, the ‘Low Value’ field should refer to the low comparison value.
- If the CP operator is used, the ‘Low Value’ field must contain at least one wildcard. ‘*’ matches against any number of characters, and ‘+’ matches against a single character.
- If the BT operator is used, enter the high comparison value in the ‘High Value’ cell.
- Select ‘I’ in the ‘I/E’ cell to include any matching objects in the retrieved results, or ‘E’ to exclude them. If the ‘Exclude’ option is used, you must create an ‘Include’ specification for the same object type.
Click:
- ‘Up’ to move the selected row up in the object header filter.
- ‘Down’ to move the selected row down in the object header filter.
- ‘Insert Row’ to add a new entry underneath the selected row.
- ‘Delete Row’ to delete the selected row.
When editing the object header filter, use the Tab key to move to the next table cell, or Shift+Tab to move to the previous table cell. The Up and Down arrow keys may be used to move between rows. Moving the cursor beyond the bottom row in the table adds a new row. This may be done using the Tab key, or the Down Arrow key for cells without drop-down selections.
To modify an element in an object header filter, select the appropriate table cells and update their values directly.
Click ‘Save’ to confirm any changes to the Object Header Filter parameter.
- Selection criteria that refer to the same object type are logically ORed together.
- Selection criteria that refer to different object types are logically ANDed together.
- Excluded criteria are logically ANDed with other criteria.
The number of items in an Object Header Filter parameter is displayed above the parameter node. To examine the details of an Object Header Filter parameter after a workflow has been saved, double-click the node or select ‘View Details’ from the node’s context menu.