Citrix testing
This chapter provides all the necessary information to configure and run Citrix tests.
About Citrix
Citrix Virtual Apps and Desktops are virtualization solutions that give IT control of virtual machines, applications, licensing, and security while providing anywhere access for any device.
Citrix Virtual Apps and Desktops allow:
- End users to run applications and desktops independently of the device’s operating system and interface.
- Administrators to manage the network and control access from selected devices or from all devices.
- Administrators to manage an entire network from a single data center.
Citrix Virtual Apps and Desktops share a unified architecture called FlexCast Management Architecture (FMA). FMA’s key features are the ability to run multiple versions of Citrix Virtual Apps or Citrix Virtual Desktops from a single Site and integrated provisioning.
For more information, visit the page here.
Client/UI based (not protocol based)
Unlike the support of Web technology which is protocol based in NeoLoad, the support of Citrix is based on a Client/UI driven approach. During the recording, NeoLoad captures the UI interaction, from both the keyboard and the mouse. At runtime, NeoLoad replays these same interactions with a Citrix client running for each NeoLoad Virtual User.
Support for ICA /Storefront
Citrix applications can be recorded either in ICA mode, or StoreFront mode:
- ICA: ICA file contains the Citrix client launching information.
- StoreFront: Storefront connection exposes the Citrix launcher through a Web portal (StoreFront, NetScaler…).
Prerequisites
Before recording a Citrix application with NeoLoad, the following requirements must be fulfilled:
- OS supported: Windows only
- Windows Vista/2008 SP2
- Windows 7 SP1/2012 R2
- Windows 8.1
- Windows 10
- Windows 2016
- Citrix recommended versions:
- Server:
- XenApp and XenDesktop 7.15, 7.18
- Citrix Virtual Apps and Desktops 1808, 1811
- StoreFront / Web Interface 3.12.3, 3.15.0, 1811.1
- Citrix client
- Citrix Receiver 4.12
- Citrix Workspace 19.7
- NeoLoad 32bits Distribution
- LG Agent: The Load Generator Agent needs to be started in normal execution mode (no support for service mode). Typically, you have to connect to the remote Load Generator using RDP, and then launch the executable "LoadGeneratorAgent".
- Disable UAC (User Account Control) if NeoLoad is launched with administrator privilege.
- On Windows 10, the Citrix client must have been installed from an installer either from the Citrix server, or the Citrix official website. It will not work if the Citrix client was installed from Windows Store.
- If the Citrix client is installed after the NeoLoad Controller or the Load Generator, then it is required to update the Window registry by running script in "tools\citrix\nl_citrix_for_xxbits.reg". "xx" depends on the operating system. bitness.
- It is recommended to disable the automatic Citrix client updates. After the Citrix client is updated, it is required to update the Window registry by running script in "tools\citrix\nl_citrix_for_xxbits.reg". "xx" depends on the operating system bitness.
- Warning: NeoLoad does not support Citrix Receiver for HTML5.
Recording a Citrix application
NeoLoad makes it possible to load test Citrix applications. The recording phase is the first step of the load testing process.
- Warning: Before recording a Citrix application in NeoLoad, make sure the prerequisites are fulfilled as described in Prerequisites.
The Citrix application recording is accessible via:
- The Record > Start Citrix Recording command.
- The Start Recording tool bar button. The Enable Citrix recording check box must be ticked in the Citrix tab.
- The Start Recording button in the User Paths panel. The Enable Citrix recording check box must be ticked in the Citrix tab.
- The Record Here option with a right-click on a Page, Transaction or Logical Action. The Enable Citrix recording check box must be ticked in the Citrix tab.
- Warning: Before recording the scenario, it is recommended to close all HTTP client applications (other Web sessions, Twitter client, and so on). NeoLoad records all the HTTP flows going through the machine. It is necessary to close HTTP clients or define exclusion rules in NeoLoad to avoid unwanted requests in the recording.
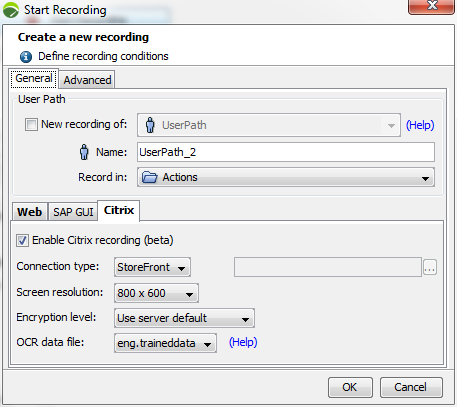
Enable Citrix recording: The check box must be ticked to record a Citrix application. It is ticked by default after selecting the Start Citrix Recording in the Record menu.
Connection type: The list box allows selecting the connection type to access the application. It can be StoreFront or ICA. When ICA is selected, the ICA file containing the connection information must be provided.
Screen resolution: The list box allows selecting the remote application screen resolution.
Encryption level: The list box allows selecting the ICA connection encryption level.
OCR data file: The OCR (Optical Character Recognition) engine default language is English. However, it can be configured in a different language as described in Configure OCR engine language. Once configured, the list box allows selecting the required language file.
A click on OK launches a Web browser to get connected to the Citrix StoreFront.

The Citrix application to record can now be selected. Once selected, the application is displayed in the Citrix Receiver where all the actions performed will be recorded.
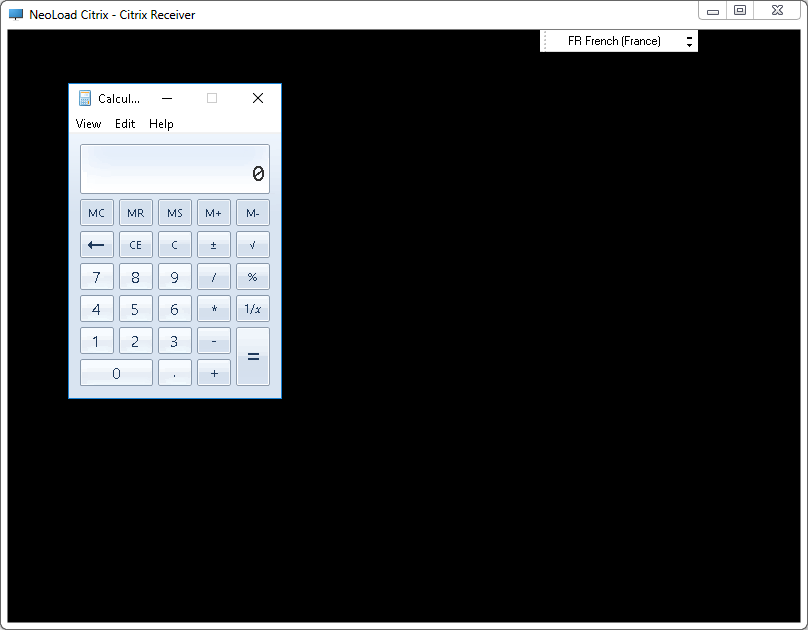
- Warning: Within the current NeoLoad recording, it is possible to record multiple Citrix virtual applications as long as the Citrix sessions are accessed sequentially (no more than one session at any time). After recording the interaction of a Citrix virtual application, you must close it before starting a new one.
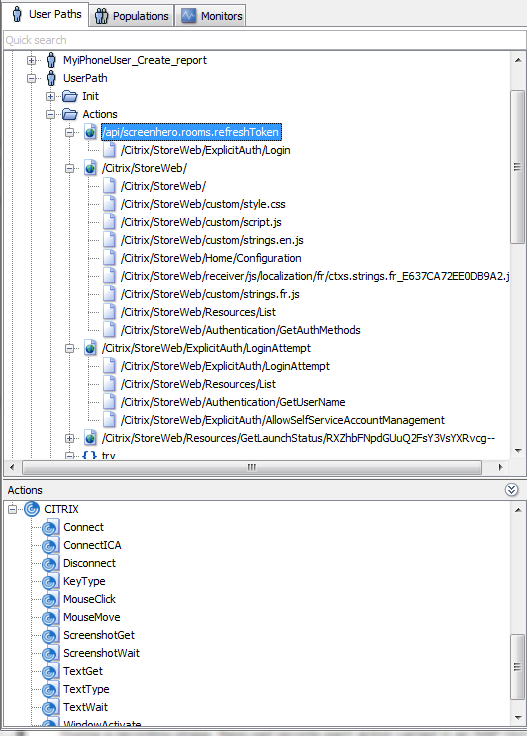
NeoLoad retrieves the ICA file and starts the recording. Also, as the recording starts, all the events are added in the User Path.
For each Citrix Action recorded, a screenshot of the Citrix window is taken.
All the Citrix Actions provided by NeoLoad are available in the NeoLoad Actions panel. For more information about Citrix Actions in NeoLoad, see Citrix Actions description.
Recording bar
As soon as the Recording bar is displayed, the recording starts.

The bar includes the following functions:
- Clicking the Stop button stops the recording and opens the Post-Recording wizard.
- Clicking the Pause button puts recording on hold. Clicking the Record button again resumes the recording.
- In the Record in drop-down menu, you can select a Transaction type into which the subsequent pages visited are to be recorded.
- Transaction is an editable dropdown list. It is automatically populated with Transactions of the User Path you want to update. You can also enter a Transaction name for the subsequent web pages to be recorded within that Transaction. A Transaction is used to identify and collect a group of web pages. Delete the Transaction name to end the collection of new pages within the Transaction and to allow the creation of a new Transaction.
- Click the Next Transaction button to place the recorded web pages in the next Transaction of your predefined Transaction list.
- Click the Prefill button to define the Transaction names to use. NeoLoad can use the Transaction names coming from an existing User Path or from a .CSV or .TXT file (Separate each Transaction by a line break).
- Clicking the Insert a rendezvous point icon makes it possible to insert a rendezvous point.
- The Citrix screenshot Action button allows launching the Citrix capture tool. This tools makes it possible to add specific Actions at recording time to ensure the replay of the scenario is stable. For more information, see Citrix capture tool below and Citrix Actions description.
Post-recording
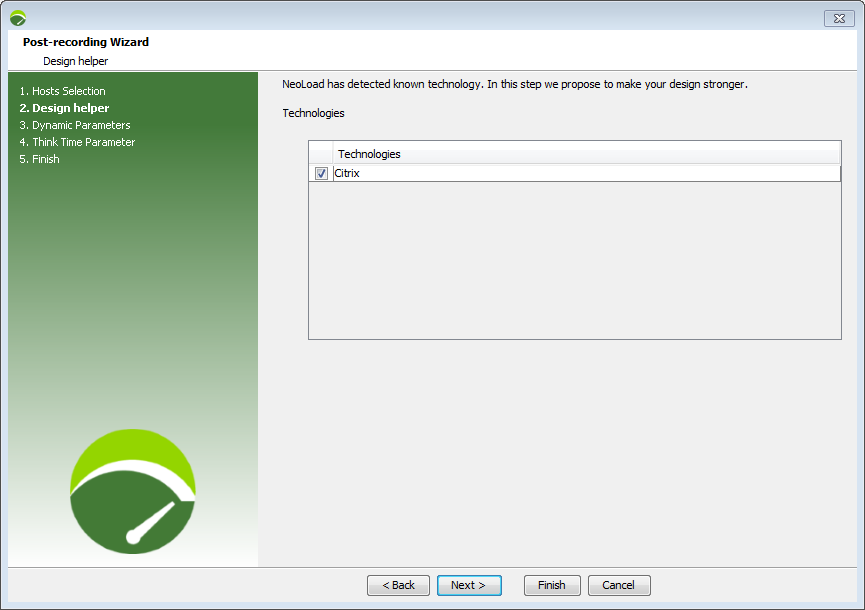
Once the record is done, the 2nd step of the post-recording wizard adds a "Try catch" logical Action to ensure the Citrix Disconnect Action is played to disconnect your Citrix session.
Citrix capture tool
During the recording phase of a Citrix application, the Citrix capture tool allows inserting specific Actions to make sure the replay of the scenario is stable and accurate. These specific Actions can help extract text or check a screenshot.
On the NeoLoad recording bar, a click on the Citrix screenshot Action button opens up the Citrix capture tool.
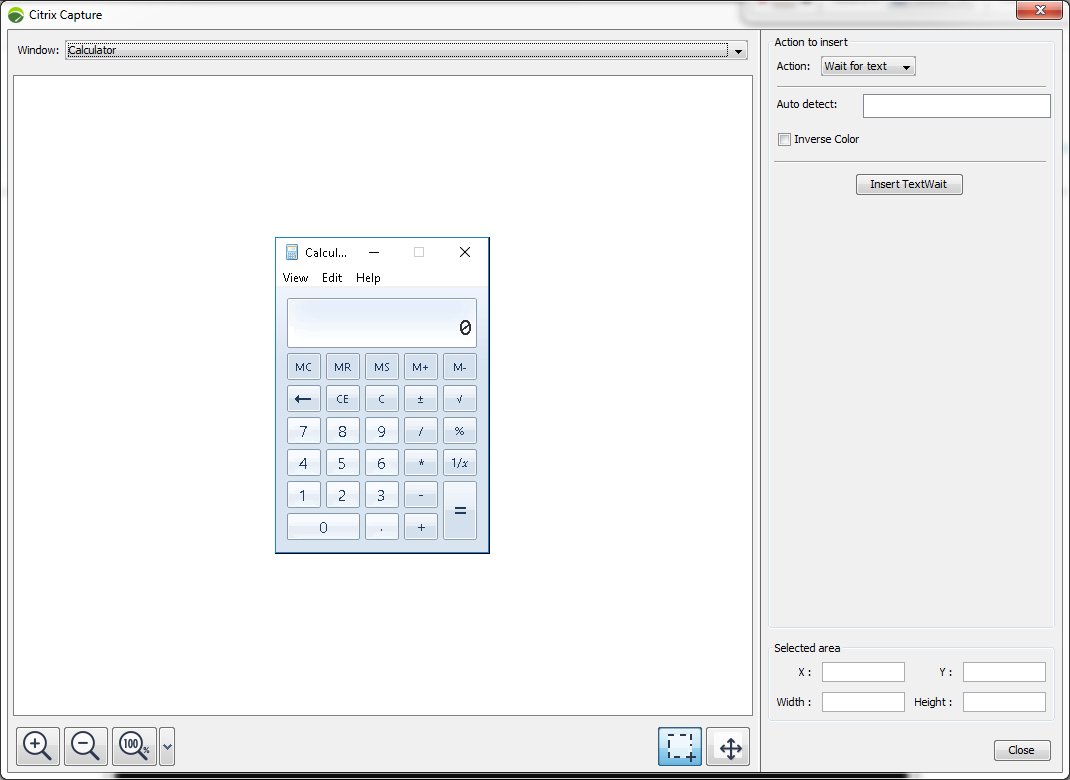
Window: The list box allows selecting the window to work on. By default, the active window is selected.
Action: The list box allows selecting the Action to insert:
- Wait for image inserts the ScreenshotWait Action. The Tolerance list box allows selecting the tolerance level for the screenshot comparison between record and replay phases. For more information, see Citrix Actions Description.
- Wait for text inserts the TextWait Action. The Auto detect field allows, through OCR, detecting the selected character from your selection and populating the field accordingly. If the character(s) to detect is dynamic, the field can be edited with a regular expression. For more information, see Citrix Actions description.
- Get image inserts the ScreenshotGet Action. For more information, see Citrix Actions description.
- Get text inserts the TextGet Action. The Auto detect field allows, through OCR, detecting the selected character from your selection and populating the field accordingly. If the character(s) to detect is dynamic, the field can be edited with a regular expression. For more information, see Citrix Actions description.
The Selected area zone allows selecting precisely the screenshot zone to capture.
 The selection button allows selecting a specific zone in the screenshot. Once a selection is active, it can be moved through the window by pointing the mouse cursor over the selection.
 The move button allows moving the image inside the window.
A click on the Close button validates the Actions insertion.
Configure OCR engine language
The OCR (Optical Character Recognition) engine allows extracting text from an image. By default the OCR is based on the English language but it can configured for additional languages.
For the OCR to work with other languages:
- Download the file from https://github.com/tesseract-ocr/tessdata_fast, put it into "<yourproject>/custom-resources".
- In the Neoload Start Recording dialog, select the OCR data file to use by clicking the OCR data file list box.
Best practices for recording
Below is a list of recommendations to follow when recording a Citrix application:
- Ensure to have a clean session before recording (never use an already opened session).
- Avoid production environments if possible.
- Always start with a simple scenario.
- Use Transaction to have meaningful result.
- Click slowly.
- Type text slowly.
- No mouse wheel support, no mouse move support. If it is absolutely necessary to perform this mouse interaction, it has to be inserted manually in the User Path.
- Do not perform keyboard ALT+TAB to switch from Citrix window to NeoLoad window.
- Use same language for local computer & remote session.
- Do not resize windows. To ensure exact reproduction of recorded actions, avoid moving or resizing windows while recording.
- Use explicit clicks. When opening expanded menu options, click explicitly on each option. Do not depend on the expanding menu.
- Make sure resolution settings are consistent.
- Use Classic Windows style. Use same style for local computer & remote session.
- Modify or disable DEP (Data Execution Prevention).
- Disable Active X. To disable ActiveX, in Internet Explorer go to Tools > Internet Options >Security tab. Click Custom level and under Run ActiveX controls and plug-ins select Disable.
- Always Use Citrix/Framework in Post Recording Wizard.
- Warning: Before you stop the recording, close the Citrix Application/Logout Desktop.
Editing a Citrix User Path
After the User Path is recorded, you can insert Citrix Actions to fine-tune it to stick to the required behavior.
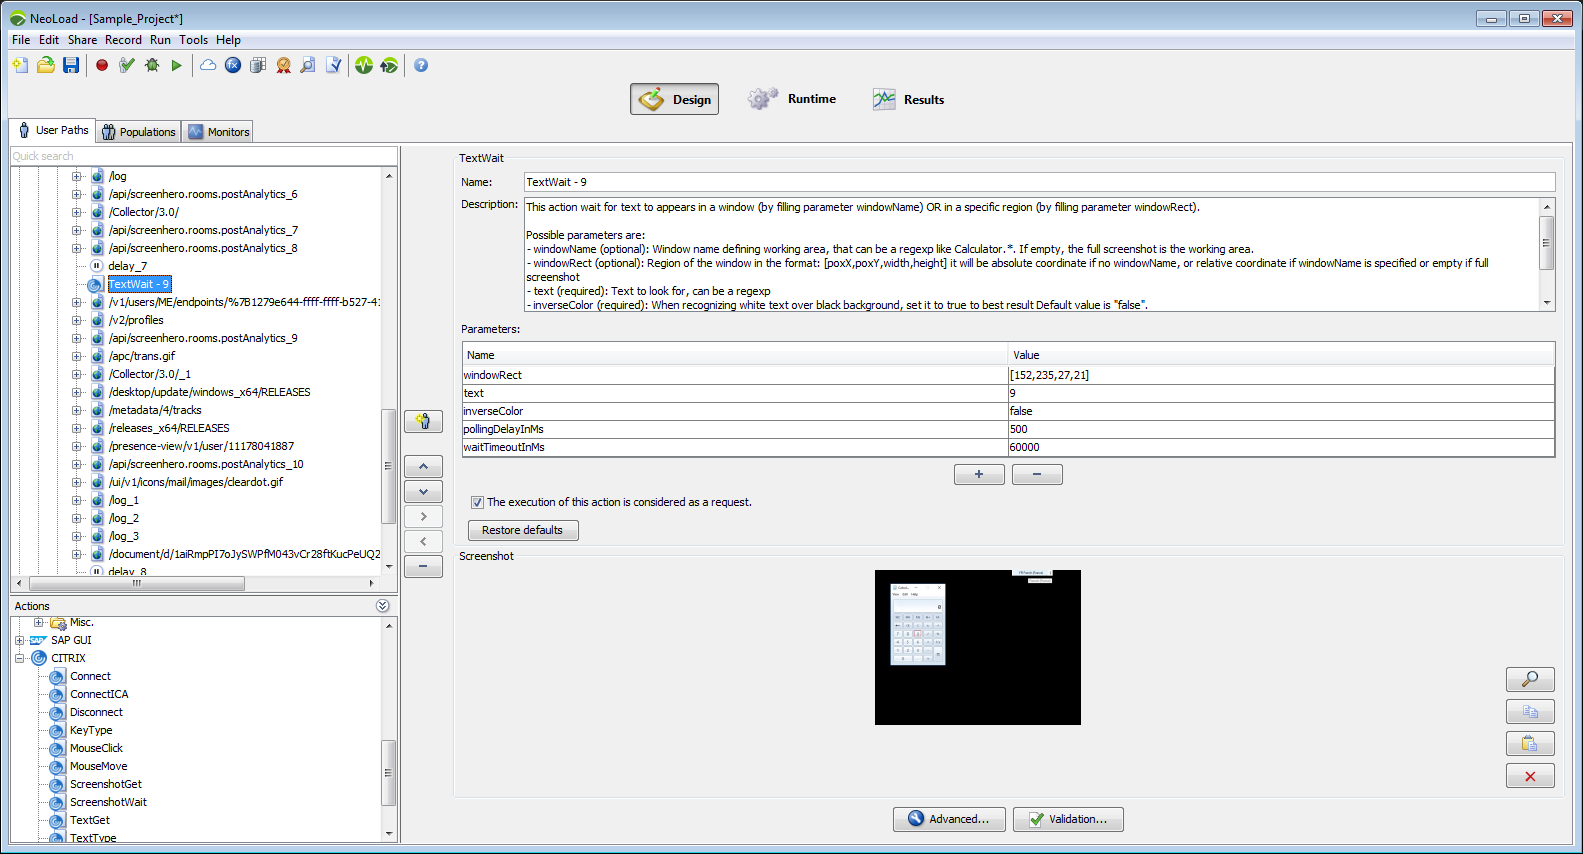
You can insert Citrix Actions to:
- add a conditional flow when combined with a condition ‘If ... Then ... Else’.
- add a validation point by adding a response Validation on the Action. For example, you can ensure that the Text returned by 'GetText" has the expected value by adding a response Validation.
As each Citrix Action added is associated with a screenshot, when adding manually an Action, the screenshot of the previous Action is taken.
- Tip: Any screenshot or image can be copied and pasted on a Citrix Action with a click on the paste button
 after copying the screenshot or image to paste.
For more information about Citrix Actions and how to configure them, see Citrix Actions description.
Best practices
Below is a list of recommendations to follow when editing a Citrix Actions based User Path:
- Make you sure to disconnect from your Citrix session when the recording is over: close your session and close all windows.
- Configure Population to let User Paths finish their iterations.
- Default Citrix configuration requires UNIQUE username for each instance:
- ICA connection file variable, ICA files in project "custom-resources". Two ways of using it: Either with one file for all Virtual Users (default), then scope should be local, and username property should be overwritten. Or with one different file for each Virtual User, then scope should be unique and there should be as many ICA file as concurrent Virtual Users.
- Connect/Disconnect ARE SLOW, ensure enough Pacing.
- Use regular expressions to identify window names
- Handle specific pop up windows: For more information, see Handle specific pop up windows.
Replay a Citrix User Path
Below is a list of recommendations to follow when replaying a Citrix User Path:
- Never double-stop neither test, nor check User Path, otherwise it would keep session opened on server.
- Choose a load variation policy that ramps-up connections slowly:
- either slow ramp-up policy,
- or start Virtual User sequentially (start policy in Population advanced settings).
- Perform Load Generator sizing to validate the appropriate number of Citrix clients that can be simulated on the Load Generator.


![]() The selection button allows selecting a specific zone in the screenshot. Once a selection is active, it can be moved through the window by pointing the mouse cursor over the selection.
The selection button allows selecting a specific zone in the screenshot. Once a selection is active, it can be moved through the window by pointing the mouse cursor over the selection.![]() The move button allows moving the image inside the window.
The move button allows moving the image inside the window.