Design a RealBrowser user path
Recording a RealBrowser user path is a great way to start creating a new business case scenario. However, if you want to add flow control, variables, or more complex browser interactions, you need to manually add them into the user path. This takes place in a phase called Designing.
RealBrowser designing leverages most of the existing NeoLoad design capabilities, and adds the following actions to help you handle most use cases when using the browser.
RealBrowser Actions
Using variables
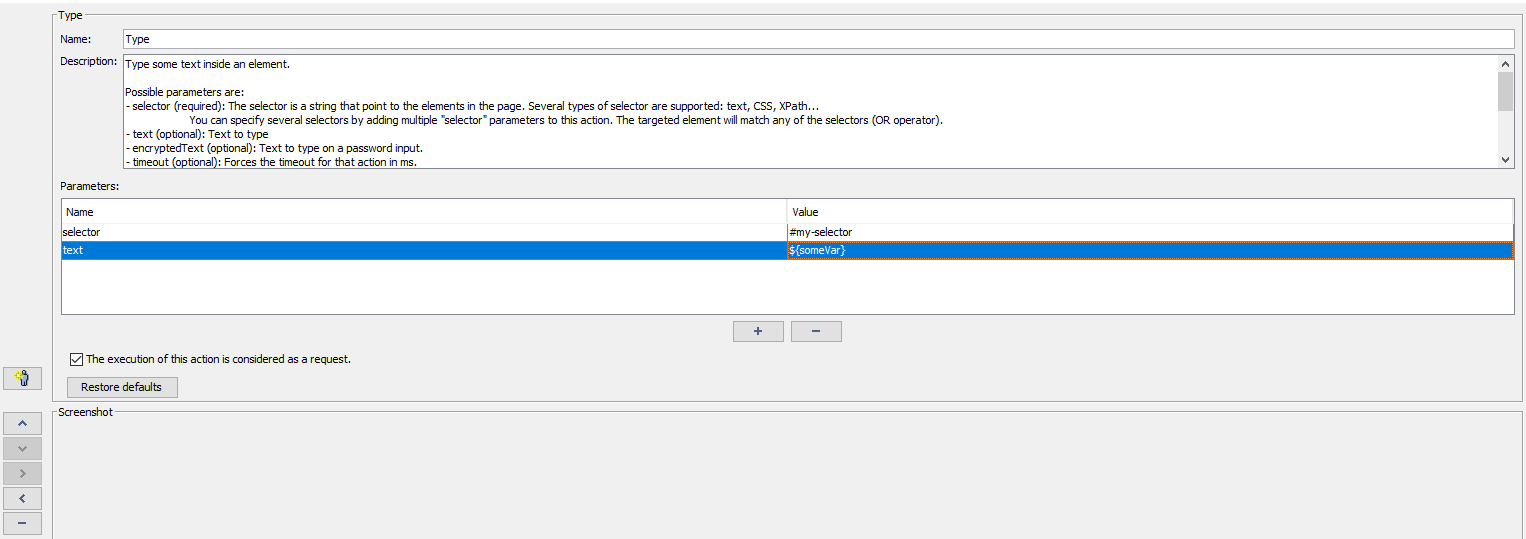
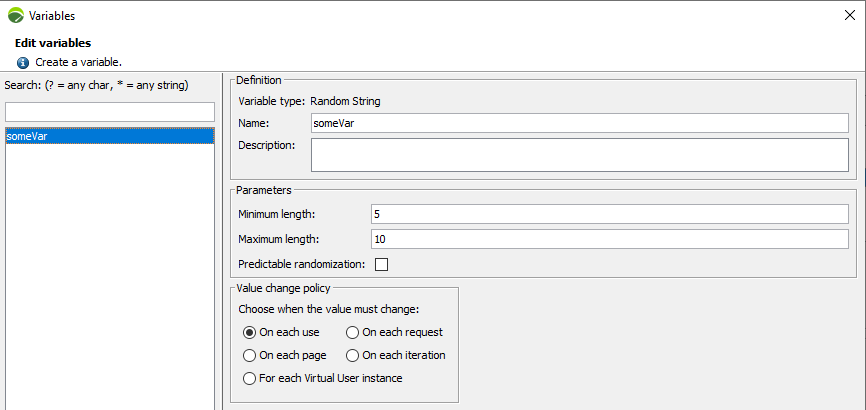
All Browser actions have parameters where variables from the Variable Manager can be leveraged.
For example, you can set a BrowserType action text parameter to a variable that takes its source from the Variable Manager. This makes it so that on each iteration a different text is set in the target element.
The syntax for using variables is the dollar sign followed by the name of the variable in between braces : ${myVariable}
Deal with iframes
iframes are web pages embedded in the main page. When you use actions that target an element, the scope for the selector parameter is implicitely the main frame. To execute an action on an element existing inside an iframe, add a frameName or frameIndex parameter.
-
frameName is the more stable way to locate your iframe, but it requires iframe to have a name attribute.
-
frameIndex is the fallback method of locating your iframe, it identifies the iframe with its index based on its order of appearance in the DOM.
Deal with browser tabs
Tabs can be opened at any time during a user path. Once you have multiple tabs open at the same time, you need to explicitly choose which tab is the current focused tab that will receive all the following actions.
Tabs are managed by 3 actions:
-
OpenTab: Opens a new tab to the right.
-
SwitchTab: Swith to specified tab index. The parameter index specify the tab to switch (is 0-based, the first tab is 0, the second is 1, etc.).
-
CloseTab: Close the current tab.
User path synchronization
RealBrowser actions are built with a retry-until-timeout mechanism. This eases your journey to a working and stable user path. For example, if you want to click on a button in the current page, that click will be tried until it is successfully performed, or a timeout has occurred.
Additionally, there are several ways for you to insert waits and pauses between actions to ensure actions are flowing correctly.
Adding think times and delays
When confronted with a new page, screen, or component on the page, some users require time to respond.
Using NeoLoad think times and delays allows you to add pauses to the flow of actions. This emulates the way a real user behaves.
Think times are a main tool to run scenarios at scale. Without them, depending on your load policy, the load generator can send orders to different browsers at the same time and this can lead to an increase in CPU consumption.
Tip: Adding pacing is the best way to increase the number of parallel virtual users when you start to hit infrastructure capacity limits.
Adding WaitForSelector actions
This RealBrowser action is useful when you want to assert the presence, absence, or visibility of an element before interacting with another.
For example, if you have a button that is enabled and ready to click, but you want to wait for a specific text content to appear before clicking it, the WaitForSelector allows you to do that.
Using waitForNavigation parameters
Use waitForNavigation* parameters to assert and ensure that a navigation has occurred after the action that is set has been performed.
Each action that is marked with at least one parameter creates a page result where the loading time of the page is collected and aggregated.
There are three parameters:
-
waitForNavigation.url: assert that the navigation leads to the specified url (in regular expression format).
-
waitForNavigation.timeout: assert that the navigation is performed under the specified timeout (default 10s).
-
waitForNavigation.until: defines the kind of event that marks the end of the navigation.
-
LOAD: the navigation is declared finished when the page emits an onload event (default mode)
-
DOMCONTENTLOADED: the navigation is declared finished when the page emits a domcontentloaded event
-
NETWORKIDLE: the navigation is declared finished when the page has made no new network calls since 500ms
-
COMMIT: the navigation is declared finished as soon as the request has been sent
-
Note: Not all pages emit the defaulted LOAD or DOMCONTENTLOADED events. If you have an action with a waitForNavigation that relies on one of these, a failed assertion or timeout might be returned. In this case, switch to the NETWORKIDLE or COMMIT mode.
Design limitations
-
Some Browser Actions allow multiple selector parameters to be defined. This use increases the resilience of the action to application changes. You can only mix:
-
Multiple CSS selectors together.
-
Multiple XPath selectors together.
-
"Text=" selectors cannot be mixed with other selectors.
-
-
Drag'N'Drop.
-
Alerts management (disabled by default).
-
Cookies and LocalStorage management (use the evaluateJavascript action instead).
-
SVG interactions.
-
Canvas interactions.
-
Downloaded file assertions.
-
Fork (flow control) actions are not compatible with RealBrowser actions
Note: Client certificates are not supported.
Run a RealBrowser User Path
Running a RealBrowser User Path requires a license with the RealBrowser feature enabled. Make sure that the amount of VUs you require at runtime is available on the license or on your current lease.
When you run a RealBrowser scenario, take into account that the Load Generator spins a browser instance for each required Virtual User. This means that the CPU and Memory footprint on your current machine is bigger than a classic protocol scenario.
Note: With RealBrowser, the main mission of the Load Generator is to send orders to the browsers that do the bulk of the work. The LG's JVM should be tuned to around 15% of the available host memory, leaving plenty of memory for the browser instances that pile up.
Logging
In addition to the NeoLoad usual logfiles, you can also read the browsers.log file to trace and debug messages coming from the browser at runtime.
From the GUI, you can access the logs folder in the Help > Open log folder menu.
Using an application proxy
RealBrowser testing inherits from the NeoLoad Application Proxy settings for reaching apps behind a proxy.
In Edit > Preferences > Proxy, you can add a new proxy with the Add button, and select that proxy or an already existing one in the Application Proxy dropdown.
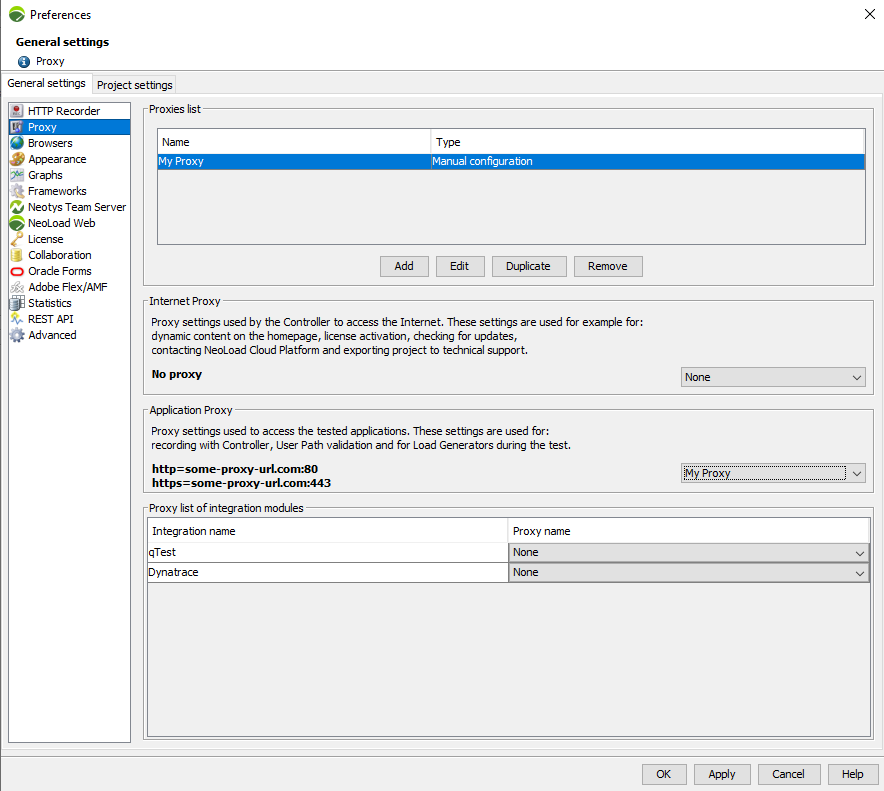
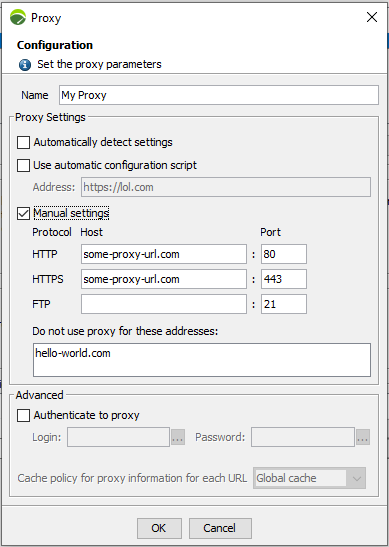
For the selected Application Proxy to be valid, it must be a manual settings, otherwise a warning will display in the logs.
Caution: Automatically detected settings or configuration script (PAC) are not supported in RealBrowser.
The proxy URL that will be used will match the protocol of the targeted application as described in the first Navigate action encountered in the RealBrowser user path.
In the example screenshot below, if you navigate to
You may also skip the usage of the proxy for requests going to specific domains using the Do not use proxy for these addresses text field.
Allowed syntax for domains are :
-
Domain: my-app.com
-
Subdomain: sub.my-app.com
-
Any subdomain: .my-app.com
Finally, you can toggle the Authenticate to proxy option and add a login/password combination if your proxy requires so.
Once enabled, all requests emitted by the browser will pass through that Application Proxy (besides those explicitly skipped).
Note: When no application proxy is defined, the running browser will use its default policy. For some of them such as Chromium, the system proxy will be used.
Monitoring the infrastructure
RealBrowser test will take more resources than Protocol test due to browsers footprint.
You have to monitor your infrastructure to calibrate how much Virtual User a Load Generator is able to handle.
Note: The memory used by browsers is different than the memory used by the Load Generator, so you do not have to increase the Load Generator Xmx.
Metrics to monitor on the Load Generator :
-
CPU Load => The more restrictive resource will often be the CPU, so this is important to monitor this metric and be sure that it does not go exceed 80%.
-
OS Memory Used => It will represent the total memory used of the Load Generator, including browsers.
-
JVM Memory Used => Does not include browsers memory but it is important that the amount does not exceed 80%.
Analyze a Browser Based User Path
Data model
The following table describes the data objects that can be analyzed during and after a Test Run.
| Data type | Description | Metrics |
|---|---|---|
| Transactions |
Transactions are a collection of actions that represent a concrete business case. The value they hold is the sum of the duration of all their children actions. |
Duration (Min, Max, Avg), Count, Errors, Error rate, Elements/Second, Std Dev, Avg-90%, Percentiles (50, 95, 99) |
| Actions | The resulting duration of an action is the time it takes to complete. Completion depends on the type of action being used, see Action timings. | Duration (Min, Max, Avg), Count, Errors, Error rate, Elements/Second |
| Pages |
Page metrics are generated only from RealBrowser actions marked with waitForNavigation parameters |
Duration (Min, Max, Avg), Count, Errors, Error rate, Elements/Second, Time to First Byte (Min, Max, Avg) |
| Requests | Requests metrics will contain metrics related to each HTTP request made by the browser. | Duration (Min, Max, Avg), Count, Errors, Error rate, Elements/Second, Time to First Byte (Min, Max, Avg), Throughput |
Action timings
RealBrowser actions return a timing after they are executed. The nature of this timing depends on the type of the action, which can be divided into three families:
-
Actions that have an effect on the browser (OpenBrowser, CloseBrowser, OpenTab, CloseTab, SwitchTab):
-
These actions return the time it took for the operation to complete.
-
OpenBrowser can take a few seconds to launch.
-
Other actions should be consistently quick to execute (0.1-0.2s)
-
-
Actions that lead to a page navigation (Navigate)
-
These return the page load time, based on the onload event.
-
Determines that the page has loaded using the parameter waitForNavigation.until
-
-
Actions that have an effect on the page (Click, Type, Press, SelectOption, EvaluateJavascript, UploadFile)
-
These return the time it takes for the operation to complete, depending on the DOM state.
Example: If you click on a button, and that button is enabled, visible, and accessible, the action will execute quickly (0.1-0.2s. However, if you click a button but it is disabled because some javascript logic has not been processed yet, the waiting time is integrated into the total action timing. This remains until the button becomes enabled and the click can occur.
-
-
You can declare that actions lead to a navigation by using the parameter waitForNavigation.url. In this case, the target page load timing is integrated into the action timing.
-
Actions that are marked with waitForNavigation parameters also generate statistics in the Page section of NeoLoad Analysis.
-
Capture Requests Metrics
From NeoLoad 9.1, RealBrowser is able to capture network traffic between the browser and the server. This stores the activity in the requests metrics so you can analyze a graph at run time, and after.
To enable this feature, add a CaptureRequests action at the beginning of your user path. Requests metrics are only captured from the moment the action is played.
Note: New recordings made in NeoLoad 9.1 automatically add this action at the beginning of the user path.
Your request results are grouped under the CaptureRequests action. You have the ability to declare buckets (based on regular expressions) to split your results based on their type or domain. You can put multiple CaptureRequests actions in your scenario. The one that is declared last receives all request results that occur. This gives you the ability to split more statistics, depending on your needs.
Note: If you don't specify a bucket, or if some requests do not match any of your defined regular expressions, they fall into the default ".*" bucket.
Whether you record or add a CaptureRequests action to your design, you have the ability to predefine buckets. This makes it so you don't have to declare them every time.
To predefine buckets, follow these steps:
-
Go to your
controller_user.propertiesfile. -
In the [RealBrowser] section, add the following keys:
-
realBrowser.captureRequests.defaultRegexp.count=<number of declared regexps> -
realBrowser.captureRequests.defaultRegexp[0]=<some-regexp> -
realBrowser.captureRequests.defaultRegexp[1]=<some-regexp>
Examples:
Configuration based on request type:
-
realBrowser.captureRequests.defaultRegexp.count=3 -
realBrowser.captureRequests.defaultRegexp[0]=.*\\.css -
realBrowser.captureRequests.defaultRegexp[1]=.*\\.js -
realBrowser.captureRequests.defaultRegexp[2]=.*\\.png
Configuration based on request origin:
-
realBrowser.captureRequests.defaultRegexp.count=2 -
realBrowser.captureRequests.defaultRegexp[0]=https://my-domain\\.com.* -
realBrowser.captureRequests.defaultRegexp[1]=https://third-party-domain\\.com.*
Caution: dot characters, and other characters reserved for regular expression, must be preceded with two backslashes.