qTest Automation Host 1.3.8 Installation Guide on Linux
In this article, we will walk you through how to install the qTest Automation Host version 1.3.8 on Linux machine.
Download qTest Automation Host 1.3.8
-
Go to this page Download qTest Automation Host and download the qTest Automation Host 1.3.8 for Linux
-
Open Terminal
-
Move the downloaded file agentctl-1.3.8-linux-x64-full.tgz to /usr/local directory:
$ sudo mv agentctl-1.3.8-linux-x64-full.tgz /usr/localYou can move the package to /usr/local or wherever you'd like; sudo is only needed depending on the location it will be moved -
Change current directory to /usr/local:
$ cd /usr/local -
Extract the bundle:
$ tar -zxf agentctl-1.3.8-linux-x64-full.tgz -
Change current directory to the extracted agentctl-1.3.8:
$ cd agentctl-1.3.8
Install and Configure the Automation Host
Execute following command to install and configure the automation host.
/usr/local/agentctl-1.3.8 $ ./agentctl config -Phost=[ip_address] -Pport=[agent_port] -PqTest.url=[qTest_url] -PqTest.username=[qTest_username] -PqTest.password=[qTest_password] -Pproxy.enable=true -Pproxy.host=[proxy_host] -Pproxy.port=[proxy_port] -Pproxy.username=[proxy_username] -Pproxy.password=[proxy_password]Command parameters description:
| Parameter Name | Description |
|---|---|
| config | Execute the configuration command |
| -Phost | IP address or host name or domain name of this machine. If this parameter is omitted, the agent will use the current IP address of this machine |
| -Pport | Specify a port that your Automation Host will be running on. If this parameter is omitted, port 6789 will be used |
| -PqTest.url | Url of your qTest Manager instance |
| -PqTest.username | User name used to login to qTest Manager |
| -PqTest.password | Password used to login to qTest Manager |
| -Pproxy.enable | Possible value is true or false. If the value is set to true, you will need to provide proxy settings, otherwise, set it to false or you can discard this parameter |
| -Pproxy.host | The IP address or machine name of the proxy server. This parameter and value is required when -Pproxy.enable is set to true. |
| -Pproxy.port | The port that the proxy server is running on. This parameter and value are required when -Pproxy.enable parameter is set to true. |
| -Pproxy.username | If your proxy server requires basic authentication, enter username to authenticate with the proxy |
| -Pproxy.password | If your proxy server requires basic authentication, enter password to authenticate with the proxy |
Configure qTest Automation Host without proxy
Example command below shows how to configure the qTest Automation Host 1.3.8 in a non-proxy environment. The values for each parameter are highlighted in bold
/usr/local/agentctl-1.3.8 $ ./agentctl config -Phost=192.168.76.29 -Pport=6789 -Pproxy.enable=false -PqTest.url=https://demo.qTestnet.com -PqTest.username=demouser1@qasymphony.com -PqTest.password=n0thIng4y0uConfigure qTest Automation Host with proxy settings
Example command below shows how to configure the qTest Automation Host 1.3.8 in a proxy environment. The values for each parameter are highlighted in bold
If your proxy does not require authentication:
/usr/local/agentctl-1.3.8 $ ./agentctl config -Phost=192.168.76.29 -Pport=6789 -PqTest.url=https://demo.qTestnet.com -PqTest.username=demouser1@qasymphony.com -PqTest.password=n0thIng4y0u -Pproxy.enable=true -Pproxy.host=192.168.76.138 -Pproxy.port=3128If your proxy does requires basic authentication with user name and password:
/usr/local/agentctl-1.3.8 $ ./agentctl config -Phost=192.168.76.29 -Pport=6789 -PqTest.url=https://demo.qTestnet.com -PqTest.username=demouser1@qasymphony.com -PqTest.password=n0thIng4y0u -Pproxy.enable=true -Pproxy.host=192.168.76.138 -Pproxy.port=3128 -Pproxy.username=proxyuser@qasymphony.com -Pproxy.password=s0mething#0923IMPORTANT: Add system environment variable
Open Terminal and execute this command to identify Java version: $ java -version
If the execution result showing your machine is running Java whose version is between 1.8.0_77 and 1.8.0_151, you must add an environment variable to make proxy with basic authentication work properly following below steps:
-
Run below command to edit the bash_profile file:
$ vi ./bash_profile -
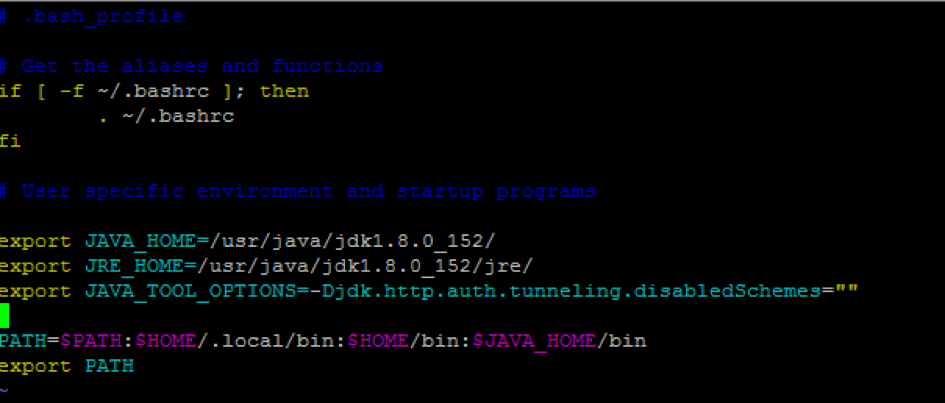
Add this line to the bash_profile file:
export JAVA_TOOL_OPTIONS=-Djdk.http.auth.tunneling.disabledSchemes="" -
Below screenshot shows how your updated bash_profile file looks like
-
Save the file when you're done.
-
Next, execute below command to load the updated bash_profile:
$ source ~/.bash_profile -
Verify the variable is loaded:
$ echo JAVA_TOOL_OPTIONS -
If you see the output -Djdk.http.auth.tunneling.disabledSchemes= printed in the Terminal, then you have successfully added a new environment variable.
Start the Automation Host
To start the automation host, run start command with an optional hostname parameter. Note: if you do not specify -Phostname parameter, the default agent host name is set to "Sample Agent".
/usr/local/agentctl-1.3.8 $ ./agentctl start -Phostname="[agent_host_name]"Example:
/usr/local/agentctl-1.3.8 $ ./agentctl start -Phostname="My Agent Host Name"Access to the Automation Host
Open your browser and enter the URL: http://<host>:<port>
-
host: the IP address or host name or domain name that you specified at step #2. If you did not specify the host at step #2, use localhost or the IP address of this machine
-
port: the port that you specified at step #2. If you did not specify the port at step #2, use the default 6789
Install the Automation Host as a Service
Access to agentctl directory and execute following commands:
/usr/local/agentctl-1.3.8 $ sudo ./install /usr/local/agentctl-1.3.8 $ sudo systemctl status qTest-automation-agentUninstall Service
Open Terminal and execute following commands
/usr/local/agentctl-1.3.8 $ sudo ./uninstall /usr/local/agentctl-1.3.8 $ sudo systemctl status qTest-automation-agent