qTest Automation Host 2.x Installation Guide on Windows
In this article, we will walk you through how to install qTest Automation Host version 2.x on a Windows machine.
Download qTest Automation Host 2.x for Windows
-
From the Download qTest Automation Host page, download the qTest Automation Host 2.x for Windows. IMPORTANT: It is highly recommended that you download the latest 2.x version to benefit from bug fixes and enhancements.
-
Extract the agentctl-[version]-windows-x64-full.zip to a desired installation folder, e.g. C:\qTest-automation-host\agentctl-[version]. Make sure you read important notes below before you perform this step: IMPORTANT NOTES:
It is NOT recommended to extract and install Automation Host in the root of C: drive, e.g. C:\agentctl-[version], since it will cause the Auto Upgrade functionality failed. The reason for the failure is the auto upgrade process will not be able to create a new folder for the new version at the root of C: drive due to Windows restriction. You are highly recommended to extract Automation Host package under at least one sub level folder, e.g. C:\qTest-automation-host\agentctl-[version]
One of our customers also experienced an issue with auto start up functionality in Automation Host 2.2.2 where it did not start the Automation Host when Windows starts up. It is due to the Automation Host was installed under C:\agentctl-2.2.2 and for some security reasons the start up script failed to execute. Although this is not universal issue as we could NOT reproduce it in our test environment, you are still advised to NOT install Automation Host under root of C: drive to avoid this unexpected issue
It is highly recommended to download and install 7-zip tool and use it to extract the package as to avoid issues with the long file path. For more detail, refer to this article.
Starting from Automation Host 2.2.2, we fixed the issue with the long file path so the use of 7-zip is optional
Replace [version] to the actual version that you have chosen to download, e.g. 2.1.1
If you plan to install multiple Automation Host instances on Windows. it is important that you create a parent folder for each instance to easily identify it, as well as to avoid issues when upgrading each instance (see the notes above). The best practice is to suffix the parent folder with a number, then extract the package to that parent folder. For EXAMPLE:
Instance #1: C:\qTest-automation-host-1\agentctl-[version]
Instance #2: C:\qTest-automation-host-2\agentctl-[version]
...
Instance #N: C:\qTest-automation-host-N\agentctl-[version]
Download the Automation Host Video
Note: For the highest quality, view the video in full-screen mode.
Acquire your qTest API Token
-
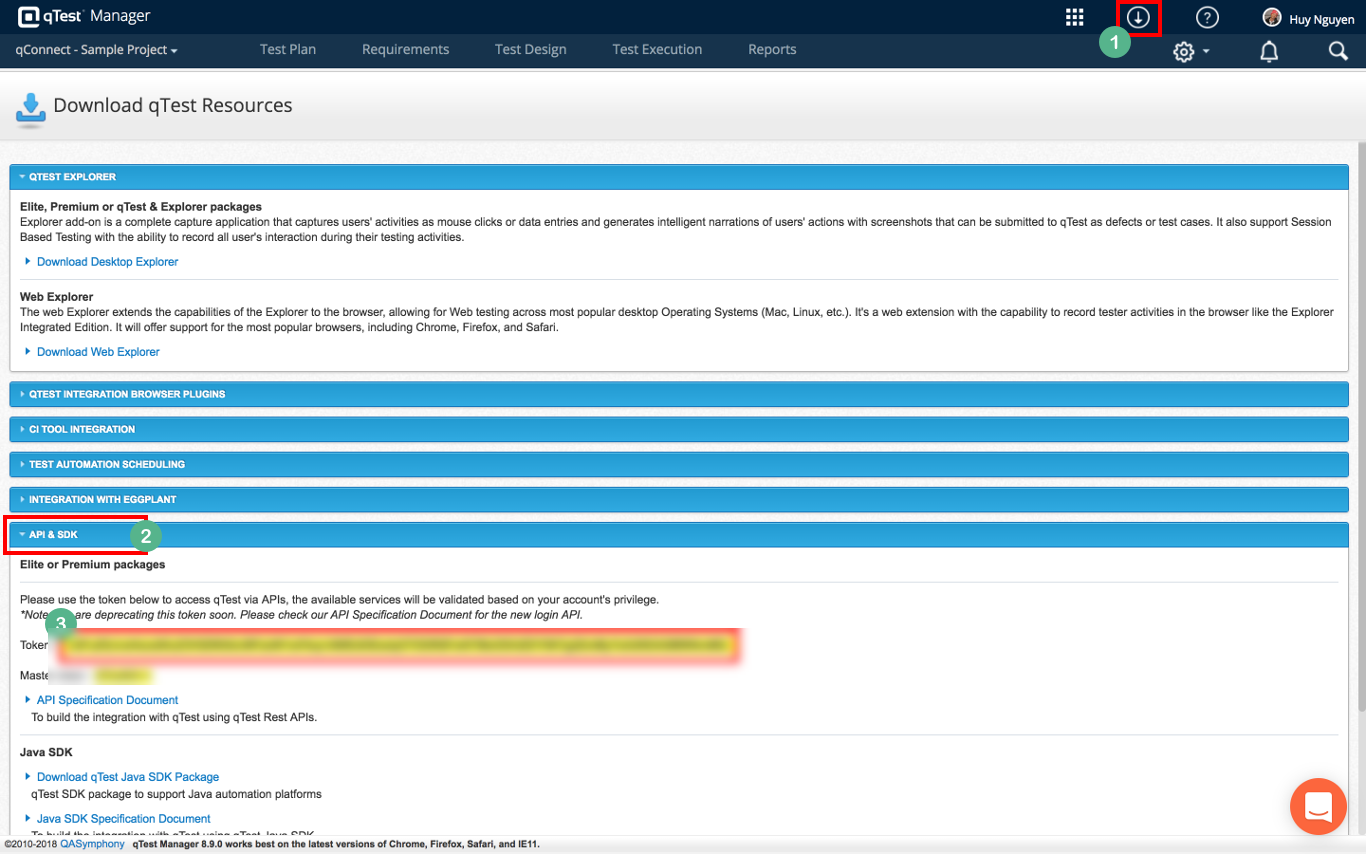
Login to qTest Manager as an Administrator and navigate to the Resources page.
-
Expand the APIs and SDK section.
-
Copy the API Token, as shown below.
NOTES ABOUT qTest API TOKEN CHANGES:
The token will be automatically changed by qTest Manager if below events occur:
-
Users change their password in qTest Manager OR
-
Users switch authentication type, e.g. from authenticating with qTest using Username and Password to SSO or LDAP. and vice versa
Install and Configure the Automation Host
There are two options to install and configure the Automation Host:
-
Via web interface
-
Via command line
Install and Configure Automation Host via Web Interface
From Command Prompt, execute the following command:
\path\to\agentctl-[version]> agentctl.bat start
Wait for a couple of minutes for the Automation Host to fully start. Open your web browser and navigate to http://localhost:6789. You'll see the registration UI being shown like below.
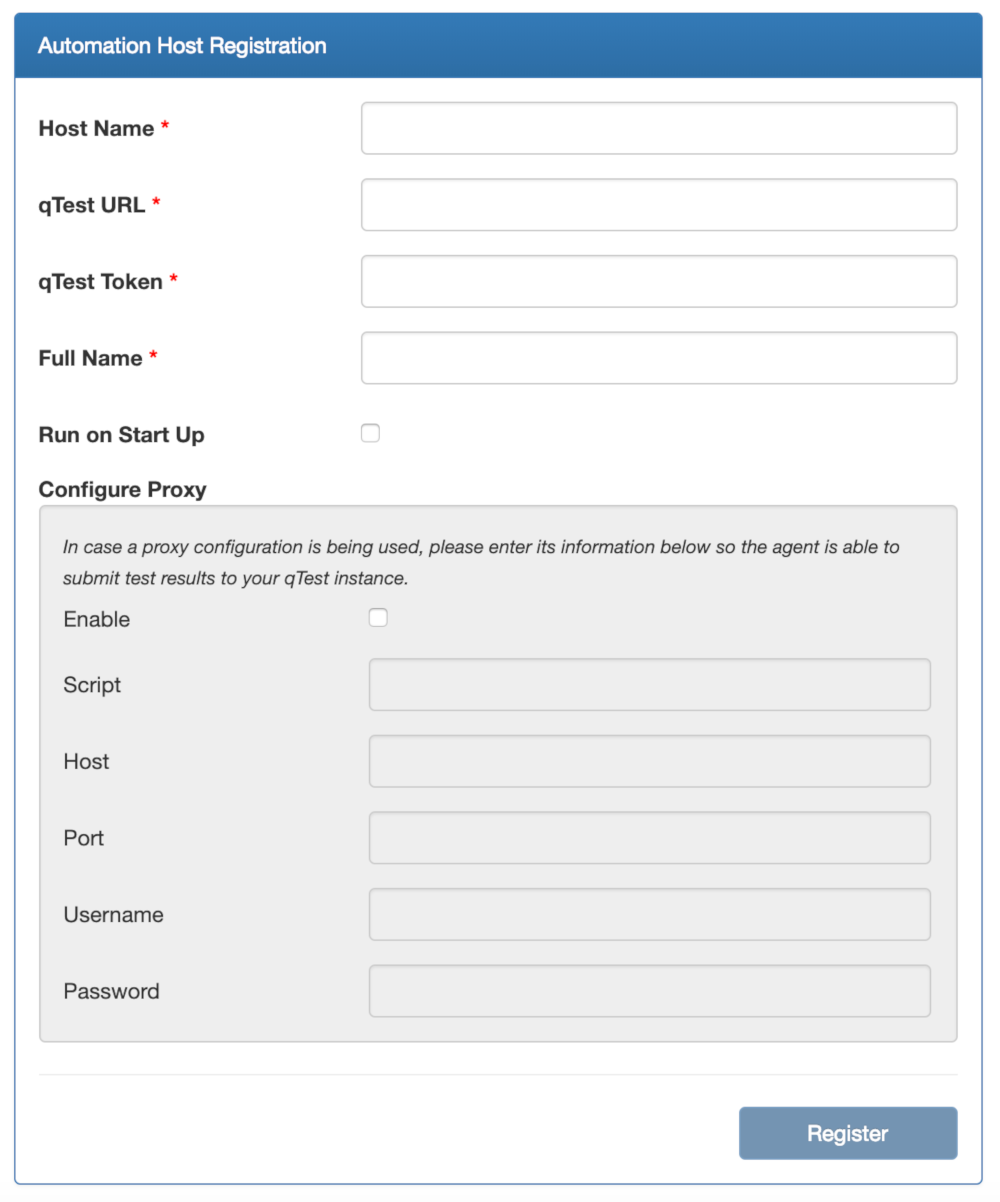
Next, enter information to register the automation host:
-
Host Name: Enter a meaningful name for the host
-
qTest URL: Your qTest Site URL
-
qTest Token: Enter the token from the step Aquire your qTest API token
-
Full Name: Your full name
-
Configure Proxy: If you are connecting to the internet through your corporate proxy, select Enable checkbox to enable proxy configuration
Script: If your proxy server is configured with a script, enter the URL to access your PAC (Proxy Auto-Configuration) file
Host: Enter the proxy host address. This can be either the IP address, computer name, or dns name of this proxy server.
Note: If you specify both Script and Host, the Automation Host will connect to the script-based proxy server first, then connect to the proxy host if the connection to the script-based one failed.
Port: Specify the port that the proxy server is running on. This parameter is required.
Username: If your proxy server requires basic authentication, enter a username to authenticate with the proxy. Otherwise, leave this field empty.
Password: If your proxy server requires basic authentication, enter a password to authenticate with the proxy. Otherwise, leave this field empty.
-
Run on Start Up: Available on Automation Host 2.2.2 and later. Select this option to automatically start the Automation Host when the machine starts
EXAMPLE
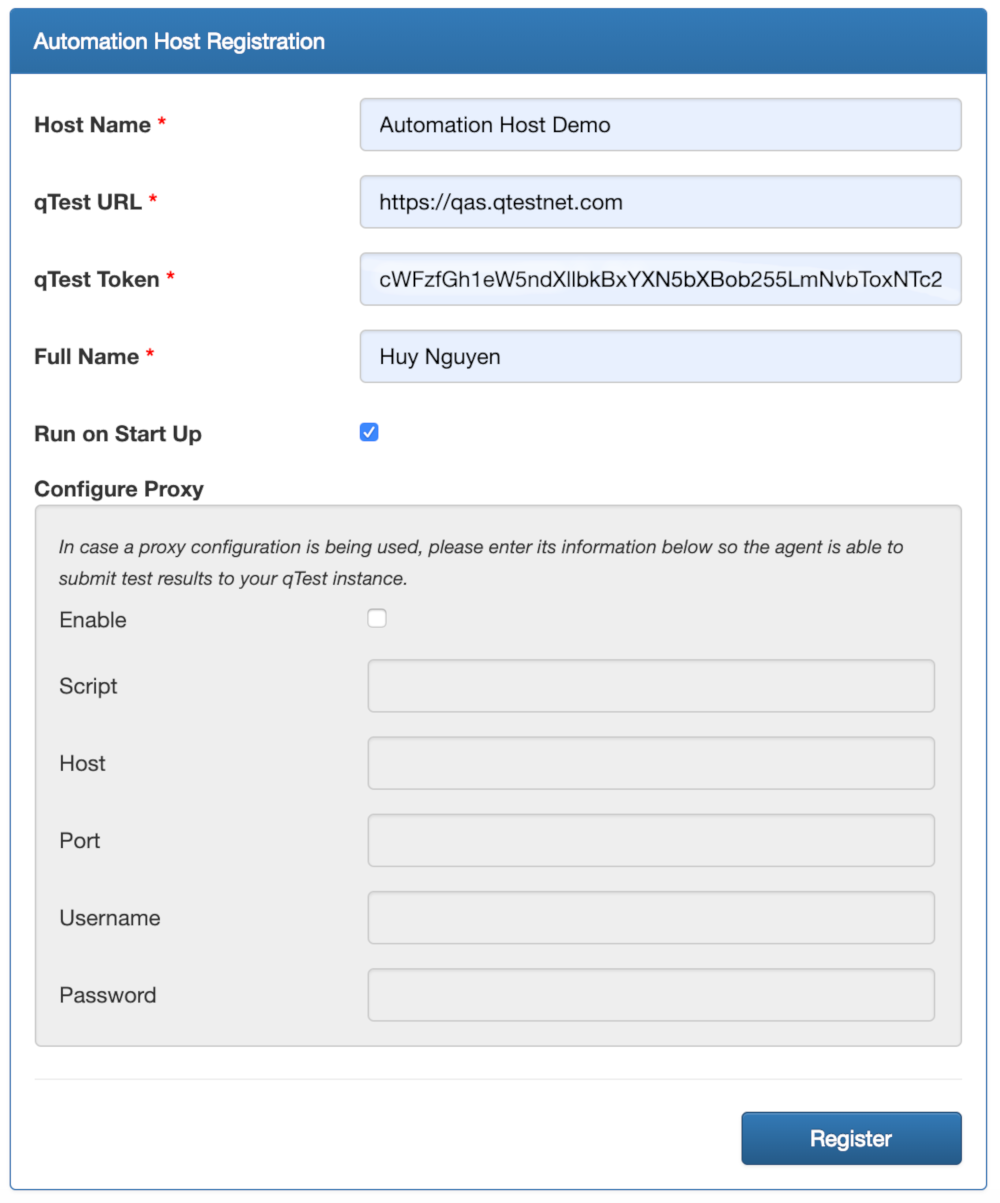
Select Register to register the Automation Host with qTest Manager. This process will take a while, once it's finished you'll be automatically navigated to the home page.
Install and configure the Automation Host via Command Line
From Command Prompt, execute the following command to configure the Automation Host:
\path\to\agentctl-[version]> agentctl.bat config -Phostname="[automation_host_name]" -Phost=[ip_address or computer name] -Pport=[agent_port] -PqTest.url=[qTest_url] -PqTest.token=[qTest_token] -Pautostart=[true|false] -Pproxy.enable=[true|false] -Pproxy.host=[proxy_host] -Pproxy.port=[proxy_port] -Pproxy.username=[proxy_username] -Pproxy.password=[proxy_password] -Pproxy.script=[proxy_script_url]
Command Parameters and Descriptions:
| Parameter Name | Description |
|---|---|
| config | Execute the configuration command |
| -Phostname |
Name of this Automation Host instance. Notes:
|
| -Phost |
The actual IP address or computer name of this machine. If this parameter is omitted, localhost will be used. Notes:
|
| -Pport | Specify a port that your Automation Host will be running on. If this parameter is omitted, port 6789 will be used. |
| -PqTest.url | URL of your qTest Manager instance. |
| -PqTest.token | The qTest API token generated for your qTest Manager account. You can copy it from the API & SDK section in qTest Manager's Resource page. |
| -Pautostart | Available from Automation Host 2.2.2. Possible value is true or false. If the value is true, the Automation Host will automatically start when system starts up. Default value is false. |
| -Pproxy.enable | Possible value is true or false. If the value is set to true, you will need to provide proxy settings. Otherwise, set it to false. |
| -Pproxy.host | The IP address or machine name of the proxy server. This parameter is required when -Pproxy.enable parameter is set to true. |
| -Pproxy.port | The port that the proxy server is running on. This parameter is required when -Pproxy.enable parameter is set to true. |
| -Pproxy.username | If your proxy server requires basic authentication, enter the username to authenticate with the proxy. |
| -Pproxy.password | If your proxy server requires basic authentication, enter the password to authenticate with the proxy. |
| -Pproxy.script | If your proxy server is configured with a script, enter the URL to access your PAC (Proxy Auto-Configuration) file. |
Configure qTest Automation Host without Proxy
The EXAMPLE command below shows how to configure the qTest Automation Host 2.x in a non-proxy environment. The values for each parameter are highlighted in bold.
Notes: Remove -Phostname parameter if you are using Automation Host version 2.1.0 or older
Automation Host 2.2.1 EXAMPLE
\path\to\agentctl-[version]> agentctl.bat config -Phostname="My Automation Host" -Phost=192.168.76.29 -Pport=6789 -Pproxy.enable=false -PqTest.url=https://demo.qTestnet.com -PqTest.token=(Your API token)
Automation Host 2.2.2+ EXAMPLE. Notes:
-
-Phost parameter is omitted and
-
-Pautostart parameter is added
\path\to\agentctl-[version]> agentctl.bat config -Phostname="My Automation Host" -Pport=6789 -Pautostart=true -Pproxy.enable=false -PqTest.url=https://demo.qTestnet.com -PqTest.token=(Your API token)
Configure qTest Automation Host with Proxy Settings
The EXAMPLE commands below show how to configure the qTest Automation Host in a proxy environment. The values for each parameter are highlighted in bold.
Notes: remove -Phostname parameter if you are using Automation Host version 2.1.0 or older.
If your proxy does not require authentication
-
Automation Host 2.2.1 EXAMPLE
\path\to\agentctl-[version]> agentctl.bat config -Phostname="My Automation Host" -Phost=192.168.76.29 -Pport=6789 -PqTest.url=https://demo.qTestnet.com -PqTest.token=( Your API token) -Pproxy.enable=true -Pproxy.host=192.168.76.138 -Pproxy.port=3128
-
Automation Host 2.2.2+ EXAMPLE. Notes:
-Phost parameter is omitted and
-Pautostart parameter is added
\path\to\agentctl-[version]> agentctl.bat config -Phostname="My Automation Host" -Pport=6789 -Pautostart=true -PqTest.url=https://demo.qTestnet.com -PqTest.token=( Your API token) -Pproxy.enable=true -Pproxy.host=192.168.76.138 -Pproxy.port=3128
If your proxy does require basic authentication with username and password:
-
Automation Host 2.2.1 EXAMPLE:
\path\to\agentctl-[version]> agentctl.bat config -Phostname="My Automation Host" -Phost=192.168.76.29 -Pport=6789 -PqTest.url=https://demo.qTestnet.com -PqTest.token=(Your API token) -Pproxy.enable=true -Pproxy.host=192.168.76.138 -Pproxy.port=3128 -Pproxy.username=proxyuser@qasymphony.com -Pproxy.password=s0mething#0923
-
Automation Host 2.2.2+ EXAMPLE. Notes:
-Phost parameter is omitted and
-Pautostart parameter is added
\path\to\agentctl-[version]> agentctl.bat config -Phostname="My Automation Host" -Pport=6789 -Pautostart=true -PqTest.url=https://demo.qTestnet.com -PqTest.token=(Your API token) -Pproxy.enable=true -Pproxy.host=192.168.76.138 -Pproxy.port=3128 -Pproxy.username=proxyuser@qasymphony.com -Pproxy.password=s0mething#0923
If your proxy is configured with a script:
-
Automation Host 2.2.1 EXAMPLE:
\path\to\agentctl-[version]> agentctl.bat config -Phostname="My Automation Host" -Phost=192.168.76.29 -Pport=6789 -PqTest.url=https://demo.qTestnet.com -PqTest.token=(Your API Token) -Pproxy.enable=true -Pproxy.script=https://proxytestlab.sampleproxy.com/proxy.pac
-
Automation Host 2.2.2+ EXAMPLE. Notes:
-Phost parameter is omitted and
-Pautostart parameter is added
\path\to\agentctl-[version]> agentctl.bat config -Phostname="My Automation Host" -Pautostart=true -Pport=6789 -PqTest.url=https://demo.qTestnet.com -PqTest.token=(Your API Token) -Pproxy.enable=true -Pproxy.script=https://proxytestlab.sampleproxy.com/proxy.pac
Note: if you specify both the script-based proxy server and proxy server host, the host will connect to the script-based proxy server first, then connect to the proxy host if the connection to the script-based one failed.
SSL Proxy Configuration
[Updated] if you are using Automation Host 2.2+, you do not need to perform this step.
If your organization uses an SSL proxy that alters all certificates on the internet, including the SSL certificate from your qTest site, to your own certificate that is not trusted by Automation Host embedded Java. you will need to add your own certificate to the default Automation Host's embedded Java certificate keystore following the steps in SSL Proxy Configuration in Automation Host.
IMPORTANT: Add System Environment Variable
If your PC is running Java 8 whose version is ranging from 1.8.0_77 to 1.8.0_151 (you can find your Java version on Windows here), you must add a system environment variable to make a proxy with basic authentication work properly by following these steps:
To add a System Environment Variable on Windows:
-
Select Start and then select the Control Panel.
-
Select System and then the Advanced tab.
-
Select Environment Variables.
-
In the System Variables section, select New. The New System Variable dialog displays.
-
In the Variable Name field, enter: JAVA_TOOL_OPTIONS
-
In the Variable Value field, enter: -Djdk.http.auth.tunneling.disabledSchemes=""
-
Select OK to close the New System Variable dialog.
Start the Automation Host
If you are using Automation Host 2.1.1 or newer:
If you did specify Automation Host name in config command (detailed above). Execute this command:
\path\to\agentctl-[version]> agentctl.bat start
Otherwise, execute the command below to start the host AND give your Automation Host a descriptive name.
\path\to\agentctl-[version]> agentctl.bat start -Phostname="[Automation Host name]"
Example:
\path\to\agentctl-[version]> agentctl.bat start -Phostname="My Automation Host"
If you are using Automation Host 2.1.0 or older:
Automation Host 2.1.0 or older does not allow you to specify Automation Host name in config command so you are recommended to do so in this start command:
\path\to\agentctl-[version]> agentctl.bat start -Phostname="[Automation Host name]"
Example:
\path\to\agentctl-[version]> agentctl.bat start -Phostname="My Automation Host"
NOTES:
-
It might take some time for the Automation Host to fully start the first time
-
If you run "agentctl.bat start" by itself, without a -Phostname parameter AND you did not specify host name in previous config command (only available in Automation Host 2.1.1 and later), "Sample Agent" will be used as the default Automation Host name
-
Once the Automation Host name is set, this name CANNOT be changed in the command prompt. However, you can change it from Automation Host UI or from qTest Launch.
Access the Automation Host
Open your browser and enter the URL: http://<host>:<port>
-
host: the IP address or computer name that you specified when configuring the host via config command (available in Automation Host 2.1.1 and later) or start command
-
port: the port that you specified when configuring the host via config command. If you did not specify the port, use the default 6789
Install, Register, Start, and Access the Automation Host Video
Note: For the highest quality, view the video in full-screen mode.
Install qTest Automation Host as a Service on Windows
If you want the Automation Host to automatically start when system starts, there are two options:
-
Install Automation Host as a Windows Service OR
-
Configure it to run at system start up (highly recommended from Automation Host 2.2.2). Refer to the previous instructions to learn how to configure Automation Host to automatically start when system starts
IMPORTANT: Limitation of Automation Host Service on Windows
When Automation Host is installed and running as a Windows service, it cannot Launch your application that has a Graphic User Interface (GUI). It also cannot execute your tests that interact with a UI application. From our experience, TestComplete, UFT. Tosca UI testing, Selenium-based tests that Launch a web browser, etc. are applications that cannot be Launched from Automation Host running as a Windows service.
Although the limitation can be overcome, building a Windows service to Launch a GUI application is considered a securityvulnerability: https://support.microsoft.com/en-us/help/327618/security-services-and-the-interactive-desktop-in-windows. We decided not to follow this path.
If the application that you are going to integrate with Automation Host has no GUI, or not going to interact with a GUI application, you are good to proceed to these instructions. Otherwise, we recommend you run Automation Host on Windows Command Prompt or configure it to run on system start up (only available from Automation Host 2.2.2 or newer) and let it Launches your application from there.
Install qTest Automation Host as a single service on Windows
Notes: if you are using Automation Host 2.1.1 or later AND you want to install multiple instances of Automation Host as services on Windows. skip to next section.
1. Run the command prompt as an Administrator, and access the agentctl directory.
2. If the agent is running in the Console, stop it with this command:
\path\to\agenctl-[version]> agentctl.bat stop
3. Execute the following command to install qTest Automation Host as a service on Windows. Note: <service name> is optional. If you do not specify service name, "qTest-automation-agent" will be used as the service name.
\path\to\agenctl-[version]> install.bat "<service name>"
Install Multiple qTest Automation Host Instances as Services on Windows
Notes: This feature is only available for the Automation Host version 2.1.1 and later.
Follow these steps if you want to install multiple Automation Host instances as services on Windows:
-
Extract the downloaded Automation Host package to multiple folders. Make sure you create a parent folder for each Automation Host instance to easily identity it as well to avoid an issue when upgrading that instance. EXAMPLE below shows how we extract each package inside a parent folder whose name is suffixed with a number:
Instance #1: C:\qTest-automation-host-1\agentctl-[version]
Instance #2: C:\qTest-automation-host-2\agentctl-[version]
...
Instance #N: C:\qTest-automation-host-N\agentctl-[version]
-
Open the Windows Command Prompt as Administrator. Access each Automation Host folder, then perform steps 3-5 for each folder
-
Install and Register the Automation Host. IMPORTANT: make sure you give each instance a unique Port number via -Pport parameter. It is also highly recommended to give each instance a unique Automation Host name via -Phostname parameter in config or start command
-
Stop the Automation Host instance if it is running in the Windows Command Prompt: agentctl.bat stop
-
Execute the command below to install the host as a service. IMPORTANT: you must give the service a unique name via <service name> parameter:
\path\to\agenctl-[version]> install.bat "<service name>"
Uninstall qTest Automation Host Service
If you want to uninstall qTest Automation Host service, open the command prompt as an Administrator. Access the agentctl-[version] directory. Execute the following command:
\path\to\agenctl-[version]> uninstall.bat
If you installed multiple instances of Automation Host as services on Windows. access to each Automation Host folder and execute the above uninstall.bat command.