Develop Custom Test Result Parser for Universal Agent
When you configure the Universal Agentto execute your test project, you have an option to choose a parser, which will translate the test results generated by your test project to a unified format defined by the Automation Host. The output of the parser will then submit to qTest Manager as test run logs.
Currently, there are built-in parsers available from qTest Launch that will parse these test result formats:
-
JUnit for Java
-
Tosca JUnit
-
Postman.Json
-
Postman.JUnit
-
Allure Results
-
Unified Functional Testing (UFT.

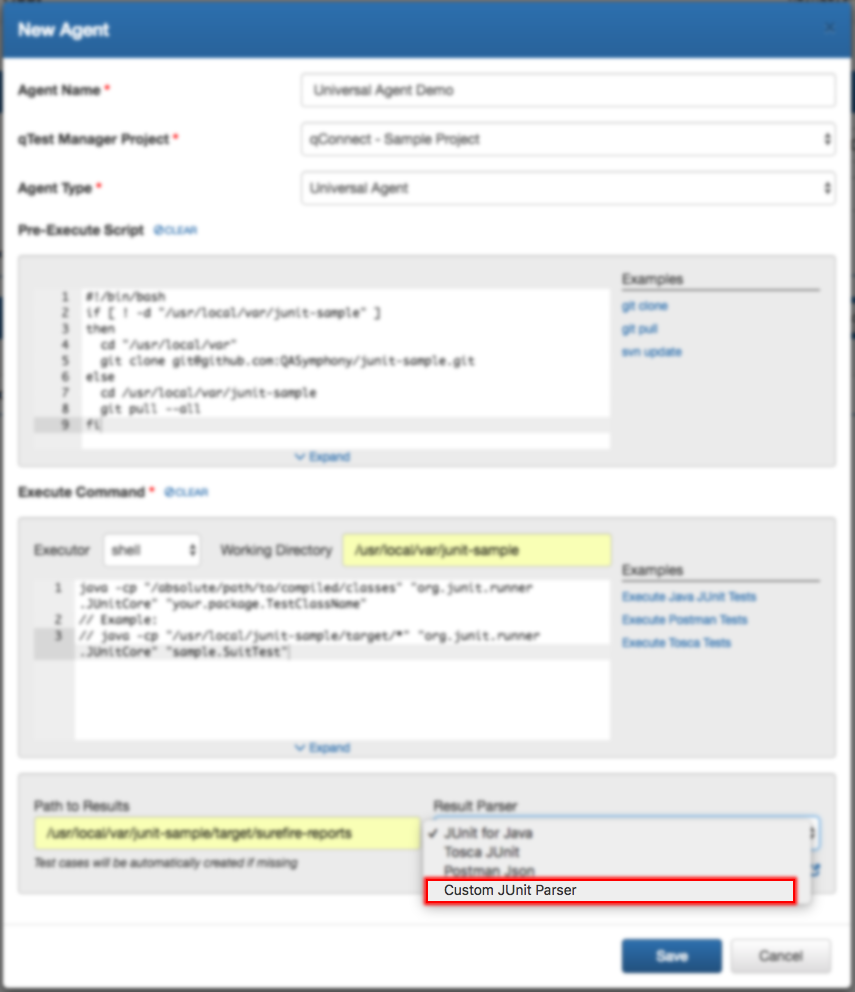
If your test project generates test results under a format that these built-in parsers do not support, you can create your own parser and upload it to qTest Launch under Universal Agent Settings.
The Automation Host will download these parsers and they will be available for you to choose when you create or configure your Universal Agent
Prerequisites
Since parser is implemented in NodeJS, you are expected to have some knowledge of NodeJS development in order to Build your own custom parser.
Steps to create a custom parser:
-
Install NodeJS to your development machine
-
Create a NodeJS application
-
Implement the parser
-
Package the parser
-
Upload the parser to qTest Launch under Universal Agent Settings
Install NodeJS to your Development Machine
Notes:
-
Since the Automation Host already bundles NodeJS in order to execute the parser, you do not have to install NodeJS in the machine that the Automation Host is running.
-
For the development machine, it is highly recommended you install the same NodeJS version as the one being bundled with Automation Host. which is 8.11.3 LTS.
Follow this link to download and install NodeJS: https://nodejs.org. Tips: if you want to manage multiple node versions on your machine, we recommend you to try nvm.
After installing, open the Command Prompt on Windows (or Terminal if you're on Linux or Mac. then execute the command below and make sure you see an output like this:
node --version
v8.11.3
Create NodeJS Application
-
Create a directory on your machine with the name of your custom parser. You can choose whatever name you want. For this article we will use my-custom-parser.
-
Open a Command Prompt (or Terminal if you're on Linux or Mac), and navigate to 'my-custom-parser' directory and execute the command below to initialize the NodeJS application:
npm init
This is an interactive command that will ask you for information about your NodeJS project. So make sure you enter the appropriate information for this parser. -
Once finished, the command will create a package.json file inside your 'my-custom-parser' directory.
-
Now you can install any node modules that your parser needs with the `npm install` command:
npm install <node module name> --save
-
Next, create a JavaScript file named parser.js in your NodeJS project. This file is the implementation of your parser and it has to be named parser.js.
Open your 'my-custom-parser' NodeJS project in your preferred IDE, then copy and paste the code snippets below to parser.js.
/**
 * Description of your custom parser
*/
"use strict"

const fs = require("fs");

module.exports.parse = (pathToTestResult, options) => {
    return new Promise((resolve, reject) => {
        if (!fs.existsSync(pathToTestResult)) {
            return reject(new Error(`Test result not found at ${pathToTestResult}`));
        }
        // implement the parser from here
        // ..
    });
}
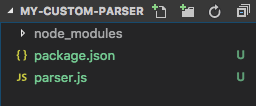
Now your project will look something like the example below.
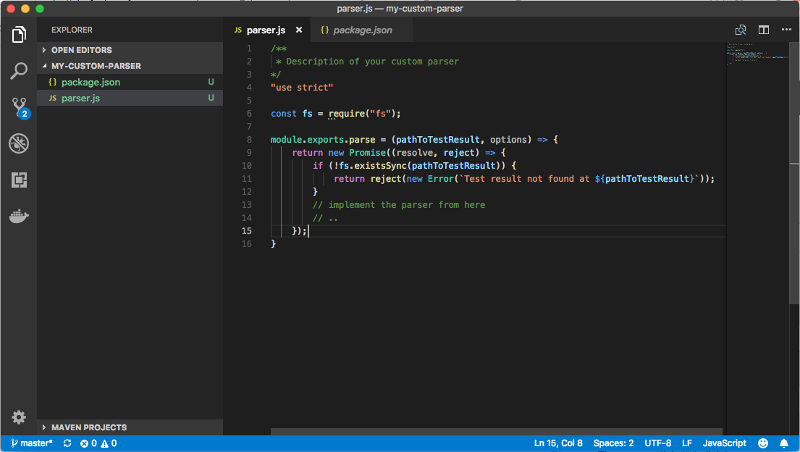
As you can guess from the code snippet, your parser implementation logic starts from these lines:
        // implement the parser from here
        // ..
Implement the Parser
Understanding the parse() Function
module.exports.parse = (pathToTestResult, options)
The parser implements a module that exposes a parse(...) function. This function accepts 2 parameters: pathToTestResult and options.
pathToTestResult parameter
This parameter carries the path to the test result(s) generated by your test project. It has the value of the Path to Results field that you configured in the Universal Agent

The possible value of pathToTestResult can be one of the following:
-
An absolute path to the directory where one or multiple test result files are generated. For example, TestNG can generate multiple XML test results file inside a specific directory. So the path could be like this: /path/to/your/testng-project/target/surefire-reports
-
An absolute path to a test result file, e.g. newman command line tool saves test results to a file after executing Postman.tests, and so the value could be something like this /path/to/your/postman-project/test-result.json
options parameter
This parameter is for extensibility purposes and you should ignore it at this moment.
function output
The parse function must return an output under a format defined by the Automation Host. The Automation Host. in turn, will submit the output to qTest Manager as test run logs. The output is a literal JavaScript object which can be easily transformed to JSON in order to submit to qTest Manager.
Basically, the output is an array of test case objects:
[     // test case #1
    {
        name,
        status,
        attachments,
        exe_start_date,
        exe_end_date,
        automation_content,         order: 1,
        test_step_logs,         attachments
    },     // test case #2
    {
        name,
        status,
        attachments,
        exe_start_date,
        exe_end_date,
        automation_content,         order: 2,
        test_step_logs,         attachments
    },     // other test case(s)     ...
]
test case object explained
-
name <string> name of the test case. This field is required.
-
status <string> execution status of this test case. Possible values are PASSED or FAILED. This field is required.
-
order <number> order of the test case. Increased by one (1) for every test case
-
exe_start_date <string> date the test case is executed under ISO 8601 format. This field is required.
-
exe_end_date <string> date the test case finished execution under ISO 8601 format. This field is required.
-
automation_content <string> this is the unique identifier of the automated test case. This field is required
-
attachments <Array> an array of attachment objects. This field is optional. Default: empty array []. Below is how an attachment object looks like
name <string> file name
data <string> based64 encoded data of the attachment
content_type <string> content type of the attachment. Default: text/plain
-
test_step_log <Array> an array of test step log object. Default: empty array. Below is how a test step log object looks like
order <number> order of the test step. Default: 0.
status <string> execution status of the test step. Possible values are PASSED or FAILED
description <string> description of the test step
expected_result <string> expected result of the test step
Below is an example of function output:
[
    {
        "status": "FAILED",
        "name": "sample.junit.CalculateTest#testSum_second",
        "attachments": [
            {
                "name": "testSum_second.txt",
                "data": "amF2YS5sYW5nLkFzc2VydGlvbkVycm9yOiBleHBlY3RlZDo8Nz4gYnV0IHdhczo8MTA+CglhdCBvcmcuanVuaXQuQXNzZXJ0LmZhaWwoQXNzZXJ0LmphdmE6ODgpCglhdCBvcmcuanVuaXQuQXNzZXJ0LmZhaWxOb3RFcXVhbHMoQXNzZXJ0LmphdmE6NzQzKQoJYXQgb3JnLmp1bml0LkFzc2VydC5hc3NlcnRFcXVhbHMoQXNzZXJ0LmphdmE6MTE4KQoJYXQgb3JnLmp1bml0LkFzc2VydC5hc3NlcnRFcXVhbHMoQXNzZXJ0LmphdmE6NTU1KQoJYXQgb3JnLmp1bml0LkFzc2VydC5hc3NlcnRFcXVhbHMoQXNzZXJ0LmphdmE6NTQyKQoJYXQgc2FtcGxlLmp1bml0LkNhbGN1bGF0ZVRlc3QudGVzdFN1bV9zZWNvbmQoQ2FsY3VsYXRlVGVzdC5qYXZhOjUwKQo=",
                "content_type": "text/plain"
            }
        ],
        "exe_start_date": "2018-06-07T14:43:44.834Z",
        "exe_end_date": "2018-06-07T14:43:44.834Z",
        "automation_content": "sample.junit.CalculateTest#testSum_second",
        "test_step_logs": [
            {
                "order": 0,
                "status": "FAILED",
                "description": "testSum_second",
                "expected_result": "testSum_second"
            }
        ],
        "order": 1
    },
    {
        "status": "FAILED",
        "name": "sample.junit.CalculateTest#testSum_One",
        "attachments": [
            {
                "name": "testSum_One.txt",
                "data": "amF2YS5sYW5nLkFzc2VydGlvbkVycm9yOiBleHBlY3RlZDo8MTE+IGJ1dCB3YXM6PDc+CglhdCBvcmcuanVuaXQuQXNzZXJ0LmZhaWwoQXNzZXJ0LmphdmE6ODgpCglhdCBvcmcuanVuaXQuQXNzZXJ0LmZhaWxOb3RFcXVhbHMoQXNzZXJ0LmphdmE6NzQzKQoJYXQgb3JnLmp1bml0LkFzc2VydC5hc3NlcnRFcXVhbHMoQXNzZXJ0LmphdmE6MTE4KQoJYXQgb3JnLmp1bml0LkFzc2VydC5hc3NlcnRFcXVhbHMoQXNzZXJ0LmphdmE6NTU1KQoJYXQgb3JnLmp1bml0LkFzc2VydC5hc3NlcnRFcXVhbHMoQXNzZXJ0LmphdmE6NTQyKQoJYXQgc2FtcGxlLmp1bml0LkNhbGN1bGF0ZVRlc3QudGVzdFN1bV9PbmUoQ2FsY3VsYXRlVGVzdC5qYXZhOjQwKQo=",
                "content_type": "text/plain"
            }
        ],
        "exe_start_date": "2018-06-07T14:43:44.834Z",
        "exe_end_date": "2018-06-07T14:43:44.834Z",
        "automation_content": "sample.junit.CalculateTest#testSum_One",
        "test_step_logs": [
            {
                "order": 0,
                "status": "FAILED",
                "description": "testSum_One",
                "expected_result": "testSum_One"
            }
        ],
        "order": 2
    }
]
TIP: it is highly recommended that you download the built-in parser provided in qTest Launch's Universal Agent Settings, learn the implementation logic before starting to develop your own custom parser.
Package the Parser
When you finish implementing the parser, you can package it under a .zip file. Ensure your zip package, once unzipped, has a structure like below (they should NOT be nested in a folder)
IMPORTANT: you must pre-install all the node modules needed for your parser and zip them along with the package. The Automation Host will NOT install those node modules for you due to some network restriction that might cause the modules installation failed unexpectedly.
Upload the Parser to qTest Launch
-
Access qTest Launch and open the Settings dialog.
-
Select the Universal Agent/strong> tab and then the ADD button.
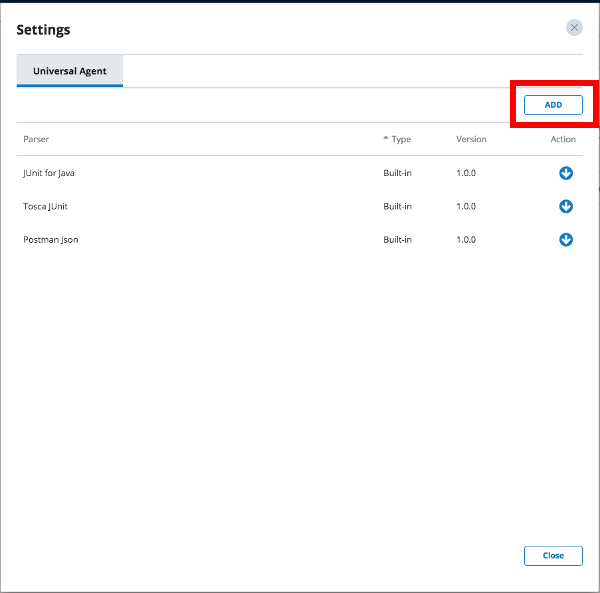
-
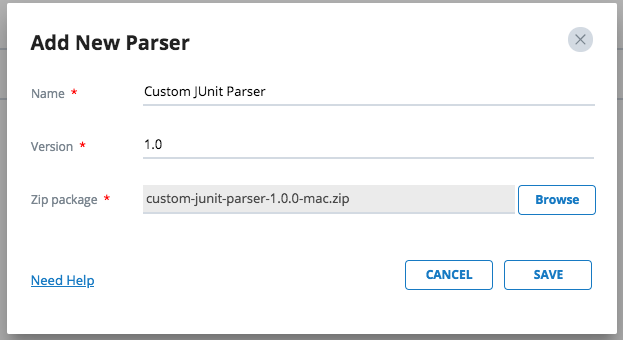
The Add New Parser dialog will display. Then, enter the following:
Name: name of your custom parser
Version: version of your parser
Zip package: browse to the location of your .zip package
-
Save and then your parser will be uploaded to qTest Launch as shown in the following screenshot.
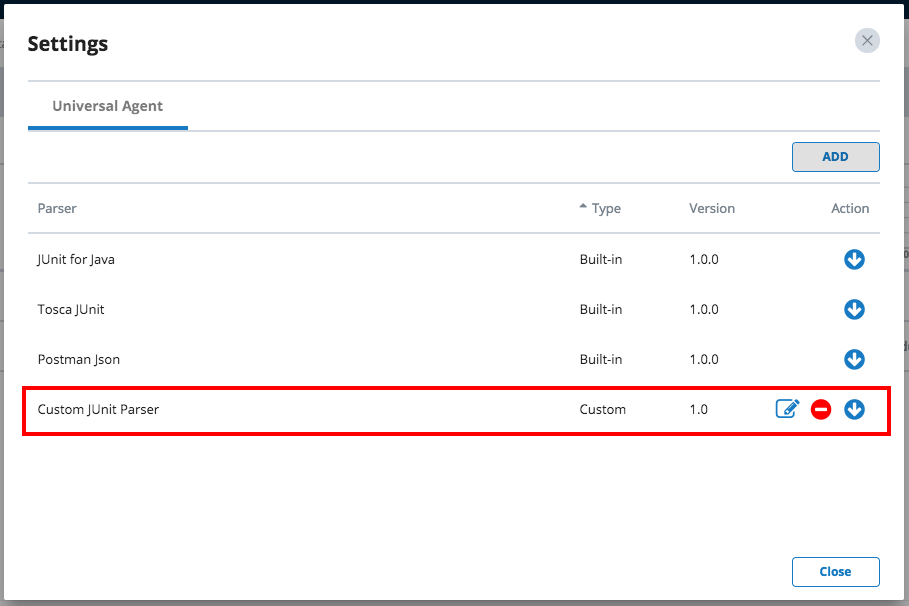
From now on, the parser will be available in qTest Launch and you can use it in your Universal Agentconfiguration.
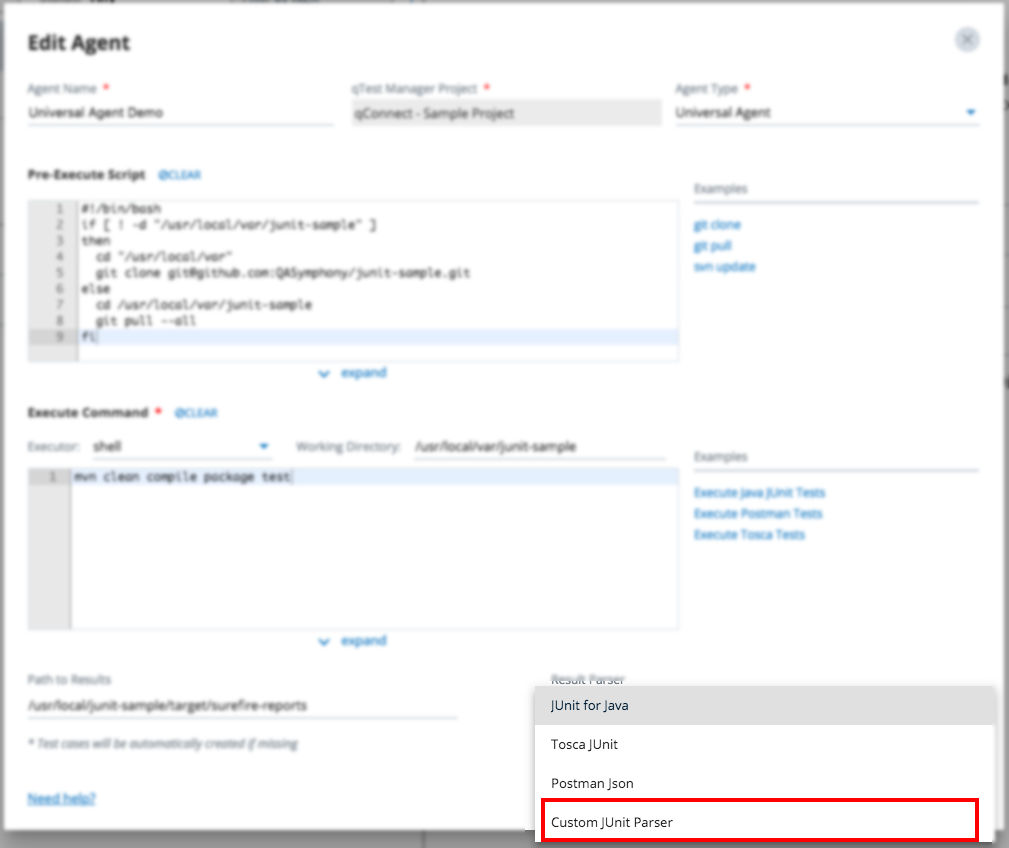
The parser will also be downloaded and made available in Automation Host that you can use in your Universal Agentconfiguration.