Import Test Cases from TestLink
These instructions give step by step instructions to convert XML files exported from TestLink to qTest Manager.
Prerequisites
-
Windows 32 or 64bit is required.
-
Currently, we only support converting and importing Test Cases from TestLink to qTest.
-
The tool supports the following exported XML files from TestLink: Test Project, Test Suite, and Test Case.
-
Time zone on the machine from which you have exported a file from TestLink should be the same as in your qTest Manager instance.
-
In this document, the input file will be used as the exported XML file from TestLink, and the output file will be used as the converted Excel file which is importable to qTest Manager.
-
All Test Cases in the same suite must be exported in the same XML file.
Modify qTest Field Settings
Since the field system in qTest and TestLink are quite different, you will need to customize our system fields and create new custom fields before importing to qTest Manager.
To configure field settings in qTest:
-
Access the qTest Manager project to which you want to import Test Cases.
-
Select the Settings icon and select Field Settings from the drop-down menu.
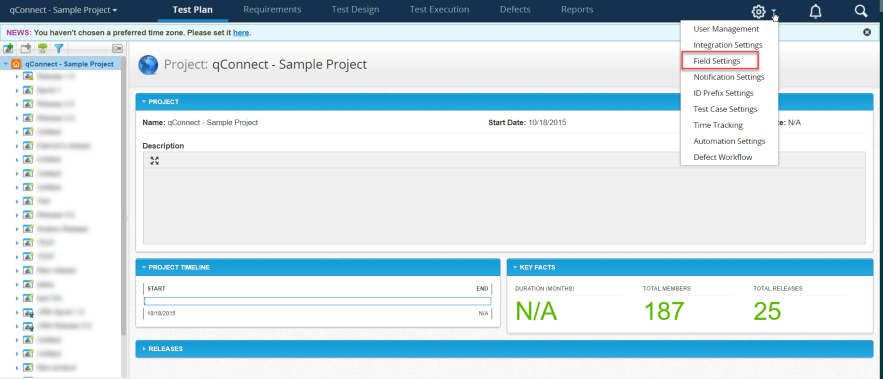
-
In the left navigation panel, select Test Case from the list of Artifacts.
-
Select the applicable Test Case.
-
Edit our system fields and create new custom fields.
Edit System Fields
Four system fields of Test Case in TestLink can be mapped with qTest system fields as shown here.
| TestLink | qTest |
|---|---|
| Status | Status |
| Execution Type | Type |
| Importance | Priority |
| Estimated Exec Duration | You will need to create a qTest custom field to map with this TestLink field |
Status
In qTest, add Status values according to TestLink Status values. Unfortunately, the input file does not contain the real Status value but is a number representing the status. Therefore, you will need to configure the qTest Manager Status field with the numbers in the input file. Follow these steps:
-
In the input file, collect all distinct values of the status element.
 If you cannot find any status element, you are not using the test case Status field in TestLink.
 -
On the "Test Case" page, select Status.

-
On the Edit System Field dialog, add status values according to the distinct status values you have found in the input file
Select the Add Value icon.
Select the Display name to edit it.
Select the Delete icon to remove any unused values.
Uncheck the Required check box if you are not using the Status field in your TestLink.
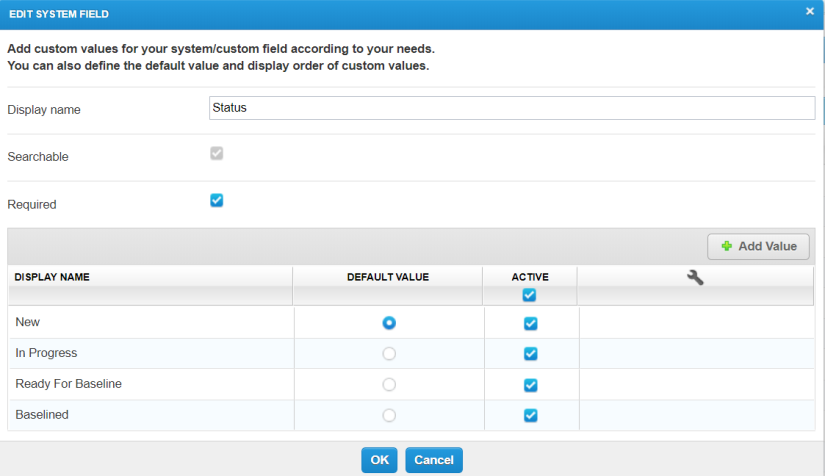


| Status value (in TestLink application) | Number (in the input file) |
|---|---|
| Draft | 1 |
| Ready for review | 2 |
| Review in progress | 3 |
| Rework | 4 |
| Obsolete | 5 |
| Future | 6 |
| Final | 7 |
Type
In the input file, collect all distinct values of execution_type element.

To edit this system field, follow the same steps mentioned above in the Status section. Simply select Type first instead of Status.
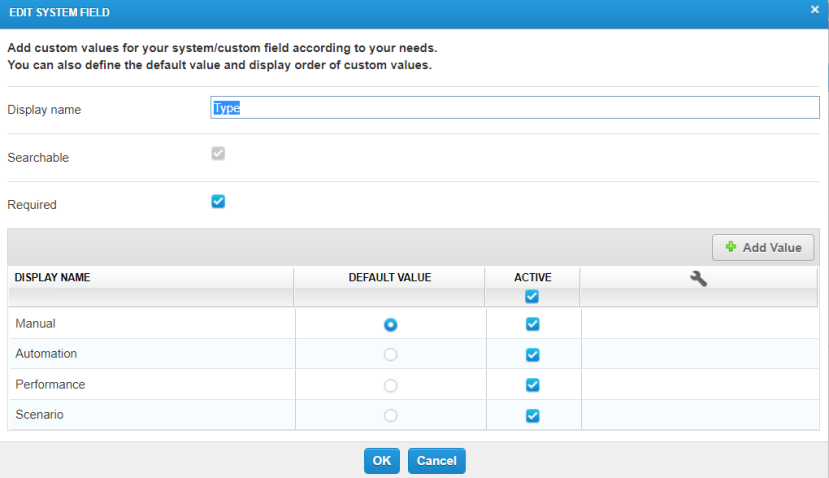
| Execution Type value (in TestLink application) | Number (in the input file) |
|---|---|
| Manual | 1 |
| Automation | 2 |
Priority
In the input file, collect all distinct values of the importance element.

To edit this system field, follow the same steps mentioned above in the Status section. Simply select Priority first instead of Status.
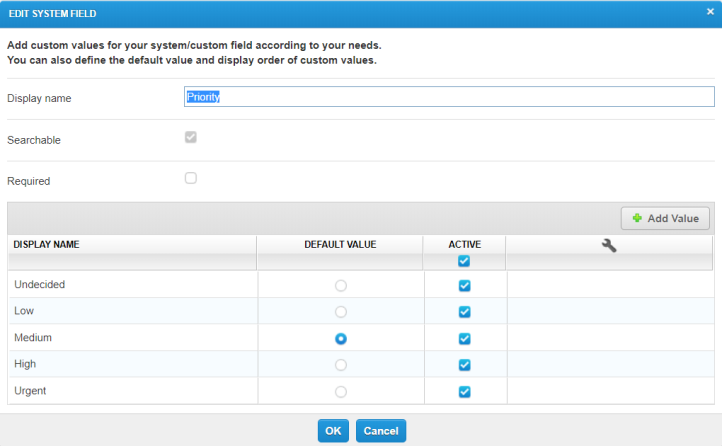
| Importance value (in TestLink application) | Number (in the input file) |
|---|---|
| Low | 1 |
| Medium | 2 |
| High | 3 |
Create Custom Fields
If there are any Test Case custom fields in TestLink, you need to create corresponding custom fields in qTest Manager Test Case. To do so, follow these steps:
-
Access the qTest Manager project to which you want to import Test Cases.
-
Select the Settings icon and select Field Settings from the drop-down menu.
-
Select a Test Case from the left pane.
-
Select the Add Custom Field icon
-
The "Add Custom Field" dialog displays. Input the Display name and select the Field type. Select OK.
-
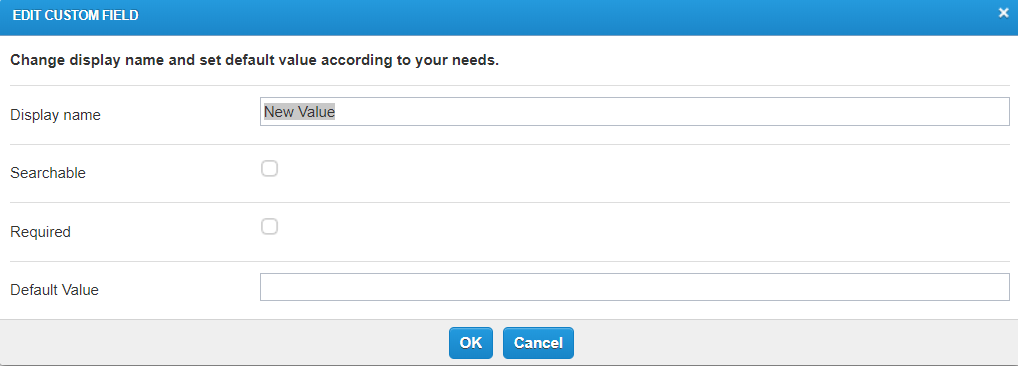
The "Edit Custom Field" dialog displays. Here, you can:
Change the Display name
Define the Custom Field as Searchable
Define the Custom field as Required
Input a Default Value for the Custom Field
-
Select OK.
| TestLink field type | Mappable qTest field type | Additional prefix |
|---|---|---|
| Checkbox | Check box | Add qtlist_ prefix to your field name in TestLink |
| Multiselection | Check box | Add qtlist_ prefix to your field name in TestLink |
| String | Text box | |
| Numeric | Number | |
| Float | Number | |
| Text box | ||
| List | Combo box | Add qtlist_ prefix to your field name in TestLink |
| Date | Date picker | Add qtdate_ prefix to your field name in TestLink |
| Radio | Check box | Add qtlist_ prefix to your field name in TestLink |
| Date time | Date and time picker | Add qtdate_ prefix to your field name in TestLink |
| Text area | Rich text editor | |
| Script | Text box or Rich text editor | Add qtscript_ prefix to your field name in TestLink |
| Server | Text box |
Convert XML to Excel
To convert XML to an Excel File for qTest, follow these steps:
-
Download TestLink's Test Cases Conversion Tool from the qTest Resources page.

-
Put a downloaded file in a directory on your machine (e,g., D:\qTest\Convert Tool)

-
Open the command line tool. Access the directory above
cd “E:\qTest\Convert Tool” -
Execute the command to convert XML files.
testlink2qTest [input file or directory][input file or directory] is the directory path where input files are located or the path to a specific input file.
Output files are located under the same directory as the convert tool. Output file names are the same with the input files.


Import the Excel File into qTest
Once the output files are converted from XML to Excel, follow the instructions to import test cases into qTest Manager Test Design using the Test Case Import.
Modify Field Settings
Access the Field Settings section and modify the system fields’ values with the proper values. If you are using TestLink v1.9, you can refer to the following tables for default values of system fields. Refer to the above Modify Field Settings instructions.
| Status value (in TestLink application | Number (in the input file) |
|---|---|
| Draft | |
| Ready for review | 2 |
| Review in progress | 3 |
| Rework | 4 |
| Obsolete | 5 |
| Future | 6 |
| Final | 7 |
| Execution Type value (in TestLink application) | Number (in the input file) |
|---|---|
| Manual | 1 |
| Automation | 2 |
| Importance value (in TestLink application) | Number (in the input file) |
|---|---|
| Low | 1 |
| Medium | 2 |
| High | 3 |