Jenkins and Bamboo Integrations
qTest Manager allows for out-of-the-box integration with two Continuous Integration (CI) tools:
-
Jenkins
-
Bamboo
The integration collects executed unit test results while building projects in your CI server and reports them to qTest Manager. Our plugin does not execute your unit tests. It will only collect and submit test results (if any) to qTest.
To Set up this Feature:
-
Activate the CI Integration feature in your qTest project.
-
Map the CI execution status with corresponding qTest values.
-
Configure the Test Run and Test Case organization.
-
Install the qTest Plugin on Jenkins or Bamboo and configure it to connect to your qTest project.
Supported Testing Frameworks
We support testing frameworks that are capable of generating JUnit XML format test reports.
-
For Jenkins, if your testing framework does not generate JUnit XML format test reports, you can utilize xUnit Plugin to generate and publish test results before qTest Plugin collects and reports them to qTest.
-
For Bamboo
qTest Bamboo Plugin does not support Bamboo Specs.
Only JUnit XML format test reports are supported.
Supported Build Tools
-
Maven
-
Ant
-
Gradle
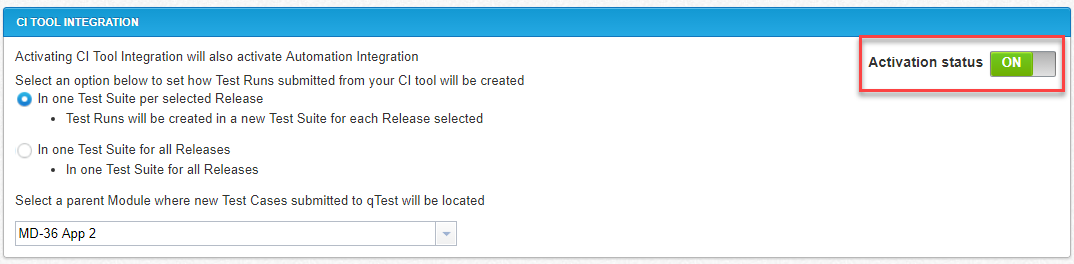
Activating the CI Integration
In order to receive Test Logs submitted from your CI server and associate them with the builds, you will need to enable this feature in your qTest project. This will need to be done for each project individually.
To Activate the CI Integration:
-
Select the appropriate qTest Project.
-
Hover over the Gear icon and select Automation Settings from the drop-down menu.
-
Switch on the Activation Status in the CI Tool Integration section.
-
Map the automation execution statuses of your CI tools with the corresponding qTest values.

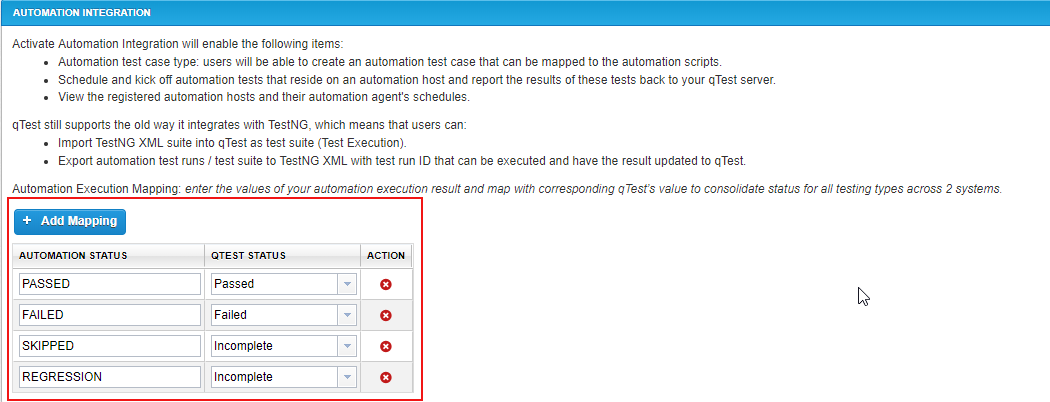
Mapping the CI Status
Activating the CI Tool Integration will also activate the Automation Integration feature. Therefore, it is required that execution statuses for your CI tools are mapped to the corresponding qTest values. The CI tools' default execution statuses are:
Jenkins:
-
PASSED
-
FAILED
-
SKIPPED
-
FIXED
-
REGRESSION
Bamboo:
-
SUCCESS
-
FAILED
-
SKIPPED
To Map the CI Statuses:
-
Select the Add Mapping button.
-
Enter the CI tools status and the corresponding qTest value.
-
Save.
Organizing Test Runs
While setting up the CI Tool Integration, you have different options to manage your Test Runs and Test Cases.
-
In one Test Suite per selected Release : One Test Suite is created under each selected Release on qTest plugin's configuration in your CI server. This is the default option.
Jenkins: Test Suites are named as [Jenkins Project Name] [mm-dd-yyyy], in which [mm-dd-yyyy] is the suite's created date.
Bamboo: Test Suites are named as [Bamboo Plan Key] [mm-dd-yyyy], in which [mm-dd-yyyy] is the suite's created date.
-
In one Test Suite for all Releases : Test Runs are created under only one Test Suite regardless of selected Release in your CI server's qTest plugin configuration.
Jenkins: Test Suites are named as [Jenkins Project Name].
Bamboo: Test Suites are named as [Bamboo Plan Key].
-
Test Case submitted from your CI server are located under a Module named as [Jenkins Project Name] or [Bamboo Plan Key]. You can optionally select a parent module to contain the CI module. If no parent module is selected, the CI module is created under root.
Jenkins Integration
The Jenkins integration is available in two configurations:
-
Freestyle: use qTest Jenkins Plugin in your Post-Build actions to submit test results to your qTest Manager project.
-
Pipeline: generate pipeline script from qTest Jenkins plugin and put it in your Pipeline code as a step to submits test results to a qTest Manager project.
You have the option to use either Jenkins Integration to submit your test results to qTest Manager.
Install the qTest Jenkins Plugin
This installation is required to use Jenkins Freestyle or Jenkins Pipeline.
-
From the Jenkins. Plugin Manager, search for the qTest Plugin and install.
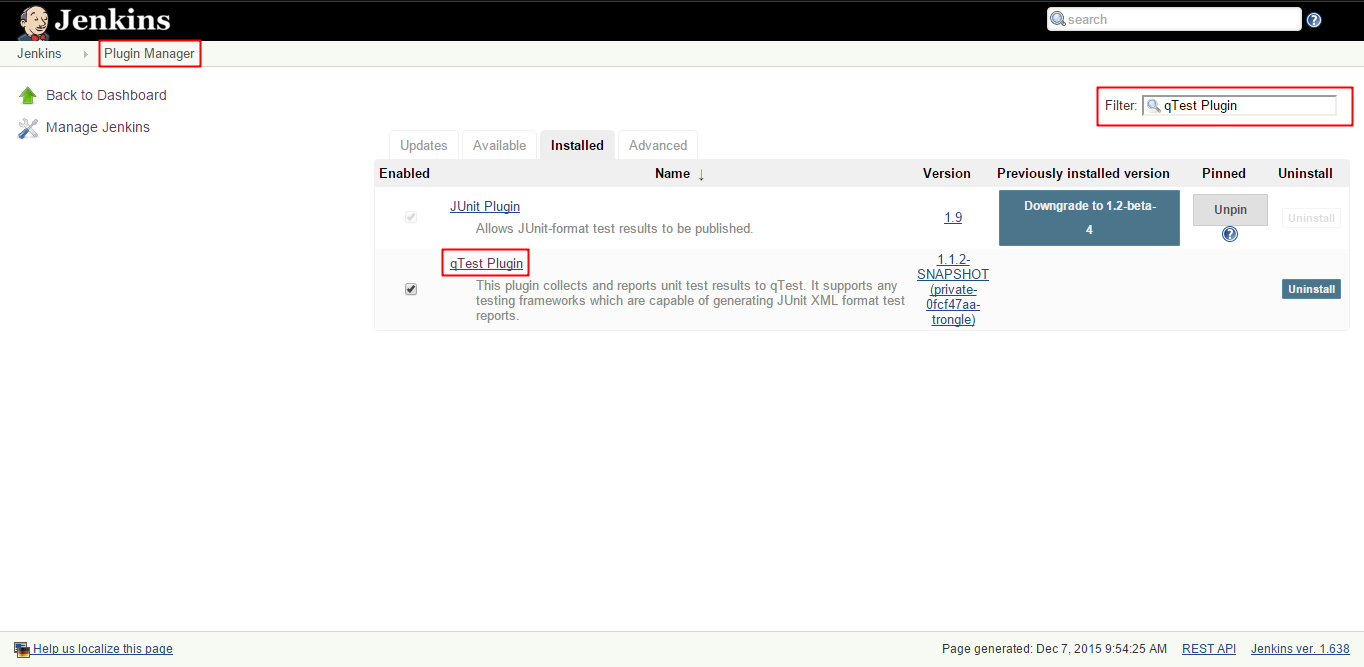
-
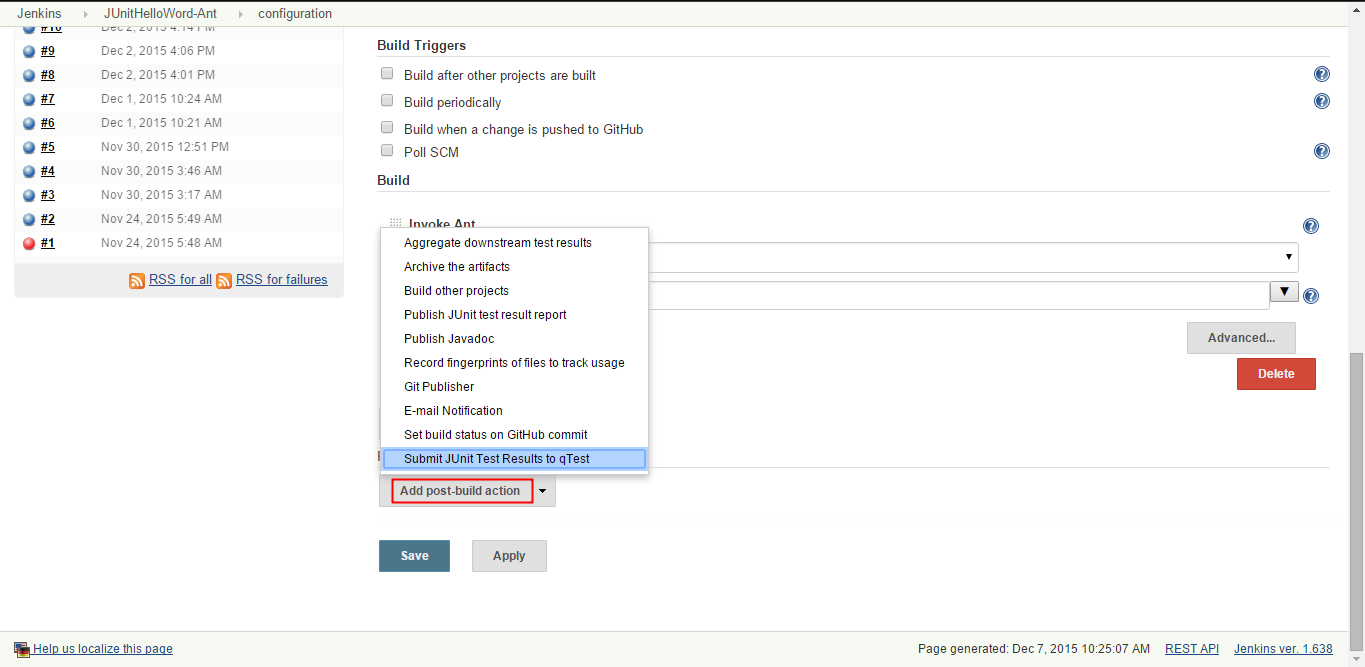
Add Submit JUnit Test Results to qTest as a post-Build action.
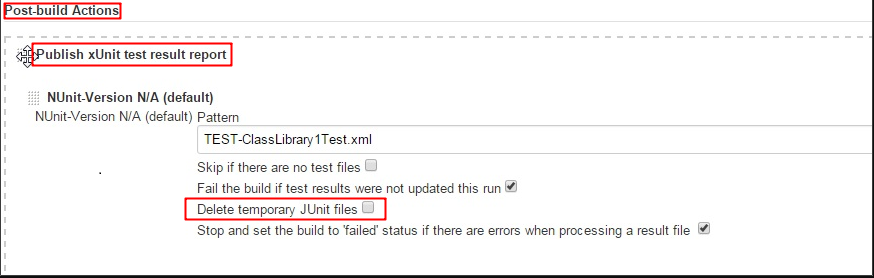
IMPORTANT:
-
If you use xUnit Plugin to generate and publish test results, make sure that the option Delete temporary JUnit files is unchecked.
-
Maven projects: it is not required that there is a prior task to publish test results to Jenkins.
-
Freestyle and Multi-configuration projects: it is required that there is a prior task to publish test results to Jenkins. If not, no test results will be submitted to qTest and the Submission Status will show the status as SKIPPED for the builds.
Below is a screenshot of the qTest Jenkins Plugin after being added as a post-Build action.
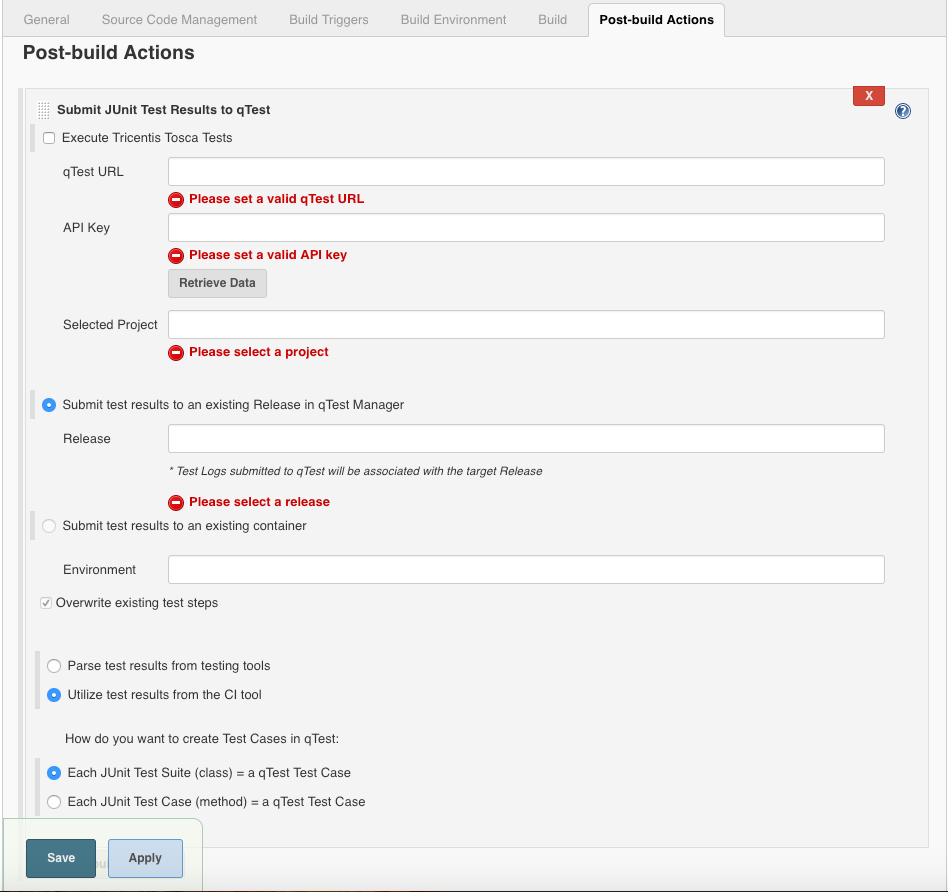
Configure the qTest Jenkins Plugin for Freestyle
-
In qTest Manager locate the Download qTest Resources
 icon to open the page.
 -
Select the CI Tool Integration.
-
Copy the API token from the 'Integration with Jenkins. section. This allows Jenkins to access your qTest Manager instance.
Note: The API token is at a user level, which means it is different between qTest users.

-
Navigate back to the Jenkins plugin configuration page.
-
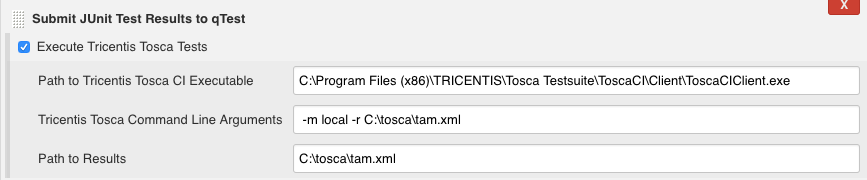
If you want the plugin to execute Tricentis Tosca tests, select the "Execute Tricentis Tosca Tests" checkbox, then enter the information below:
Path to Tricentis Tosca CI Executable: enter the path to the Tosca CI client tool, which is either ToscaCIClient.exe or ToscaCIClient.rar dependent on the Operating System this tool will execute
Tricentis Tosca Command Line Arguments: command line arguments to execute Tosca test.
Path to Results: enter the path to the results generated by the Tosca CI client tool when it finished execution
The screenshot below shows an EXAMPLE configuration:

-
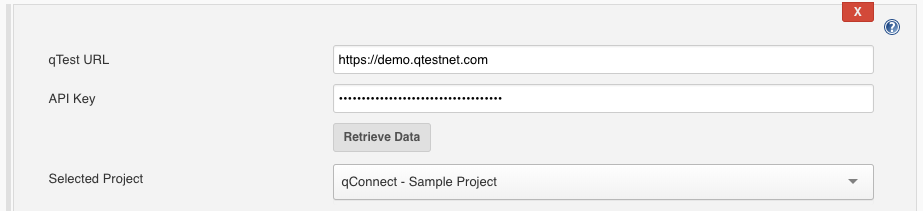
Enter the following qTest Manager information:
qTest URL: the URL to access your qTest instance. e.g. https://demo.qTestnet.com
API Key: this is the Integration with Jenkins token you obtained from the qTest Manager Resources page.
Select the Retrieve Data button to load data from qTest Manager.
Select the qTest project which the Build is integrating with and where you want to submit test results.
The configuration should look like the EXAMPLE below:
-
Configure the options to submit your Test Results to qTest Manager.
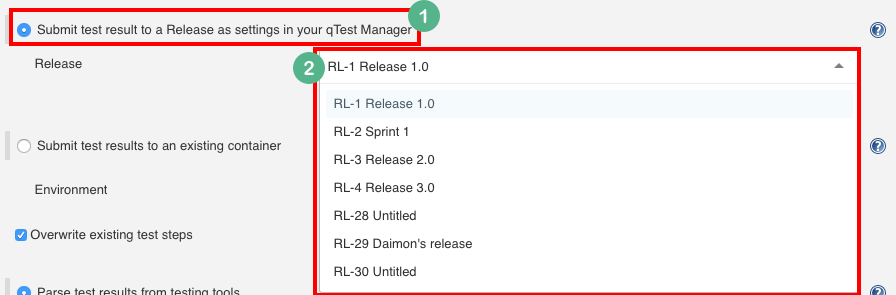
Submit test result to a Release as settings in your qTest Manager
By selecting this option, the qTest Plugin will submit the test results to a Release in qTest Manager (refer to Organizing Test Runs section above to learn how to set this up). Select a Release, which will be the target Release of submitted Test Runs.

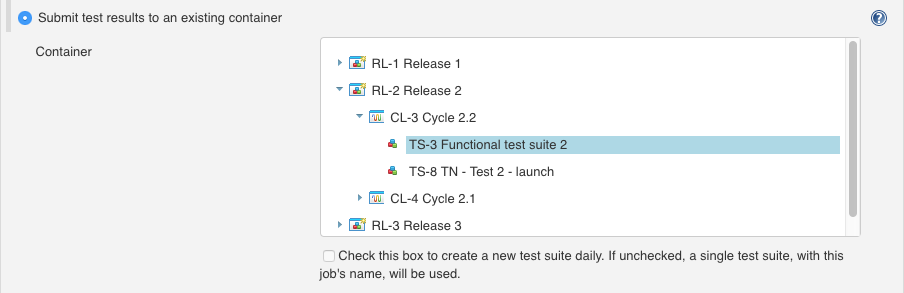
Submit Test Results to an Existing Container
By selecting this option, you allow qTest Jenkins Plugin to submit test results to a specific container in qTest Manager.
Container: select a container where you want your test results to be submitted, e.g. a Release, a Test Cycle or a Test Suite. The plugin will create a Test Suite directly under the selected container. Then it creates Test Runs underneath that Test Suite. It will then submit Test Logs to those Test Runs. If the Test Suite already exists, the plugin will not create duplicate Test Suite(s) but will submit test results to that Test Suite.
Check this box to create a new test suite daily. If unchecked, a single test suite, with this job’s name, will be used: qTest Jenkins Plugin will create a new Test Suite(s) daily, then create Test Runs underneath of that test suite and then submit Test Logs to those Test Runs. If the Test Suite already exists (e.g. created by previous Jenkins built in the same day), the plugin does not create a duplicate Test Suite but will submit test results to that Test Suite.
-
Environment: Optional. The selected Environment will be set as submitted Test Runs' property.

Note: The selected Environment only affects the newly created Test Runs. It will not update the existing Test Runs with the newly selected Environment. The user must delete the existing Test Runs and create a new ones if s/he wants to inherit the environment from the test suite.
-
Overwrite existing test steps: Selected by default, when test results are submitted to qTest Manager, the test case steps are also updated in the log. If the original test case contained test step details with manual test steps, these details would get overwritten, since the test step logs would create newer test case version(s). NOTE: If you wish to retain test step details from the existing test case, you can deselect this option.

-
Parse test results from testing tools: If selected (default), the plugin will scan for the XML files which contain the test results. You can optionally specify a directory pattern where these XML files are located, using ANT Style Pattern. If not specified, the plugin will scan the whole project. Notes: this option is not available if you selected to execute Tosca tests.

-
Utilize test results from the CI tool: In case there is one of the prior tasks that have already scanned and published test results to Jenkins. for example by using xUnit Plugin, qTest Jenkins Plugin will utilize the test results output from that task without scanning again. Notes: this option is not available if you selected to execute Tosca tests.

-
Each JUnit Test Suite (class) = a qTest Test Case: It is the default selected option. A qTest Test Case is created from a JUnit Test Suites (class.) Notes: this option is not available if you selected to execute Tosca tests.

-
Each JUnit Test Case (method) = a qTest Test Case: A qTest Test Case is created from a JUnit Test Case (method.) Notes: this option is not available if you selected to execute Tosca tests.

-
Select Save and you're done with the configuration.
Generate Pipeline Script from qTest Jenkins Plugin
If your Jenkins project uses the Jenkins pipeline feature for advanced continuous integration scenarios, you can generate a pipeline script from the qTest Jenkins Plugin to submit test results to qTest Manager. The script, once generated, can be used as a step in your entire pipeline scripts.
Prerequisite:
Make sure your Jenkins system already has Jenkins pipeline setup, which requires:
-
Jenkins 2.0 or later (we tested the qTest Plugin with Jenkins 2.89.4, which is the latest one at this writing)
Setup Pipeline Syntax
-
From your Jenkins project, select Pipeline Syntax in the left panel.

-
The Pipeline Syntax page loads.
-
Select Snippet Generator.
-
In the Steps section, select "submitJUnitTestResultsToqTest. Submit jUnit test result to qTest" from the Sample Step list.

Configure qTest Jenkins Plugin to Generate Pipeline Script
-
Navigate to qTest Manager and locate the Download qTest Resources
 icon to open the page.
 -
Select the CI Tool Integration section to open.
-
Copy the API token from the 'Integration with Jenkins. section. This allows Jenkins to access your qTest Manager instance.
Note: The API token is at a user level, which means it is different between qTest users.

-
Navigate back to the Jenkins Pipeline Syntax page.
-
If you want the script to execute Tricentis Tosca tests, select the checkbox "Execute Tricentis Tosca Tests", then enter below information:
Path to Tricentis Tosca CI Executable: enter path to Tosca CI client tool, which is either ToscaCIClient.exe or ToscaCIClient.rar dependent on the Operating System this tool is going to execute
Tricentis Tosca Command Line Arguments: command line arguments to execute Tosca test.
Path to Results: enter path to the results generated by Tosca CI client tool when it finished execution
The screenshot below shows an EXAMPLE configuration:
-
Enter the following qTest Manager information:
qTest URL: the URL to access your qTest instance. e.g. https://demo.qTestnet.com
API Key: this is the Integration with Jenkins token you obtained from the qTest Manager Resources page.
Select the Retrieve Data button to load data from qTest Manager.
Select the qTest project which the Build is integrating with and where you want to submit test results.
Now the configuration will look like below.

-
Configure the options to submit your Test Results to qTest Manager.
Submit test result to a Release as settings in your qTest Manager
By selecting this option, the qTest Plugin will submit the test results to a Release in qTest Manager (refer to Organizing Test Runs section above to learn how to set this up). Select a Release, which will be the target Release of submitted Test Runs.
Submit Test Results to an Existing Container
By selecting this option, you allow qTest Jenkins Plugin to submit test results to a specific container in qTest Manager.
Container: select a container where you want your test results to be submitted, e.g. a Release, a Test Cycle or a Test Suite. The plugin will create a Test Suite directly under the selected container. Then it creates Test Runs underneath that Test Suite. It will then submit Test Logs to those Test Runs. If the Test Suite already exists, the plugin will not create duplicate Test Suite(s) but will submit test results to that Test Suite.
Check this box to create a new test suite daily. If unchecked, a single test suite, with this job’s name, will be used: qTest Jenkins Plugin will create a new Test Suite(s) daily, then create Test Runs underneath of that test suite and then submit Test Logs to those Test Runs. If the Test Suite already exists (e.g. created by previous Jenkins built in the same day), the plugin does not create duplicate Test Suite but submit test results to that Test Suite.

-
Environment: Optional. The selected Environment will be set as submitted Test Runs' property.

Note: The selected Environment only affects the newly created Test Runs. It will not update the existing Test Runs with the newly selected Environment. The user must delete the existing Test Runs and create new ones if s/he wants to inherit the environment from the test suite.
-
Overwrite existing test steps: Selected by default, when test results are submitted to qTest Manager, the test case steps are also updated in the log. If the original test case contained test step details with manual test steps, these details would get overwritten, since the test step logs would create newer test case version(s).
NOTE: If you wish to retain test step details from the existing test case, you can deselect this option.

-
Parse test results from testing tools: If selected (default), the plugin will scan for the XML files which contain the test results. You can optionally specify a directory pattern where these XML files are located, using ANT Style Pattern. If not specified, the plugin will scan the whole project. Notes: this option is not available if you selected to execute Tosca tests.

-
Utilize test results from the CI tool: In case there is one of the prior tasks that have already scanned and published test results to Jenkins. for example by using xUnit Plugin, qTest Jenkins Plugin will utilize the test results output from that task without scanning again. Notes: this option is not available if you selected to execute Tosca tests.

-
Each JUnit Test Suite (class) = a qTest Test Case: It is the default selected option. A qTest Test Case is created from a JUnit Test Suites (class.) Notes: this option is not available if you selected to execute Tosca tests.

-
Each JUnit Test Case (method) = a qTest Test Case: A qTest Test Case is created from a JUnit Test Case (method.) Notes: this option is not available if you selected to execute Tosca tests.

-
Click Generate Pipeline Script button to generate pipeline script
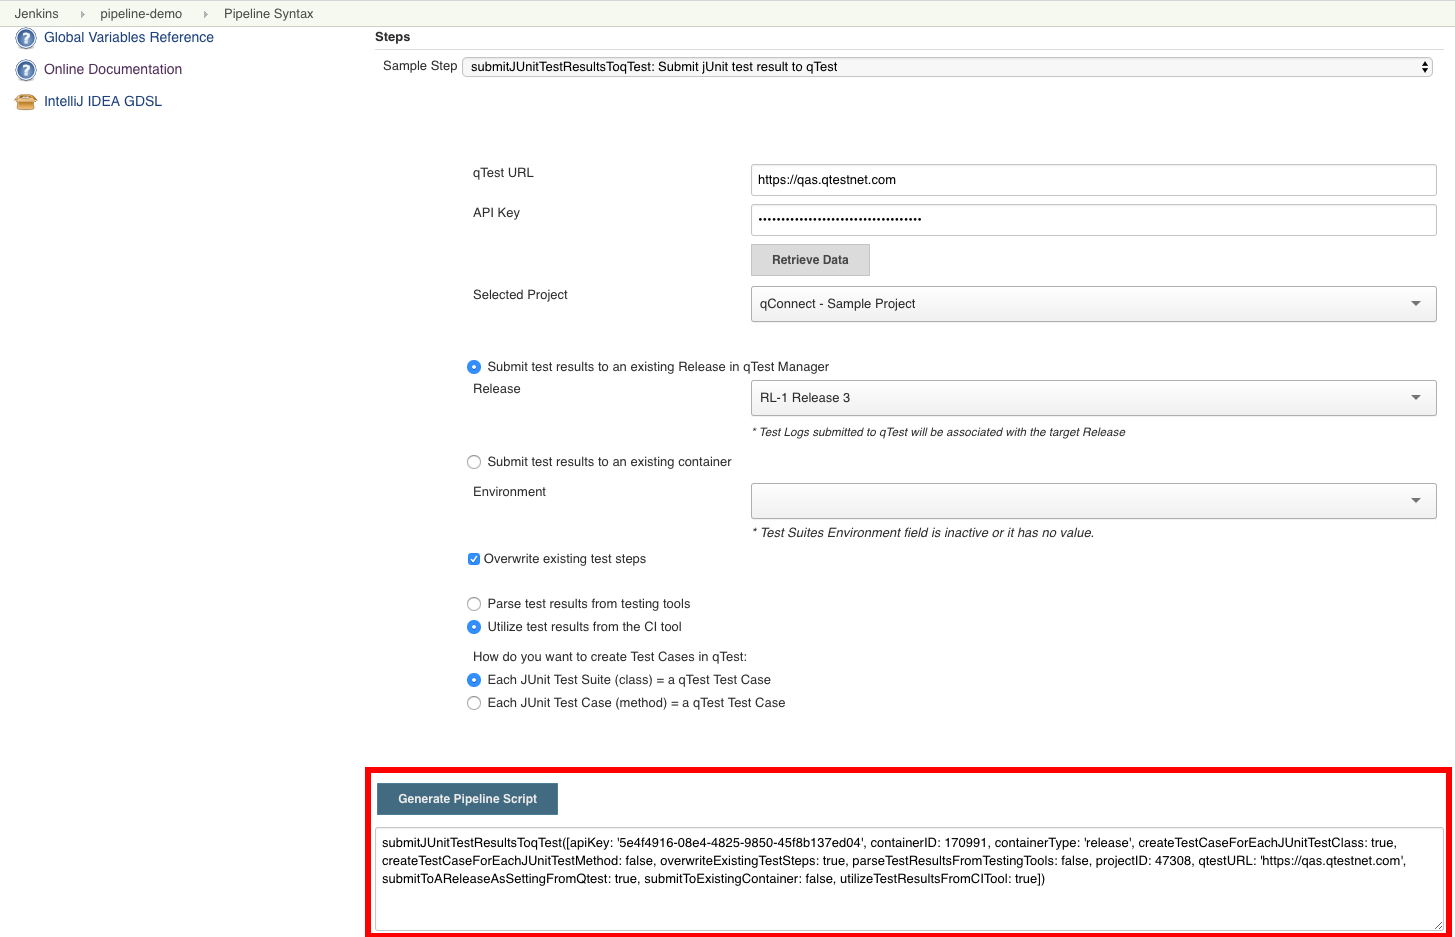
-
The script will be generated in the text area below the Generate Pipeline Script button. Now you can copy the script and put it as a step in your pipeline scripts.
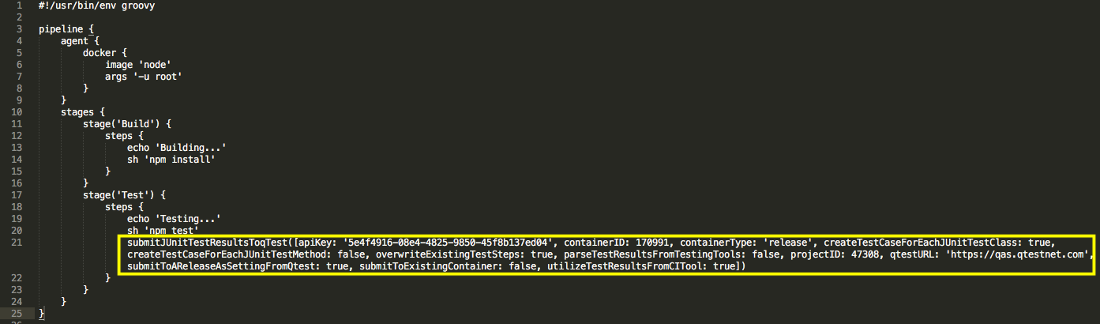
Example: Jenkinsfile
Below is a sample Jenkinsfile that shows how the generated script is used in the entire pipeline scripts. The submitJUnitTestResultstoqTest step will submit the test results to qTest Manager after a step that executes the test finished.
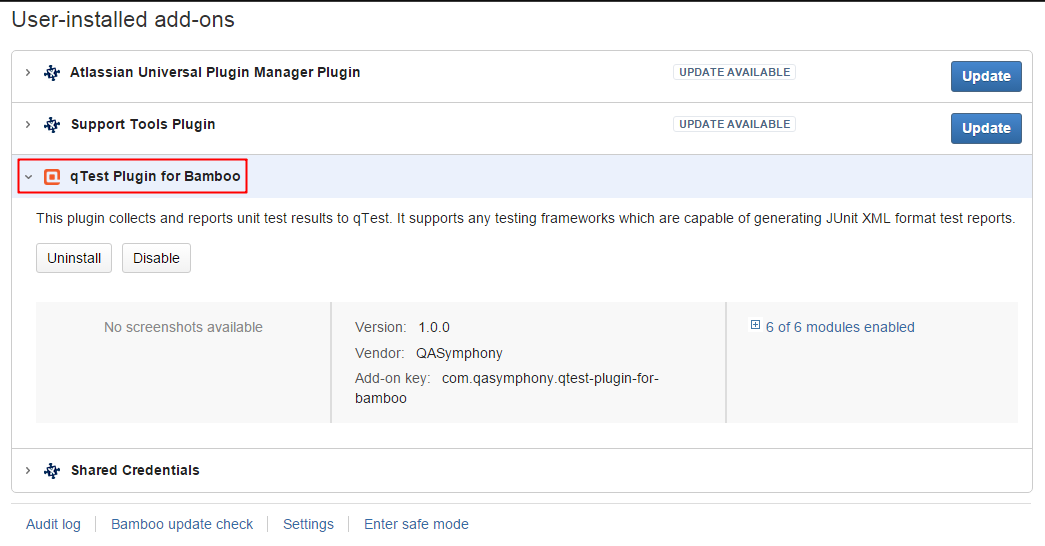
Bamboo Integration
Install the qTest Bamboo Plugin
Configure qTest Bamboo Plugin
-
Navigate to qTest Manager and locate the Download qTest Resources
 icon to open the page.
 -
Select the CI Tool Integration section to expand.
-
Copy the API token from the Integration with Bamboo section. This allows Bamboo to access your qTest Manager instance. Note: The API token is at a user level, which means it is different between qTest users.
-
Navigate back to the Bamboo Plugin Configuration page.
-
Configure a Build plan for your Bamboo server.
-
Select a Build stage under the plan.
-
Select a Build job under the stage.
-
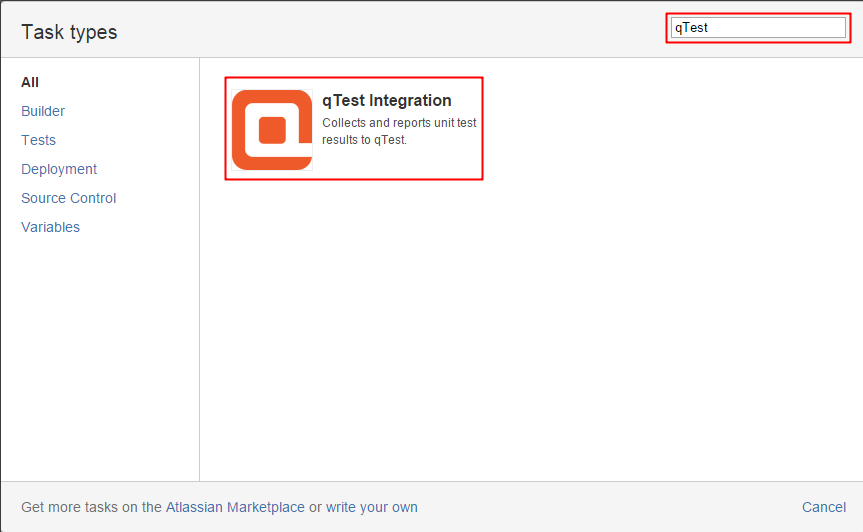
Add a new task to the selected build.
-
On the pop-up, search for the qTest Integration task and add it to the stage. Important: This task needs to be added to the job in which unit tests are executed.
-
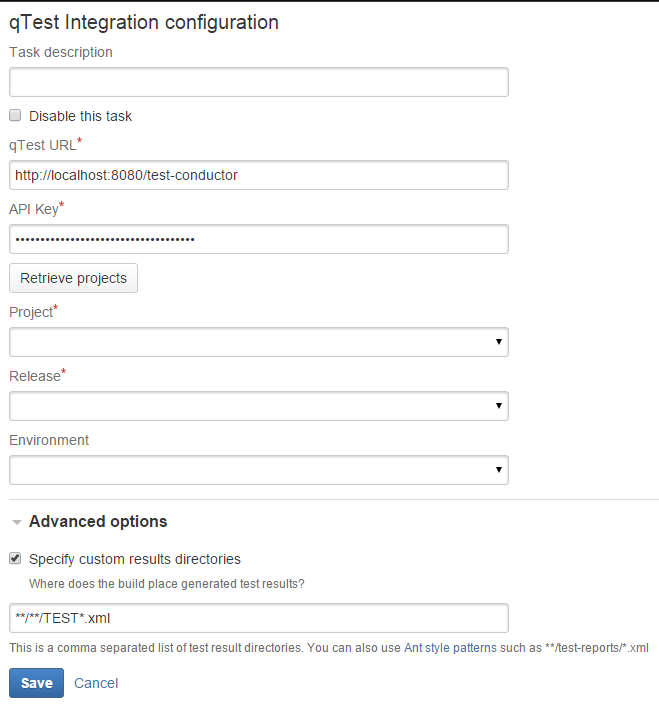
After the task is added, you will need to configure the task to connect to your qTest Manager instance.
-
Enter the following qTest Manager information:
qTest URL: the URL to access your qTest instance. e.g. https://demo.qTestnet.com
API Key: this is the Integration with Bamboo token you obtained from the qTest Manager Download Resources page.
-
Select the Retrieve projects button to load data from qTest Manager.
-
Select the qTest project which the Build is integrating with and where you want to submit test results.
-
Select one Release which will be the target Release of submitted Test Runs.
-
Optional. The selected Environment will be set as submitted Test Runs' property.
Notes:
-
The selected Environment only affects the newly created Test Runs. It will not update the existing Test Runs with the new Environment if you have selected a new one. We are working on the fix for that and will Release it soon.
-
The plugin will scan for the XML files which contain the test results. You can optionally specify a directory pattern where these XML files are located, using ANT Style Pattern. If not specified, the plugin will scan the whole project.
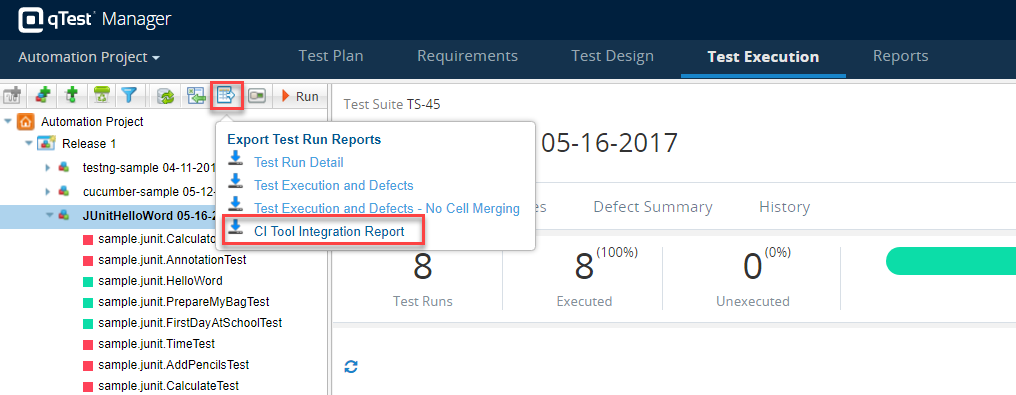
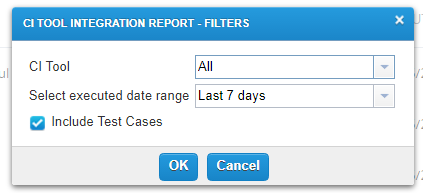
CI Integration Reports
CI Tool Integration Report
This is an export file which contains details of tests submitted from your CI server. It includes two views:
-
Build by Build : details of all tests executed in each CI build.
-
Test by Test : execution results of each test through different CI builds
To Download the Export File:
-
On the Test Execution tab, select the Export button.
-
Select the CI Tool Integration Report.
-
Select filters before exporting.
Note: The export is not filtered by what you select on Test Execution tree. It is only filtered by values selected in this pop-up.
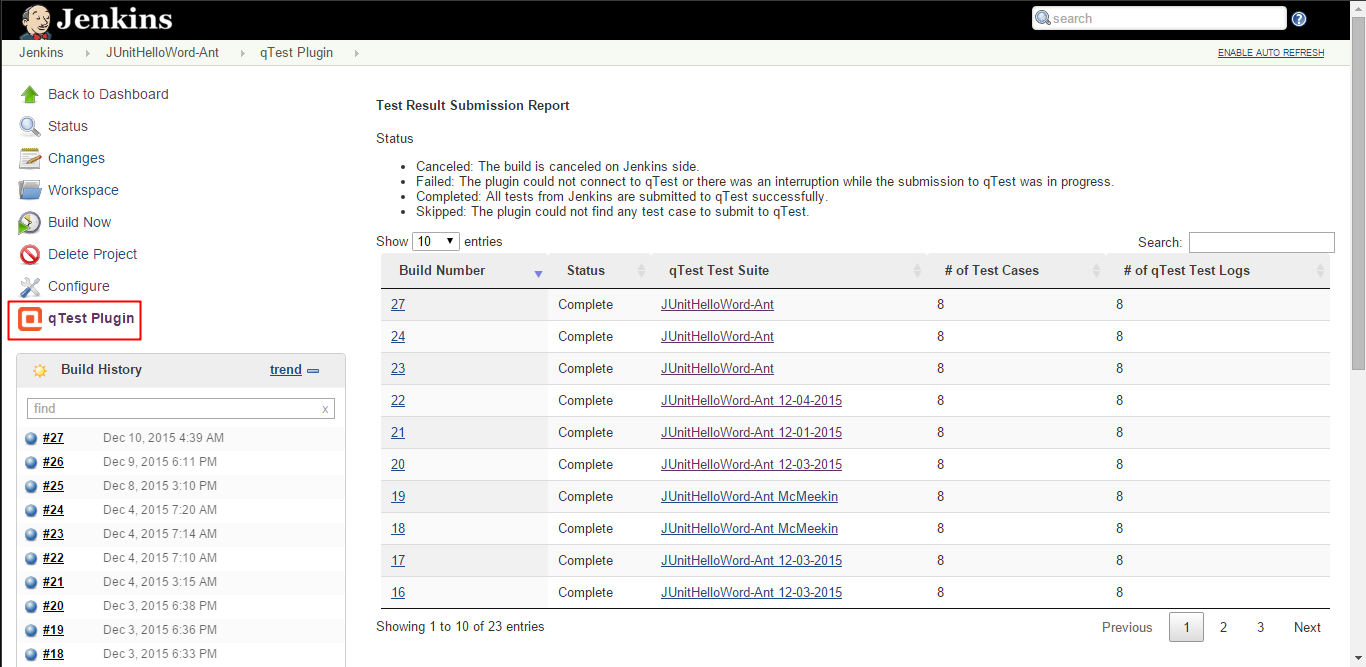
Test Result Submission Report
On your CI tool side, we provide a report allowing you to track the status of test submissions to qTest after each Build is completed.
Note: If a failure occurs during test submission, the Failure Log will be included as a text file attachment in the Test Log Details.
-
Jenkins: Select a 'Build project.' Select the qTest Plugin on the left panel.
-
Bamboo: Select a 'Build plan.' Open the qTest Plugin tab.
