Configure JIRA Defects
After establishing a connection between qTest Manager and JIRA, you must configure your Defect integration with JIRA. This provides developers with comprehensive details from Test Execution, such as the steps to reproduce and the environment.
The setup steps in this article, help you determine the JIRA issue type that the Defect will represent, and the JIRA fields that will be auto-filled when submitting a Defect.
Prerequisites
Before configuring your JIRA Defect Integration, make sure to complete the setup steps described below.
Required Permissions
-
qTest Manager Project Administrator permissions to access the project’s integration settings.
-
The JIRA username in the connection must have ‘Create Issue’ permission in the JIRA project. For more information, refer to the JIRA article Manage Project Permissions.
-
You can set up your qTest Manager project to be able to submit Defects into multiple JIRA projects. If so, the JIRA project will be selectable when the Defect is logged by the tester.
-
You can select multiple JIRA issue types (such as Bug or even custom issue types) to be mapped as Defects. Mapped JIRA issues will be referred to as "Defects" in qTest Manager.
-
qTest Manager requires that at least one JIRA issue is mapped as a Defect.
How to Get Here
-
Within the qTest Project that you are configuring your JIRA integration, select the Gear icon.
-
Select Integration Settings from the drop-down and the Configure Integrations page loads.
-
In the External Systems panel on the left, select JIRA.
-
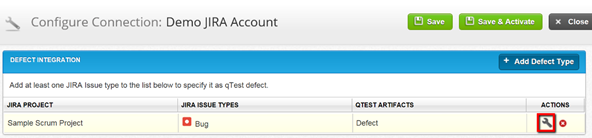
Locate your JIRA connection in the Connections List section and in the Action column, select the wrench icon to configure.
![]()
Configure JIRA Defect Integration
-
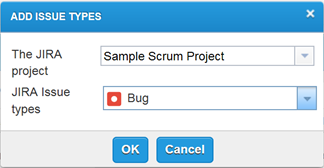
From the Configure Connection page, select the Add Defect Type icon.

The Add Issue Type pop-up window displays.
-
Select the down-arrow to the right of The JIRA project field and in the drop-down list, select the JIRA project in which to submit the Defect.
-
Select the down-arrow to the right of the JIRA Issue types field and choose the applicable JIRA issue type from the drop-down list. The selectable issue types in this field automatically show the issue types that are available in the JIRA project you just selected.
The Bug issue type is a very popular choice, but you can also select other issue types, such as tasks or even custom issue types that exist in the JIRA project. -
Select OK, and the Defect Integration section displays the JIRA project and JIRA issue type you selected.
Auto-Fill Defect Fields
To automatically fill in JIRA fields when submitting a Defect, use the Defect Auto Fill feature as follows.
-
Position the arrow cursor in the ACTIONS field of the new line created in the Defect Integration area.
-
Select the wrench icon.
-
The Edit Auto Filling instructions vary depending on whether you are connected to JIRA Cloud or JIRA Server. More details are provided below.
JIRA Cloud Auto-Fill
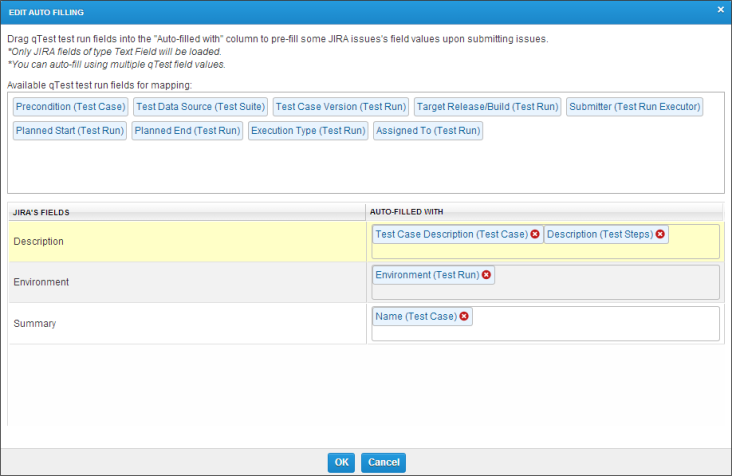
This screen allows you to select the JIRA Defect fields to auto-fill using qTest Manager field values. When you create a Defect in qTest Manager, the information you select on the Edit Auto Filling screen is automatically populated in the JIRA “Create Issue” window. The tester need not manually enter the information in JIRA.
-
Select the fields you want to auto-fill on the JIRA Defect.
The auto-filling of Defect fields is optional, but highly recommended to save time and provide more information from the qTest Manager test. -
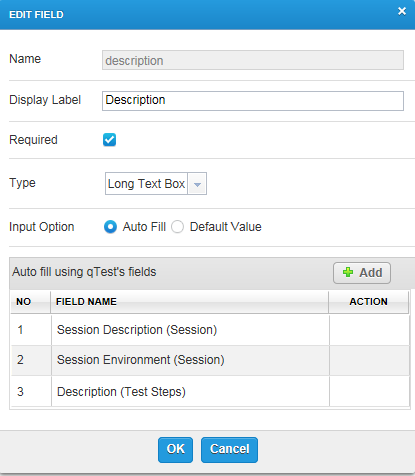
Select the values to auto-fill. For example, select the link under the Description field. The Edit Field screen is displayed.
-
In the Input Option field, you can either select the Auto Fill option or the Default Value option. Consider the following:
Selecting the Auto Fill option means the data is taken from qTest Manager and dynamically filled into JIRA. Selecting the Default Value option means the JIRA field will always fill with the same pre-defined value.
Only fields in Text format can be auto-filled. Other fields can be configured for Default values only (instead of dynamic auto-fill).
You can select multiple qTest Manager fields to auto-fill into one JIRA field. For example, the Description of the JIRA issue can be auto-filled with Description (Test Steps), Assigned To (Test Run), and Environment (Test Run).
-
To add additional fields for auto-fill, select the Add icon and select from a list of other available qTest Manager fields, such as Assigned To (Test Run).
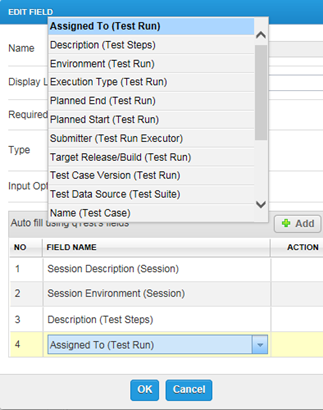
-
Select OK. You can add as many additional fields as you like.
JIRA Server Auto-Fill
-
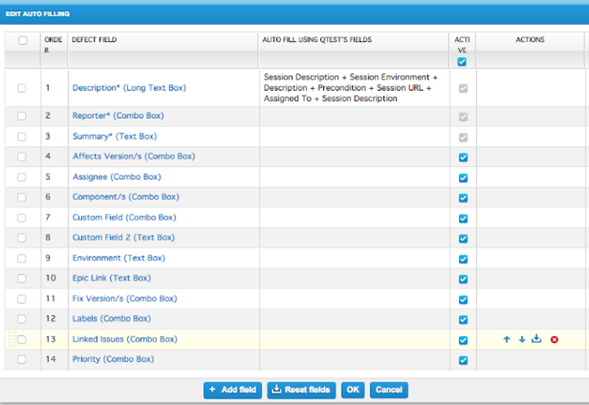
The Edit Auto-Filling form displays. By default, qTest Manager will load all available fields of the mapped JIRA issue type to the Defect Field column.
-
Set Auto-Filling for mapped JIRA issue's fields. qTest Manager will auto-fill data from the Test Run or Test Case into the mapped JIRA issue's field as settings.
-
Drag the available qTest Manager Test Run fields and drop to the corresponding JIRA fields in the Auto-Filled With column.
-
Select OK to complete the Auto-Filling configuration.
Send Test Log Attachments to Linked Defects in JIRA
Attachments for Test Logs and Test Step Logs can be automatically uploaded to linked Defects in JIRA. This feature is enabled by default, but you can disable it by selecting the 'send attachments' checkbox.
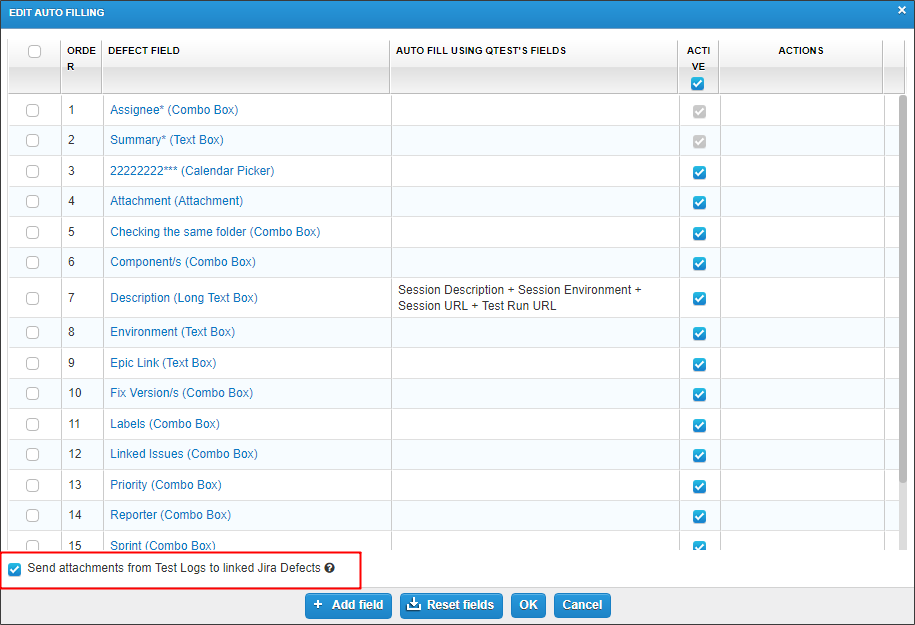
-
If you link a Defect to a Test Log, attachments of the overall Test Log and each Test Step Logs will be uploaded to the Defect.
-
If you link a Defect to a Test Step Log, only attachments from the Test Step Log and its previous steps are uploaded to the Defect.
Attachments sent from qTest will have the following identifiers in the JIRA Defect:
-
a prefix of "qTest" or "qTest_[Test Step#]"
-
comment with the name of the attachment and the qTest user who sent the attachment
-
comment in the event the attachment failed to upload properly
The maximum attachment size for qTest is 50MB, so you will need to configure your "JIRA Attachment Size" to be at least 50MB. If you remove an attachment in qTest, it will not remove the corresponding attachment from JIRA.
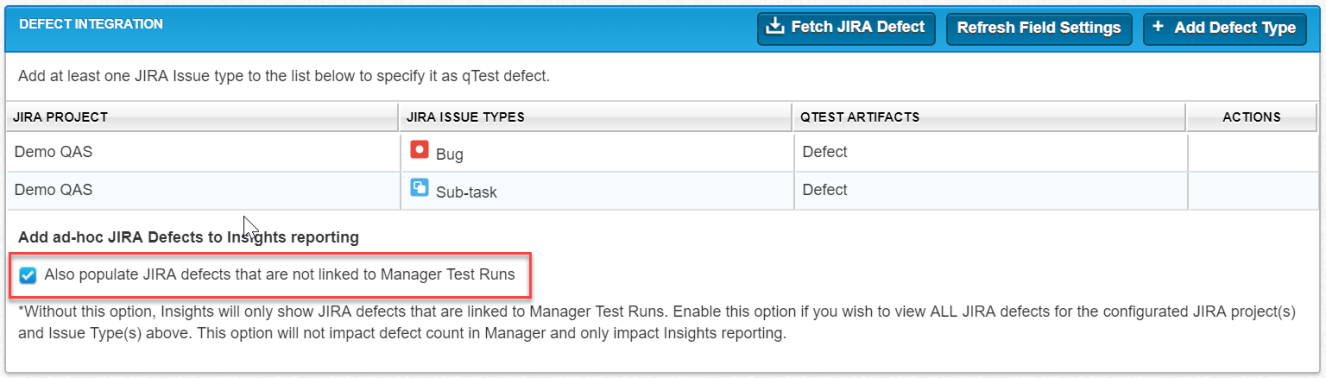
Store Unlinked JIRA Defects in Manager to be Reported in Insights
You can use Insights to report on JIRADefects that are not linked to a Test Run in qTest Manager. To use this enhancement you will need to enable JIRA to provide unlinked JIRA Defects. You can fetch the data manually or through auto-sync which will then be stored in the Manager database.
Unlinked JIRA Defects will not be shown in Manager in the following areas:
-
Reports
-
Linked Defect Dialog
-
Defect Summary
To enable JIRA to provide unlinked Defects, do the following:
-
In qTest Manager, navigate to the qTest project for which you would like to enable JIRA to provide unlinked Defects.
-
From the Gear icon drop-down, select Integration Settings.
-
Select JIRA from the External Systems panel on the left side of the screen.
-
Locate the JIRA integration name you would like to provide unlinked Defects for, and select the wrench icon in the Action column. The Configure Connection page loads.
-
In the Defect Integration section, select the "Also populate JIRA Defects that are not linked to Manager Test Runs" checkbox.
-
Save and then select the Fetch JIRA Defect icon.
Next Steps
See the following articles:
-
Import Requirements from JIRA (optional).
-
Submit Defect (to validate the Defect configuration works as expected).