Integration with Rally
qTest Rally integration helps Build a seamless bridge between Rally and qTest Manager. qTest Manager currently supports integration with Rally OnDemand for submitting Defects to Rally and import Requirements from Rally. You can add as many connections with Rally OnDemand but only one connection will be active at a time.
Set up the Connection
-
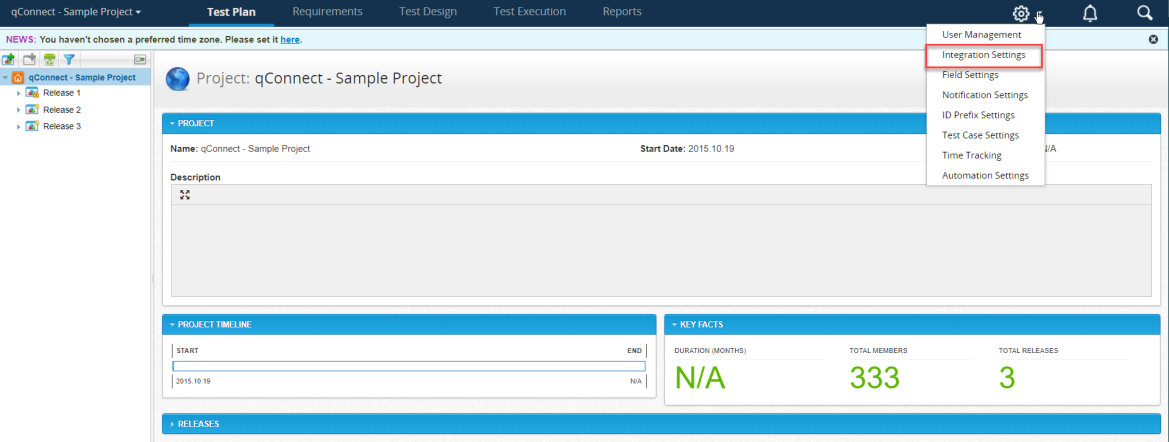
In your qTest Manager instance, access your Integration Settings.
-
In the left navigation panel, under "External Systems," select Rally. The "Configure Integration: Rally" page displays.
-
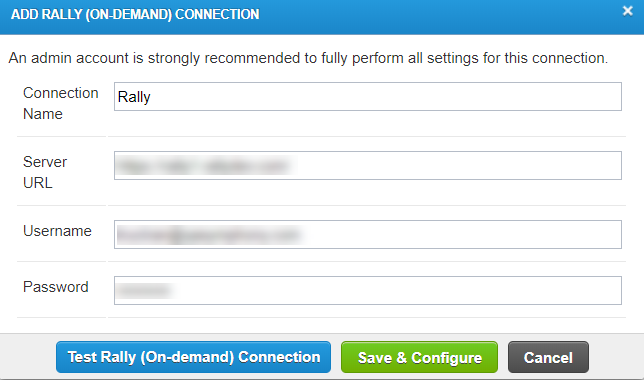
Select the +Add Rally (On-demand) Connection icon.
-
In the dialog, enter the required information for the connection:
Connection Name
Rally Server URL
Admin Rally Account Credentials
-
Select the Test Rally (On-demand) Connection icon to make sure that your connection has been successful.
-
If successful, select Save & Configure.
Add Connection Form
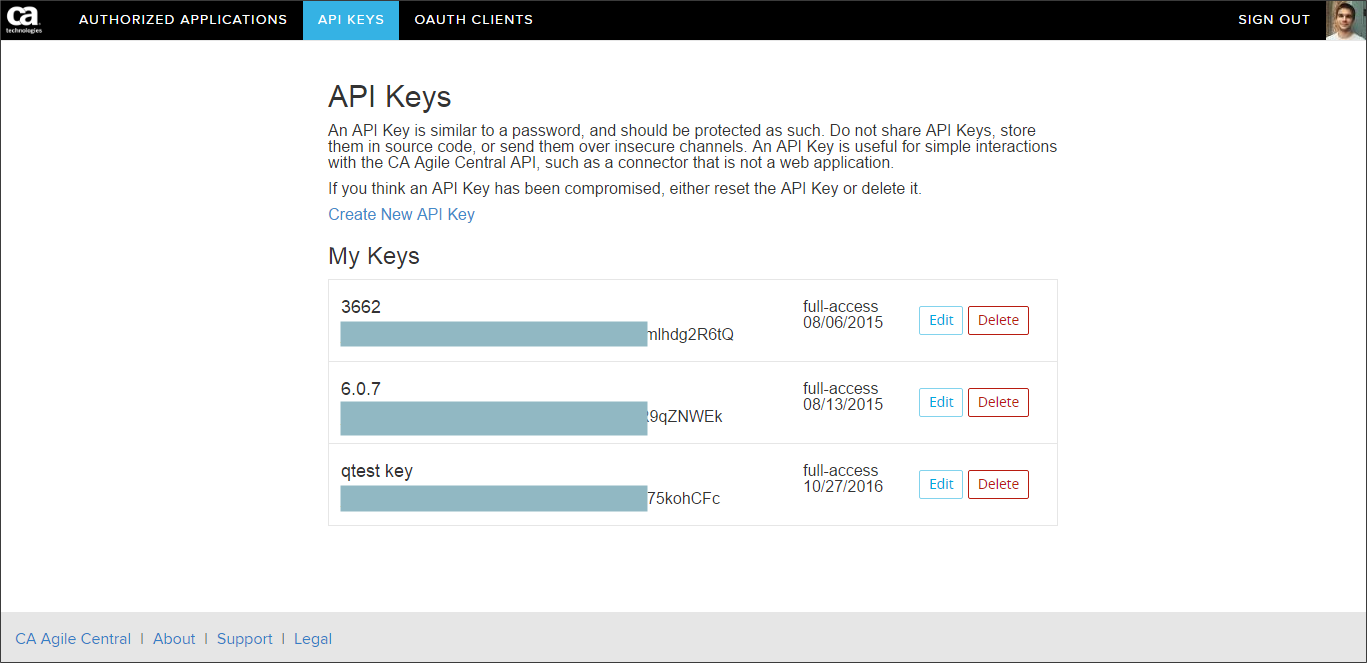
Alternatively, you can log in with your Rally API key. Follow these steps:
-
Access to [your Rally URL]/login/accounts/index.html#/keys to get the API key
-
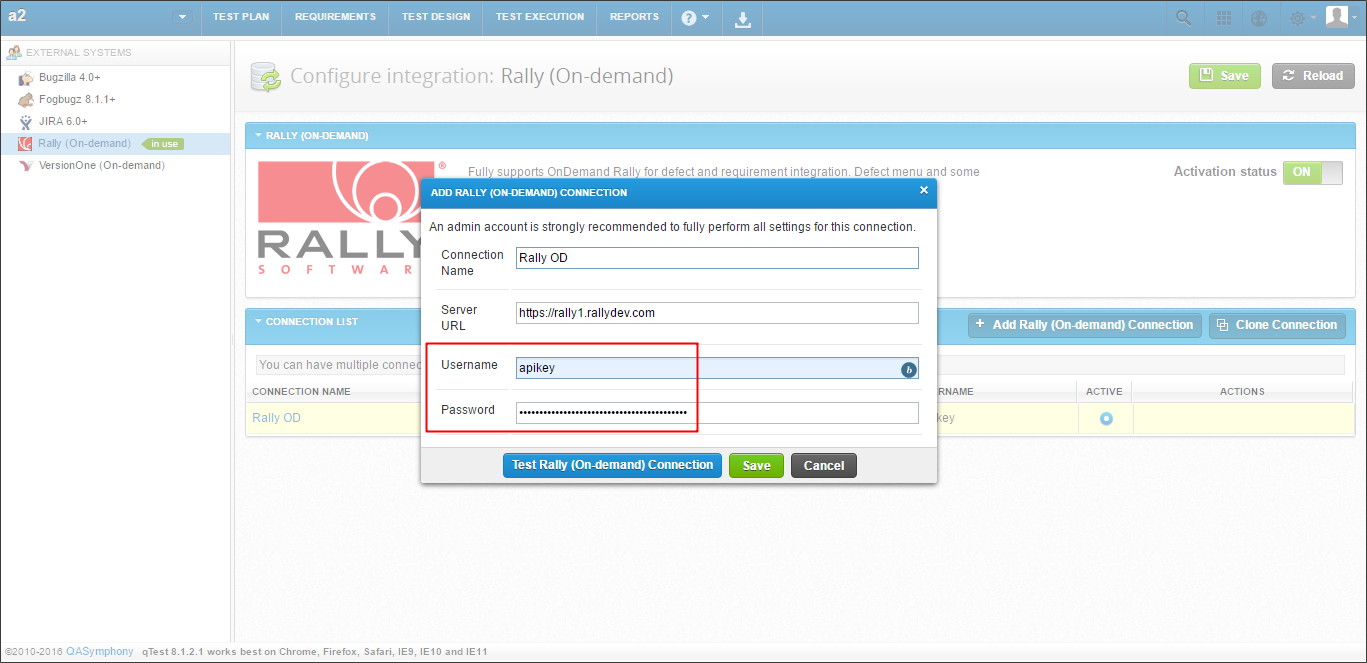
Enter apikey in the Username field, and enter the API key in the Password field.
-
Select the Test Connection icon to check the server availability.
-
Select Save & Configure after a successful connection test.
You can now start to configure integration with Rally for Defects and Requirements. For a new Connection, the Configure Connection page will display after selecting Save and Configure.
For an existing Connection, follow these steps:
-
Select the Configure icon for that connection to open the "Configure Connection" page.
-
Configure the Defect and Requirement integration.
-
Select Save and Activate.
-
Select Refresh in the "Confirmation" dialog. Your newly configured connection will be activated.
The Activation Status is ON and your configured connection is checked as "Active" in the Connection List.
After your Rally Connection Integration is successfully activated, a green status label indicating "in use" will be displayed next to Rally (OnDemand) and the Defect menu will be hidden. Thus, the only way to submit a Defect is through Test Execution.
To edit your connection, select the Configure icon in the Connection List.
You can delete your Rally connection in the Connection List by selecting the Delete icon in the Connection List.
Configure Defects with Rally
After you set up the connection with your Rally OnDemand instance, you can set up Defect integration with Rally OnDemand. You are able to do the following:
-
Set up integrations with multiple Rally Projects
-
Select Rally Defects to map as qTest Manager Defects
Note:
-
qTest Manager requires you to have at least one project and type selected
-
Mapped Rally Objects will be treated as Defects in qTest Manager
To Configure your Defects Integration with Rally, please follow these steps:
-
After a successful Connection set up, navigate to the "Configure Connection" page.
-
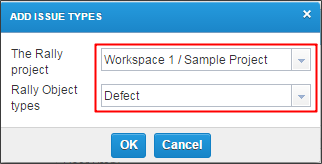
In "Defect Integration," select Add Defect Type.

-
Select both the Rally Project and Defect as the Rally Object types from the drop-down menus.
-
In the Action column of the Defect Integration's Mapping list, select the Configure icon. Here, you can configure individual mapped Defects.
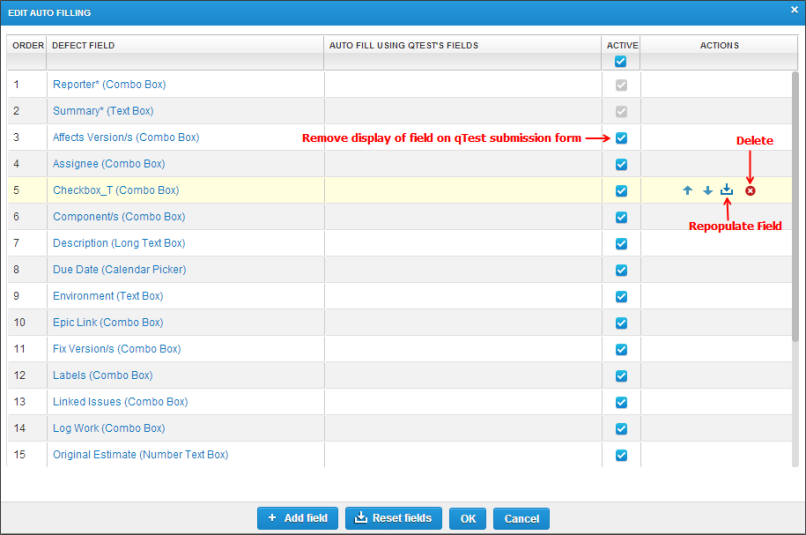
The Edit Auto-Filling form displays. By default, qTest Manager will load all available fields of the mapped Rally Defect onto the Defect Field column. Users can do the following:
-
Select Reset Fields to reload the latest Field Settings of mapped Rally Defects
-
Select the Repopulate icon in the Action column of each Defect Field to reload the latest values of individual fields from Rally
-
Select the Delete icon to remove the display of specific fields from the qTest Manager's Defect submission form
- Those deleted fields will still be on the Rally form
-
Select the Move up or Down arrows to re-arrange the display of Defect fields in the qTest Manager Defect submission form
- Their positions remain unchanged in the Rally form
-
Select the Add Field icon to manually add fields that can't be automatically populated from Rally to qTest Manager
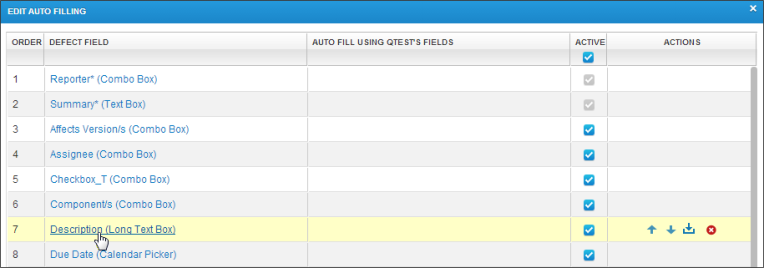
Now, Set Auto-Filling for the mapped Rally Defect's fields. qTest Manager will auto-fill data from the Test Run or Test Case into the mapped Rally Defect's field as settings. Follow these steps:
-
Select a Defect field to open the Edit Field Screen
-
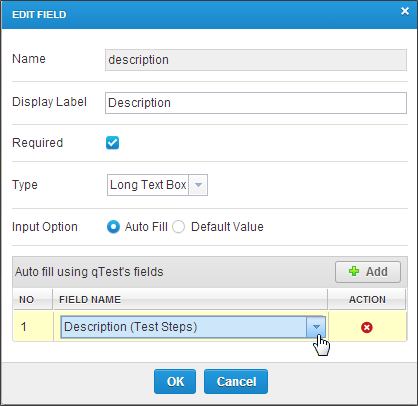
Edit the field as you like.
-
Select the Auto fill option from the "Input Option" section, or, set the Default Value for the field.
-
Select the Add icon to add the field for mapping.
-
Select the Drop-down menu to select the qTest Manager field to map to the Rally field.
-
Select OK to finish your mapping configuration.
Take Note
-
The values of mapped input and output fields must be symmetrical between Rally and qTest Manager
-
Only Defect fields in Text format can be auto-filled
-
You can select to fill multiple qTest Manager fields into one Rally field
Retrieving Requirements from Rally
Configure Requirement Integration with Rally
You can turn on Requirement Integration to retrieve Rally User Stories and import them into qTest Manager as Requirements. To specify which Rally Projects and User Stories should be retrieved as qTest Requirements, perform the following steps:
-
Turn the Activation of Requirement Integration feature on.
-
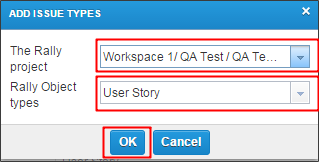
Select the Add Requirement Type icon.

-
Select Rally Projects and User Story as the Rally Object type. User Stories from selected Rally projects will be imported into qTest and Requirements.
-
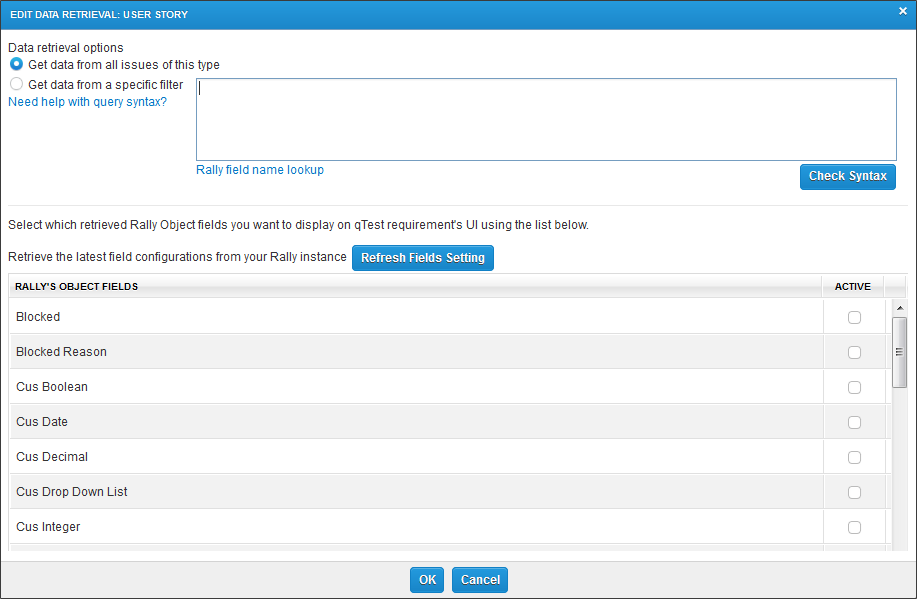
Select the Configure icon to open the "Edit Data Retrieval" page and configure for User Stories in each selected Rally Project.
-
On the "Edit Data Retrieval" page, qTest Manager displays all Rally's User Story fields. Here, you can:
Select to retrieve data from all Rally objects or from a query.
Select Active for Rally User Stories' fields that you want to display on qTest Manager's Requirement pages.
Select the Refresh Fields Setting icon to reload the latest field configuration from your Rally instance.
-
You can either retrieve the data from all Rally User Stories or from each Project that you map. To do so:
Select the Retrieve Rally Data icon to populate the latest data of all mapped Rally User Stories.
Select the Re-populate icon to get the latest data from User Stories from a specific Project.

-
In your qTest Manager Requirements, from within a specific Imported Rally User Story, select Retrieve data to reload the latest data of that Rally User Story.

Viewing Imported Rally User Stories From Within qTest Requirements
Imported Rally User Stories are treated as Requirements in qTest Manager. By default, these integrated Requirements are loaded into a common Module folder named "Imported from Rally, as shown below. 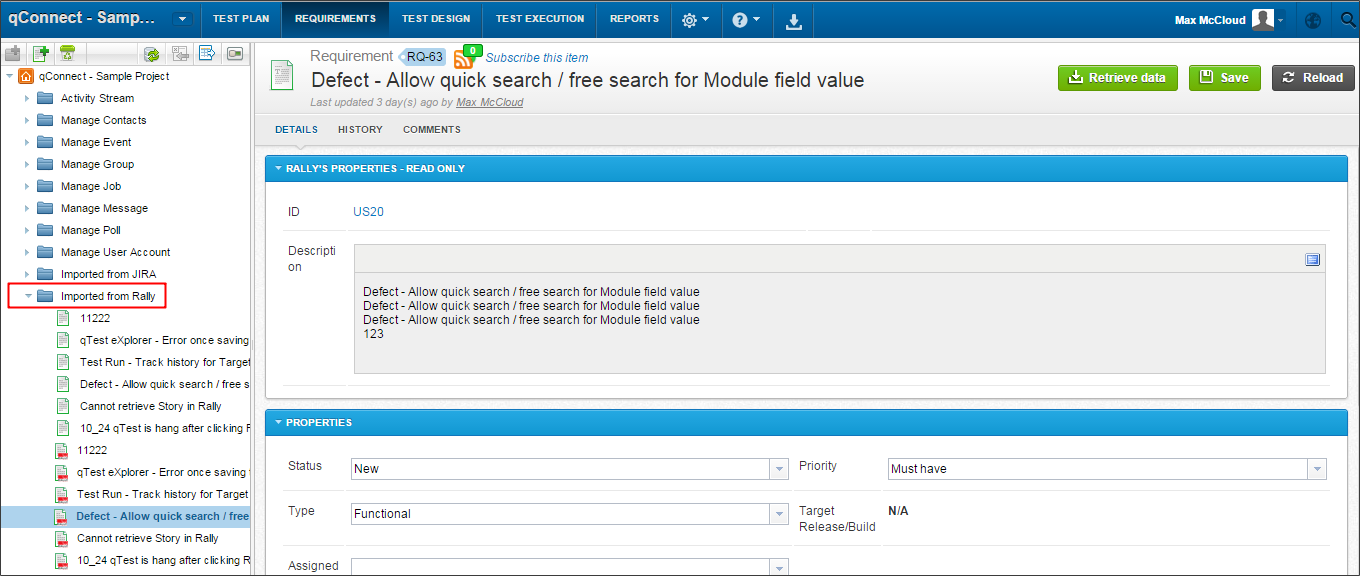 IMPORTANT:
-
Rally imported Requirements are represented by special integration icons
-
An imported Requirement from Rally has two Properties sections: Rally's Properties and qTest's Properties.
Rally's properties contain Active Rally User Story fields configured on the "Edit Data Retrieval" page. These Properties are Read-only. qTest's Properties contain all qTest Requirement fields, excluding Description.
Currently, Rally fields CANNOT be used to Search or Query in qTest Manager.
qTest Manager will poll Rally every two minutes to pull both the updated and new User Stories. You have to Re-select, Reload or Refresh to fetch updated data from Rally imported Requirements you are standing on.
-
Imported Rally User Stories can be copied or moved across Modules within a qTest Manager Project to re-organize Module Structure.
Copied issues will become a qTest Requirements that only retains the Description of the Rally object.
Moved issues' Properties remain unchanged.
-
Imported Requirements can be associated with qTest Manager Test Cases
-
Rally ID's for imported Requirements will be included in the Requirements and Test Execution Results Report.
Linking qTest Manager Objects with Requirements Imported from Rally
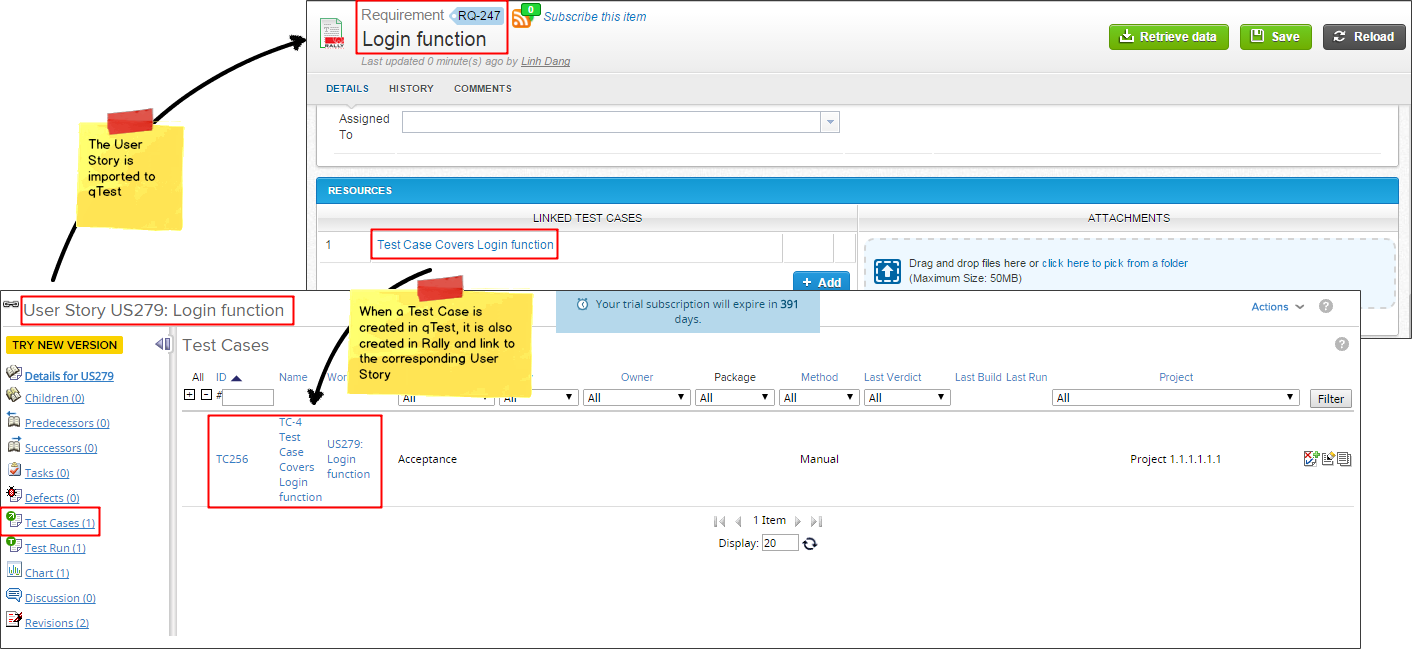
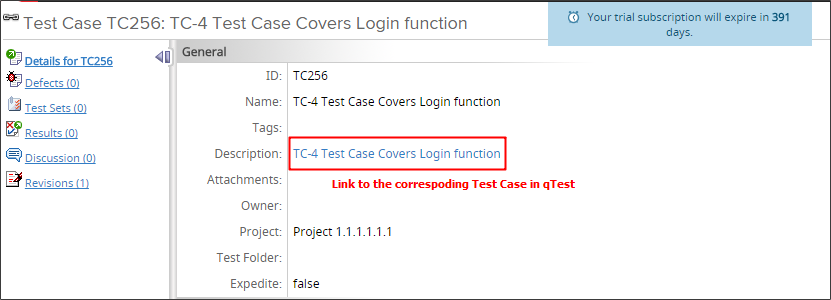
When a Test Case is created and linked to a Requirement imported from Rally into qTest Manager, a Test Case is also automatically generated and linked to that User Story in Rally.
 IMPORTANT:
-
Although qTest Manager allows linking a Test Case to multiple User Stories imported from Rally, Rally limits one Test Case's association to only one User Story. Thus only the first associated User Story will be displayed in that Test Case in Rally.
-
Test Cases and their associated User Stories will not be updated or removed in Rally, regardless of any change in qTest Manager.
-
In the Rally Test Case, the link to the corresponding Test Case in qTest Manager is put in its Description field.
Retrieve Requirements using Rally Query Filter
While configuring Requirement retrieval from Rally to qTest Manager, you can input a query to retrieve only the Requirements that meet specific conditions.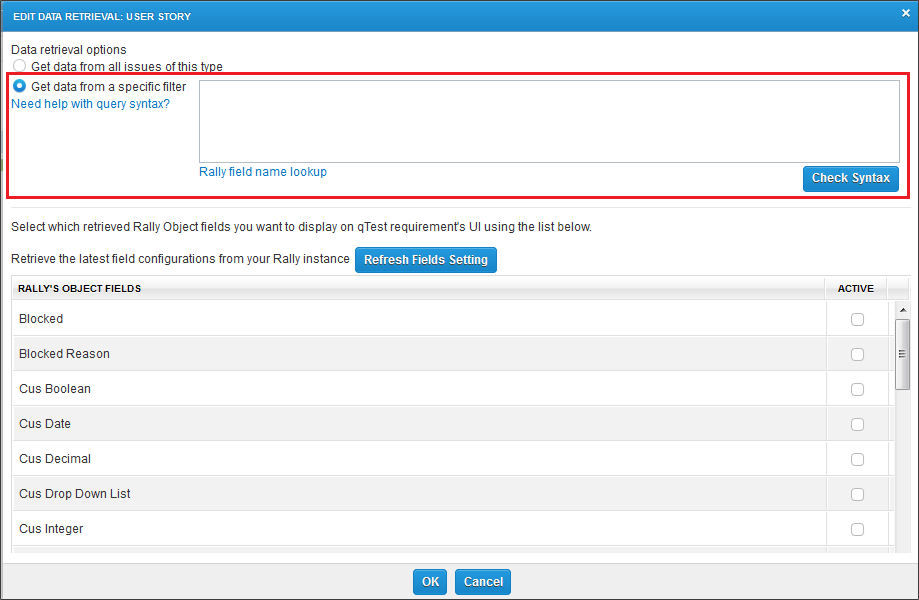
To Build a Rally query, follow these steps:
-
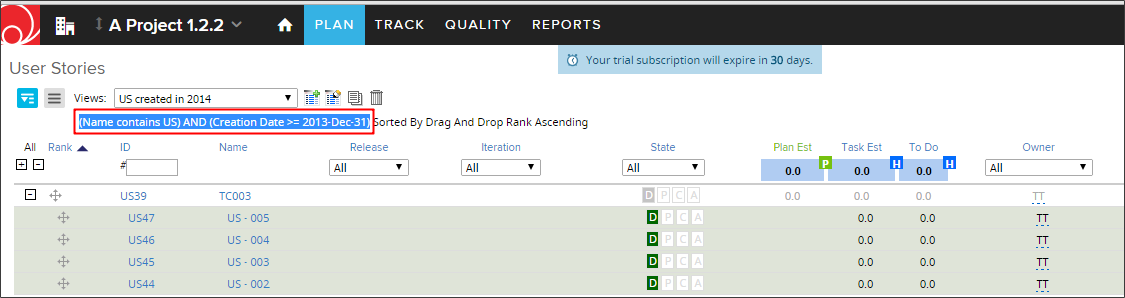
From Rally. define a new custom view of User Stories or select an existing one.
-
Copy the custom view conditions. Only select the text before "Sorted" as shown below.
-
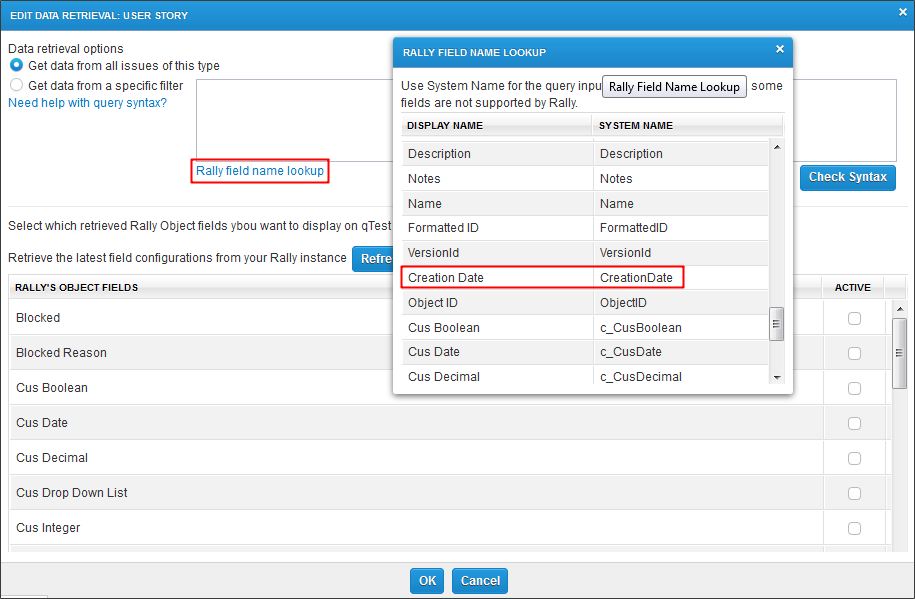
Replace the field's display name with its system name. Select the Rally field name lookup link to view the mapping between display names and system names.
Important
-
Date/time values need converting to UTC and reformatting to the correct form: yyy-mm-dd"T'hh:mm:ss'Z' (e.g., 2013-12-31T00:00:00Z).
-
You cannot create a query with Release and Iteration names. Please use their Object ID in the query.
The syntax: Release.ObjectID + [RElease ID] or Iteration.ObjectID = [Iteration ID]
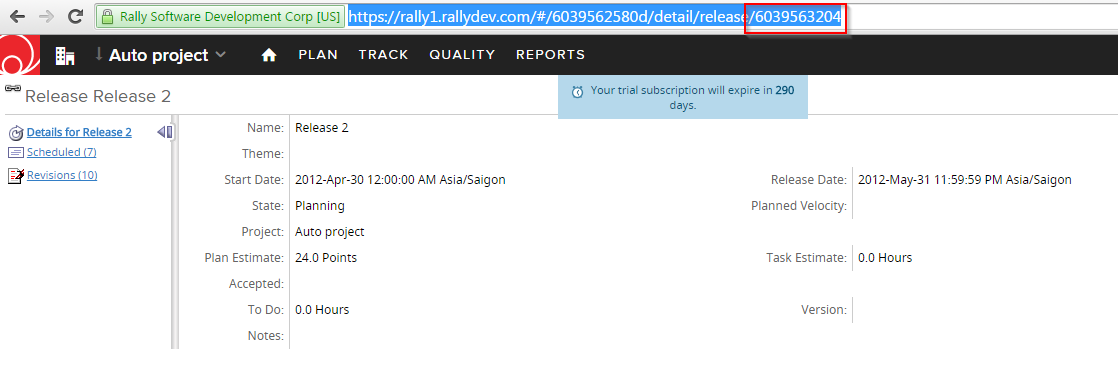
To get the Object ID of a Release/Iteration:
Access its detailed page in Rally
From the URL, the last string of numbers is the Object ID
For example: Release.ObjectID = 6039563204
-
You will need to append time values (e.g., 00:00:00Z) to the end of date values.
-
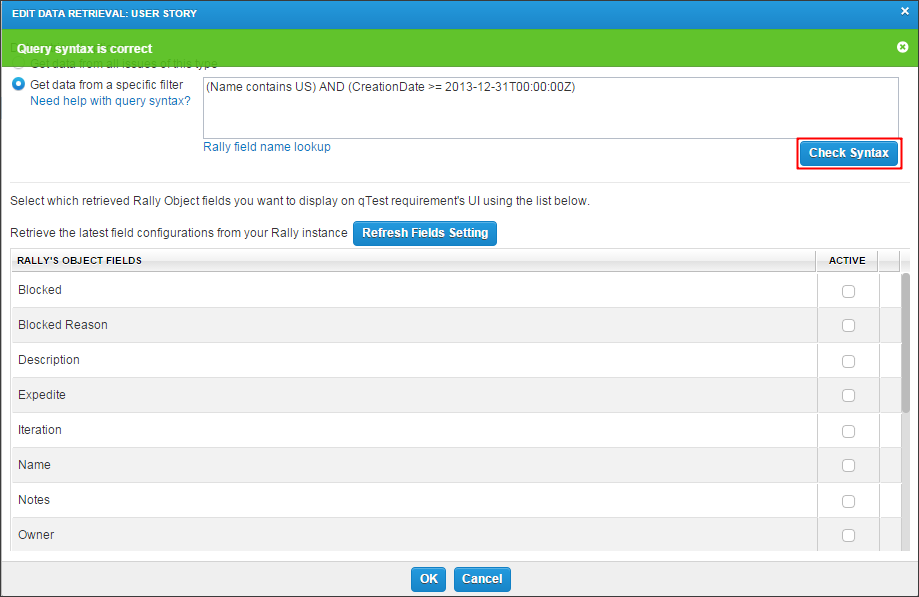
For example, the conditions (Name contains US) AND (Creation Date >= 2013-Dec-31) will be re-written as (Name contains US) AND (CreationDate >= 2013-12-31T00:00:00Z).
-
Fill in the query. Select Check Syntax to make sure your query is correct.
Submitting Defects to Rally
You can submit Defects to Rally from qTest Manager during Test Execution, or, from the Test Log. Follow these steps:
-
Select the Bug icon linked to Test Steps or Submit Defect linked to a Test Run in the TestPad.
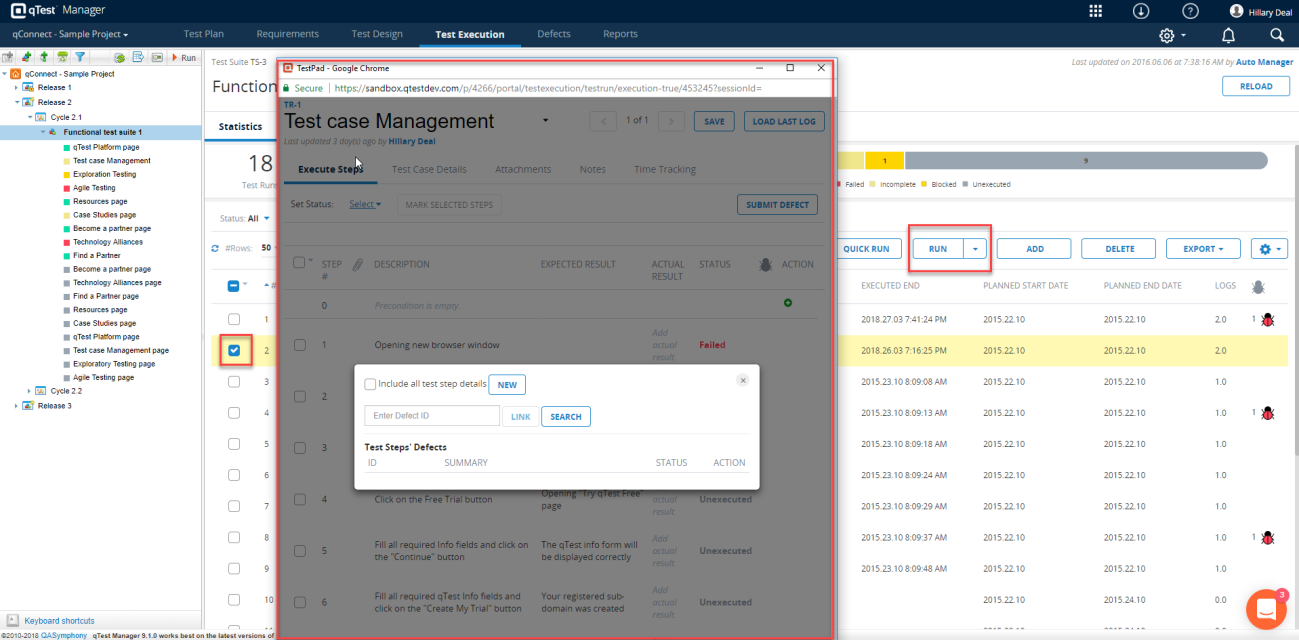
You can also select the Bug icon in the Execution History and Test Log Detail sections to create Defects. Follow these steps:
-
Select the New icon to create a new Defect.
-
Select one of the configured Rally Projects to submit the Defect.
The Mapped Project will be attached before Defect Type and auto-displayed in the Project drop-down list, corresponding to the selected Defect Type.
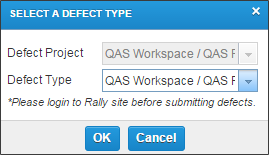
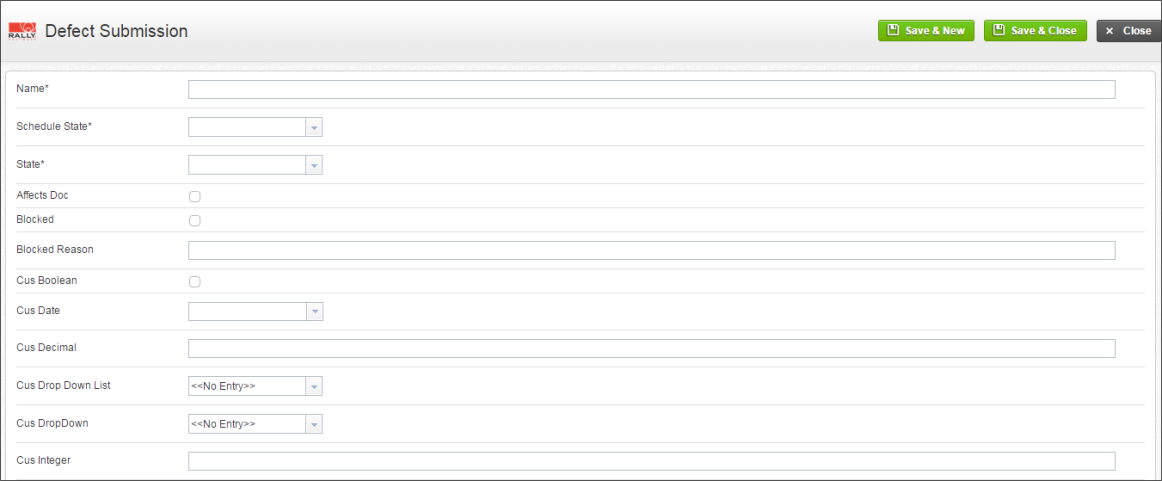
The Defect Submission form displays.
-
If you have the qTest Integration Browser Plugin installed, qTest Manager will open the Rally Create Defect form. You are required to login before submitting Defects.
-
If you DO NOT install the browser plugin, qTest Manager will open the qTest Defect Submission form with integrated fields from Rally. Defect Fields will be auto-filled as configured.
Important
When submitting a Defect, two windows/tabs will be open: the Dashboard and the Defect Submission form. Please do not close the dashboard. If it is closed, the Defect is still submitted successfully, but will not be linked to the corresponding Test Run and User Story.
-
Depending on your qTest version, the Dashboard may not display.
The System will return Defect ID with Summary and the latest Defect Status from Rally attached to the Bug icon.
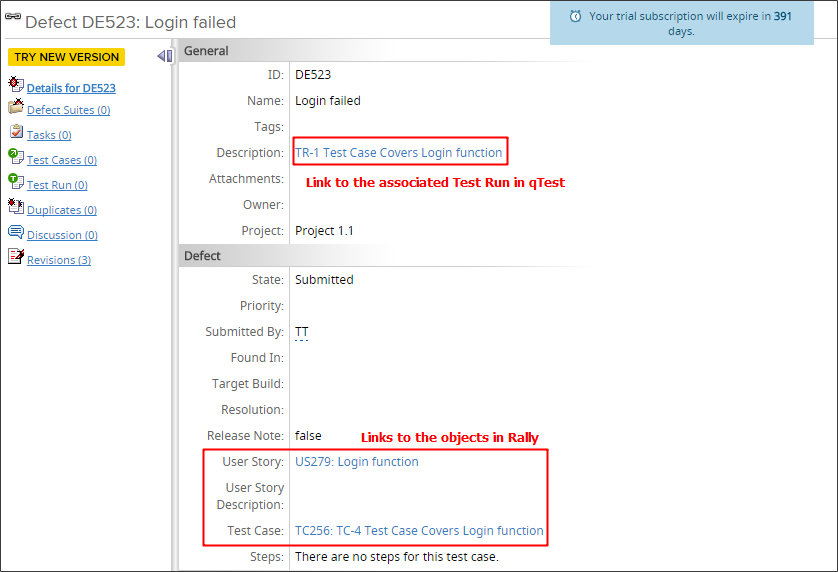
Review Rally Defect After Submission
The following links will be displayed in the Defect Page in Rally:
-
The link to the corresponding Test Run in qTest Manager is put in the Description field.
-
Links to the associated Rally User Story and Test Case.
 You can download the browser plugins for the supported browsers from the qTest Resources page.
Review Rally Defects in Manager
In qTest Test Execution, you can find Rally Defect information in many areas:
Test Run page
To view Rally Defects in a particular Test Log, select the Defect icon from the Execution History grid.
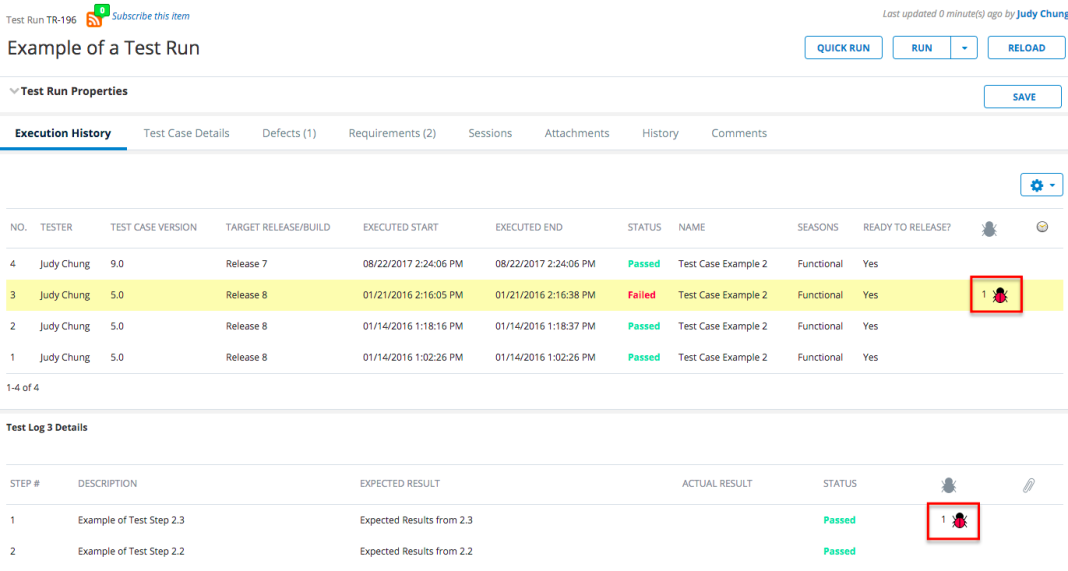
For an aggregate list, select the Defects tab for a roll-up of all Rally Defects related to any of the test logs of the Test Run. The Defects tab can be customized so you can display additional RallyDefect fields as columns.
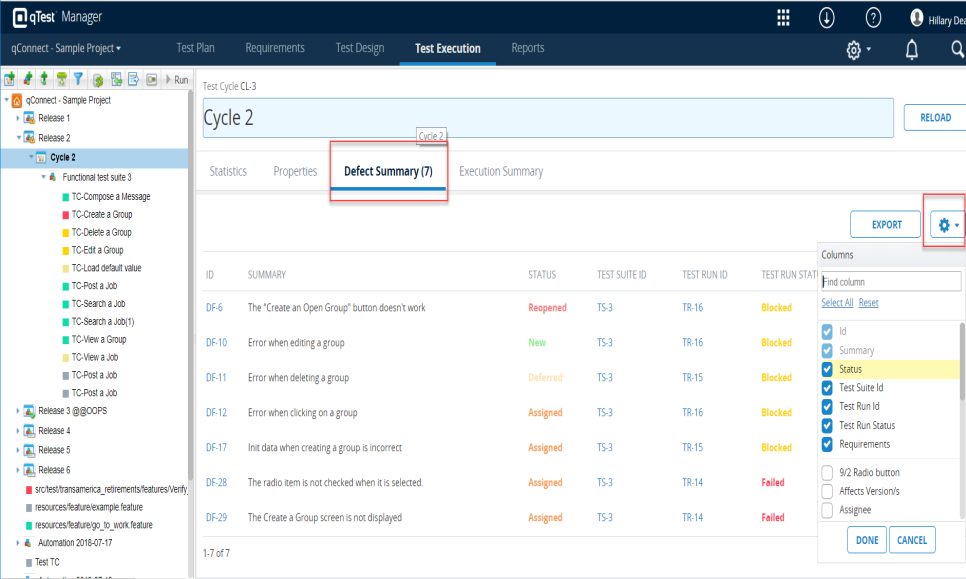
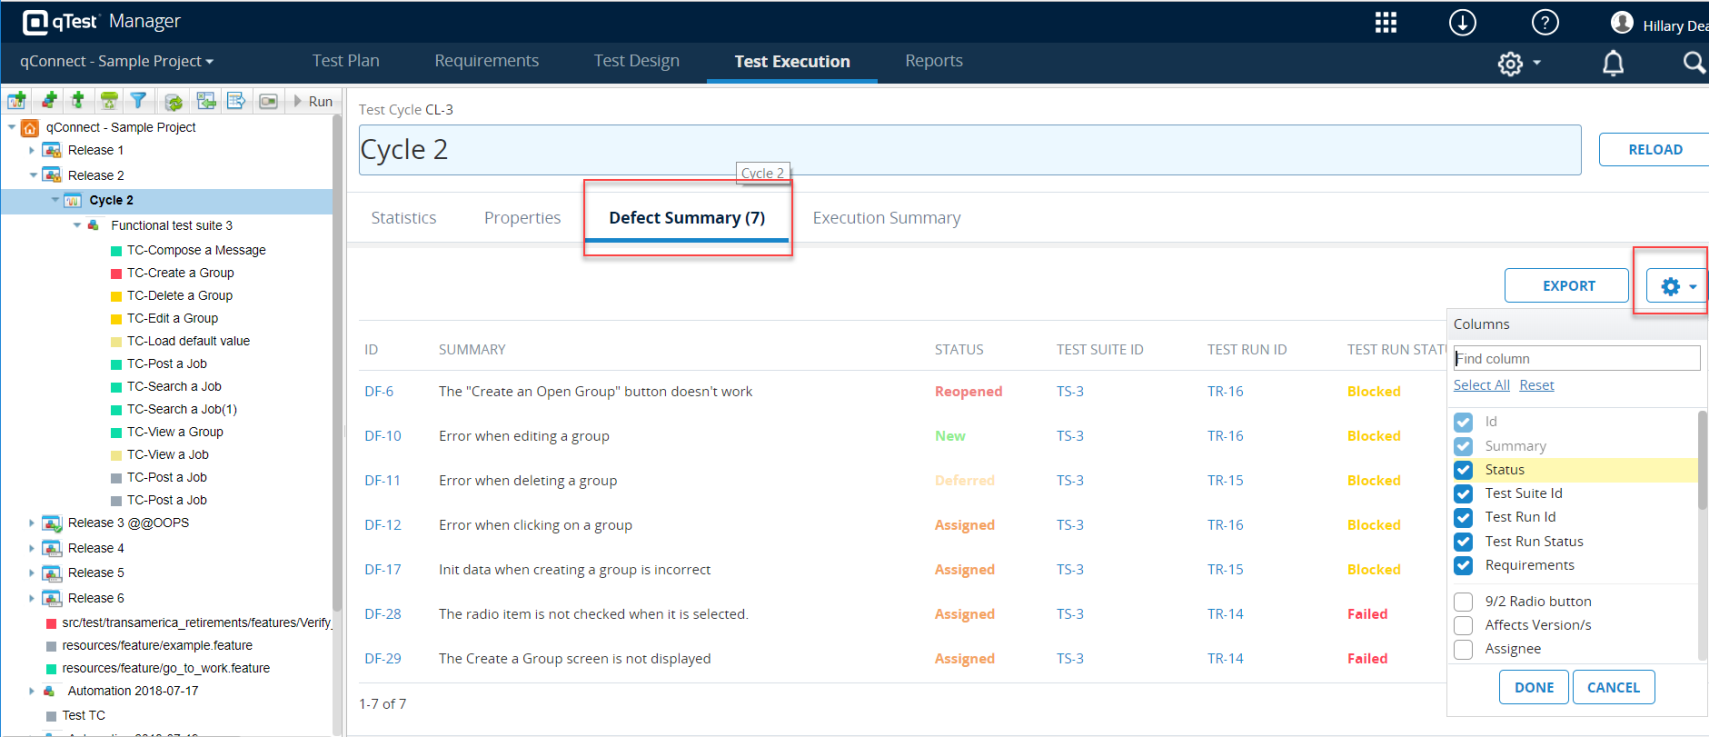
Test Suite, Cycle, and Release pages:
To view Rally Defects for a single Test Run, select the Defect icon from the Test Run grid.
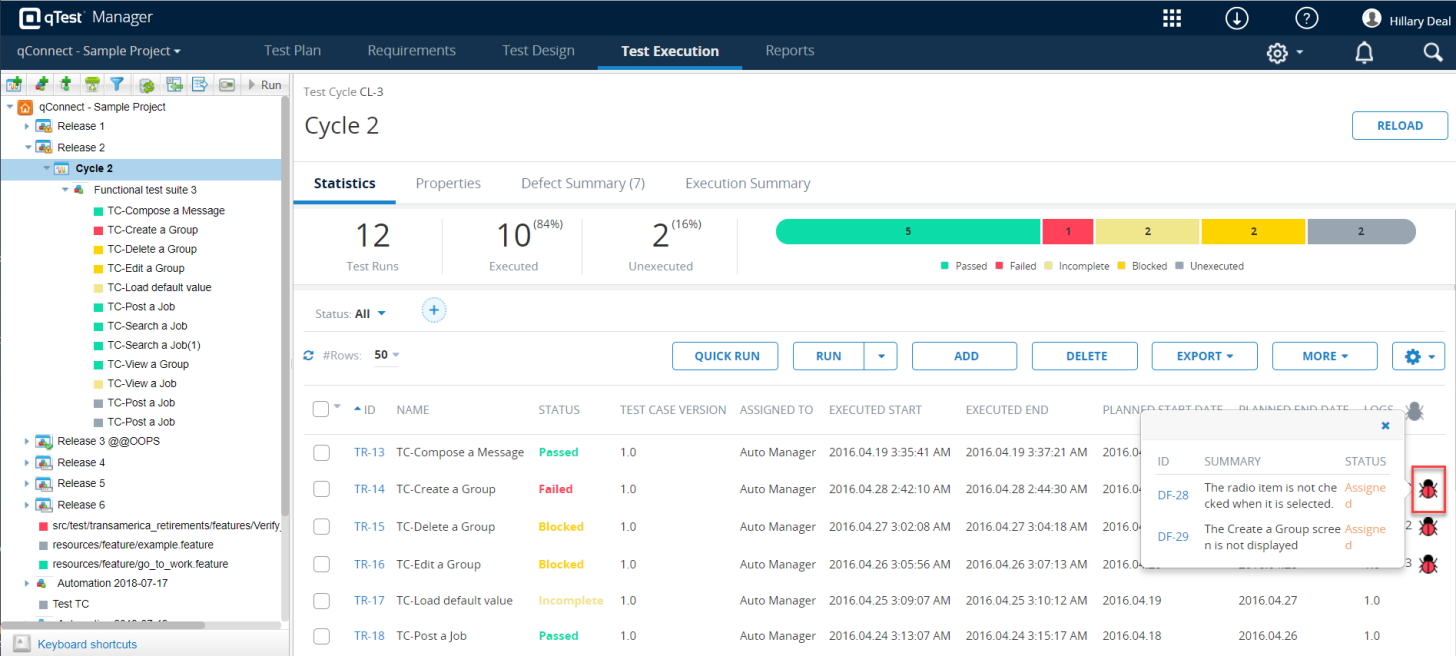
For an aggregate list, select the Defect Summary tab for a roll-up of all Rally Defects related to associated Test Runs. This Defect Summary tab can be customized so that you can display additional RallyDefect fields as columns.
For advanced reporting, use qTestInsights to gain more Defect visibility.