Reusing Test Cases
Testers can reuse Test Cases in a variety of different ways to both save time and make it easier to maintain information over time. Below is a summary of the different options:
-
Calling Test Cases: Also known as "shared steps" or "embedded tests" in which you can reuse existing Test Cases within one another.
-
Copying Test Steps: A one-time copy and paste of Test Steps. You can copy steps into the same Test Case or another Test Case (within the same project).
-
Copying Test Cases: A one-time copy and paste of Test Cases or folder(s) of Tests. A Test Case can be pasted into the same project or another project.
-
Moving Test Cases: Cut and paste or drag and drop Test Case(s) or folder(s) of Test Cases (within the same project).
-
Sharing Test Cases: Manage a centralized repository of Test Cases in the Test Design module of one project and create Test Runs in the Test Execution module of a different project.
Calling Test Cases
qTest Manager allows you to insert one Test Case into another Test Case. This is known as calling a Test Case. Users call Test Cases so that the Test Case can be used in numerous other tests within the same project. A classic example is a Test Case to log into an application.
The calling Test Case function is beneficial for the following reasons:
-
Saves time: Instead of entering the steps in every Test Case that calls upon the Called Test Case, the common steps are entered into a single Test Case.
-
Maintains consistency: If a called Test Case must be updated, you can update the called Test Case in a single place. As a result, all other Test Cases that call upon that Called Test Case will have the updated information.
Create a "Login Process" Called Test Case
-
Select Test Design.
-
Select the Test Case in which you want to make your Login Process Called Test Case.
-
In the "Test Steps" section of the page, select the Test Steps that you want to associate with your Called Test Case.
-
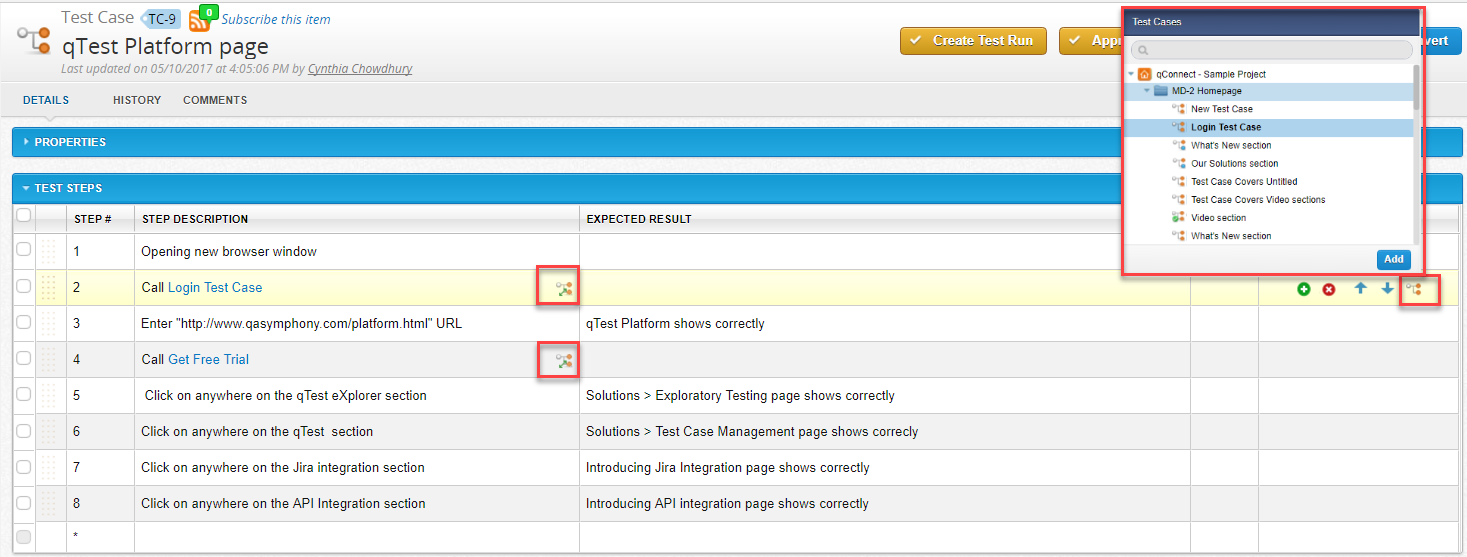
Under the Action column (the Wrench icon), select the Test Case icon.
-
The "Test Cases" dialog displays. Select the Test Case you want to insert. Select Add.
A Test Case cannot Call upon itself.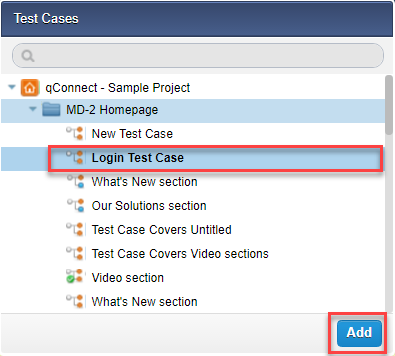
 If you look at the step that contains the inserted Test Case, you can click the hyperlink to display the inserted Test Case. The individual steps for the called Test Case are not displayed on this page in the Test Design module. When you add a Test Run in the Test Execution module and select the Run icon, the individual steps of the called Test Case are displayed in the TestPad as well as the steps of the actual Test Case.
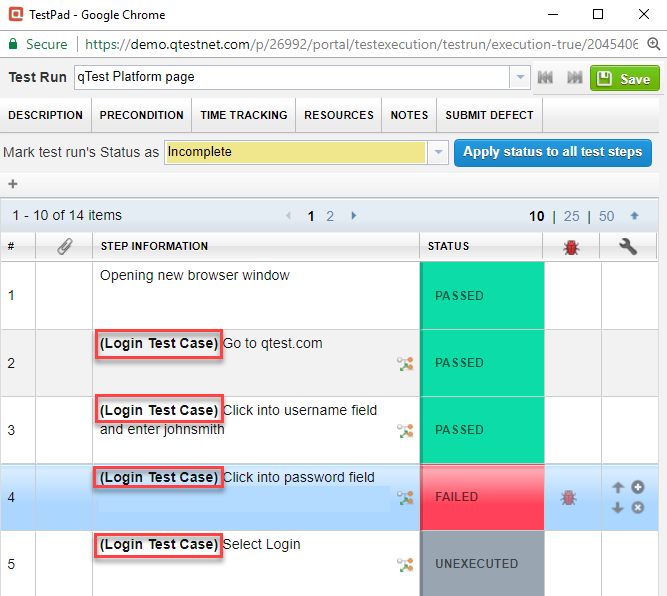
Hints:
-
Called Test Cases can be copied to the same or different Test Cases in a project, but NOT across projects.
-
A Test Case cannot call itself either directly or indirectly.
-
Only Approved Test Cases can be called by another Test Case.
-
A Test Case can call the same Test Case in different Test Steps.
Try This: Call a Test Case For Your Second Test Step
Note: Watch this video in full-screen mode for highest quality.
Copying Test Steps
qTest Manager allows you to copy and paste Test Steps within the same Test Case or to different Test Cases.
Copy and Paste Test Steps Within the Same Test Case
-
Select consecutive or non-consecutive Test Steps in a Test Case.
-
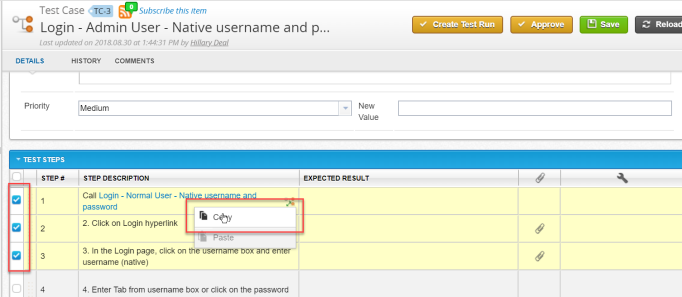
Right-click on the selected Test Steps and select the Copy option.
-
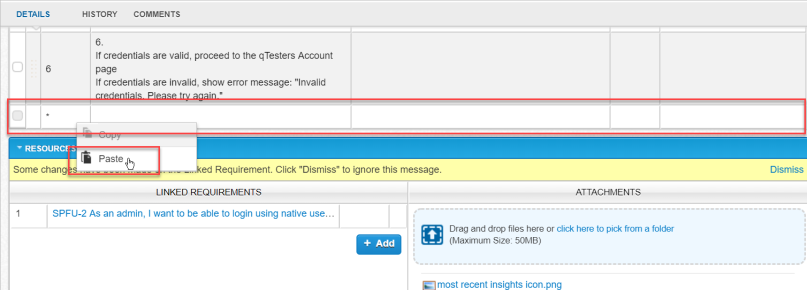
Right-click on the destination row in the same Test Case and select the Paste option. The copied Test Steps will be inserted below the selected row in the order of the selected Test Steps.
Copy and Paste Test Steps to different Test Cases
-
Select consecutive or non-consecutive Test Steps in a Test Case.
-
Right-click on the selected Test Steps and select Copy.
-
In the Navigation Panel, select a different Test Case in which you want to Paste your Test Steps.
-
In the "Test Steps" section of the Test Case, right-click in the destination row. Select the Paste option. The copied Test Steps will be inserted below the selected row in the order in which the Test Steps had been selected.

Copying Test Cases
Test Case(s) or folder(s) of Test Cases can be copied into the same project or another project. This function works as a one-time copy so that the duplicate sets of Test Cases(s) act independently going forward. In other words, after the copy and paste, any changes performed on the original Test Case will not be reflected in the Test Case's copy.
To copy a Test Case from one project to another project, perform the following steps:
-
Select the project from which you will copy a Test Case.
-
Select the Test Design. The Test Design page is displayed.
-
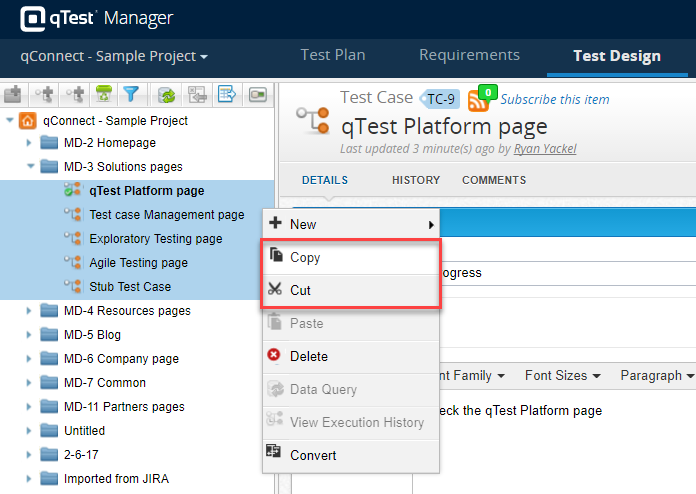
In the left Navigation panel, select the Test Case that you want to copy.
-
Right-click, and select copy.
-
If you wish to paste the Test Case into another project, select the different project.
-
Select Test Design.
-
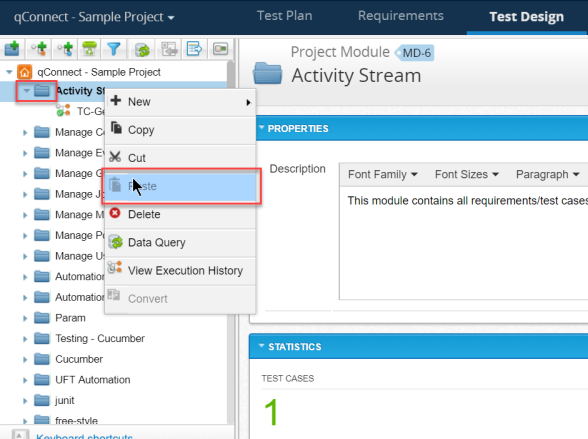
In the left Navigation panel, select the folder into which you will copy the Test Case. Right-click, and select Paste.
 If changes are made to the Test Case at a later date, the copied Test Case will not inherit these changes.You can also copy a folder of Test Cases in one project into another project. In this instance, you would select the applicable project, then select the folder in the left panel, choose the Copy option from the drop-down menu, select the project into which you will copy the folder of Test Cases, select the Test Design object, and paste the Test Cases into a folder in the project.
Moving Test Cases
This function allows you to move a Test Case to another folder within the same project. This can be accomplished by using the right-click Context Menu or by using the Drag & Drop function. Note: To move Test Cases, you need Create/Edit Test Cases permissions.
Cut/Paste Test Cases using Context Menu
-
In Test Design, select one or multiple Test Cases from the left navigation panel. You can use SHIFT or CTRL to select multiple Test Cases.
-
Right-click and select Cut.
-
Select a destination (e.g., root or a folder), right-click, and select Paste.
Move Test Cases using Drag & Drop function
-
In Test Design, select the Test Cases that you want to move in the navigation panel.
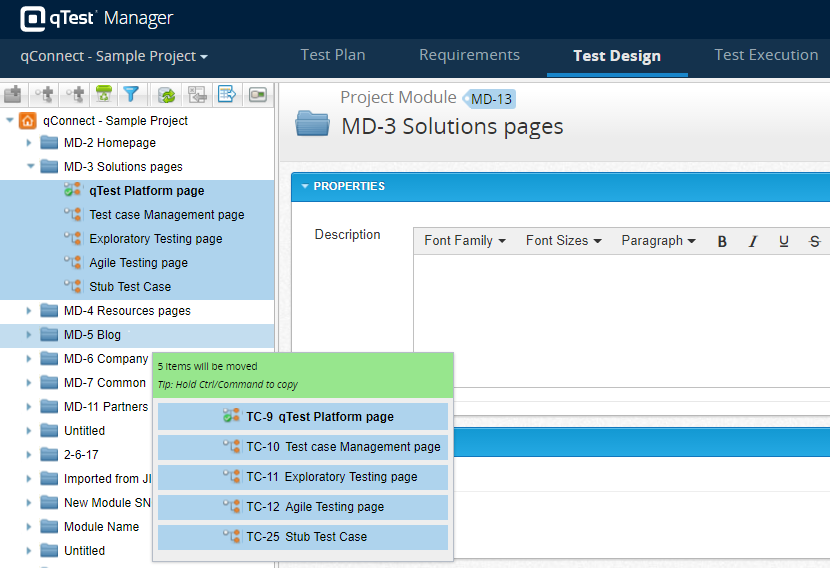
You can select individual Test Cases, multiple Test Cases, or Modules containing multiple Test Cases. To select multiple objects, hold down the SHIFT or CTRL key, and select objects. -
Drag the selected objects, and drop them in the destination (e.g., root or a folder).
HINTS:
-
All sub-Modules or objects under copied/moved Modules will also be copied/moved.
-
You can reorder the structure of the Module using the Drag & Drop nesting function to move modules to any position beyond root and Modules.
-
If you copy or move a parent Module with its sub-Modules to the root, all belonging sub-Modules will be copied or moved to the same level as the parent Module.
Sharing Test Cases With Another Project
Another way to use Test Cases from another project is by sharing a Test Case for Test Execution. This function is used to create a Test Run in one project using a Test Case shared by another project.
Note: There is a difference between copying a Test Case and sharing a Test Case. When a Test Case is copied, the result is two Test Cases, one in the original project and a second Test Case in the project where it is copied. When a Test Case is shared, there is one test case, and it resides in the original project while also affecting the project with which it is shared. The benefit of sharing a Test Case is that any updates made to the Test Case after it is shared are inherited by the project where the Test Case resides, as well as by the project that has borrowed the Test Case.
Activate Test Case Sharing
-
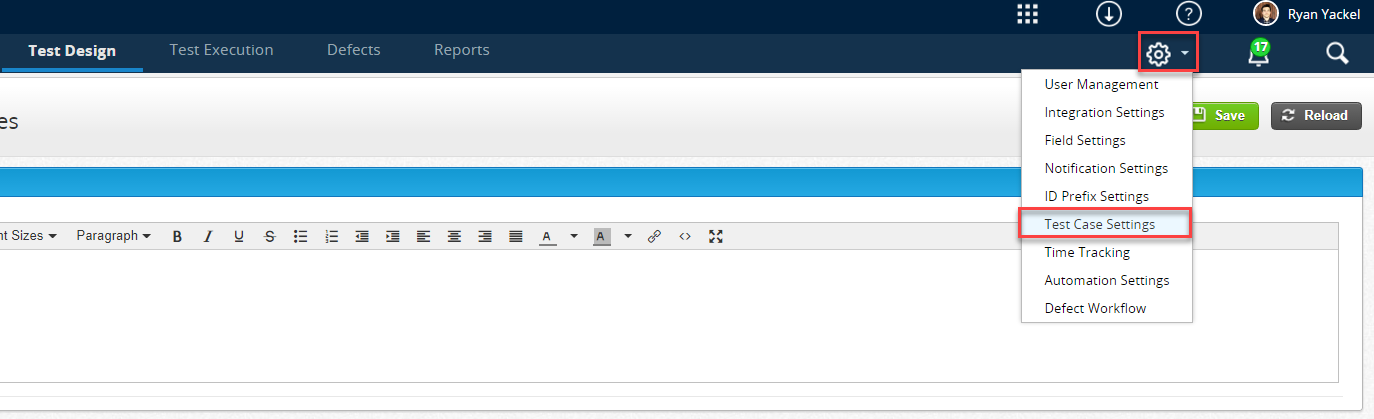
Select the project where the Test Case originates. Select the Gear icon.
-
Select the Test Case Settings option from the drop-down menu. The Test Case Settings screen displays.
 HINT: Test Case settings are made on a per-project basis.
 -
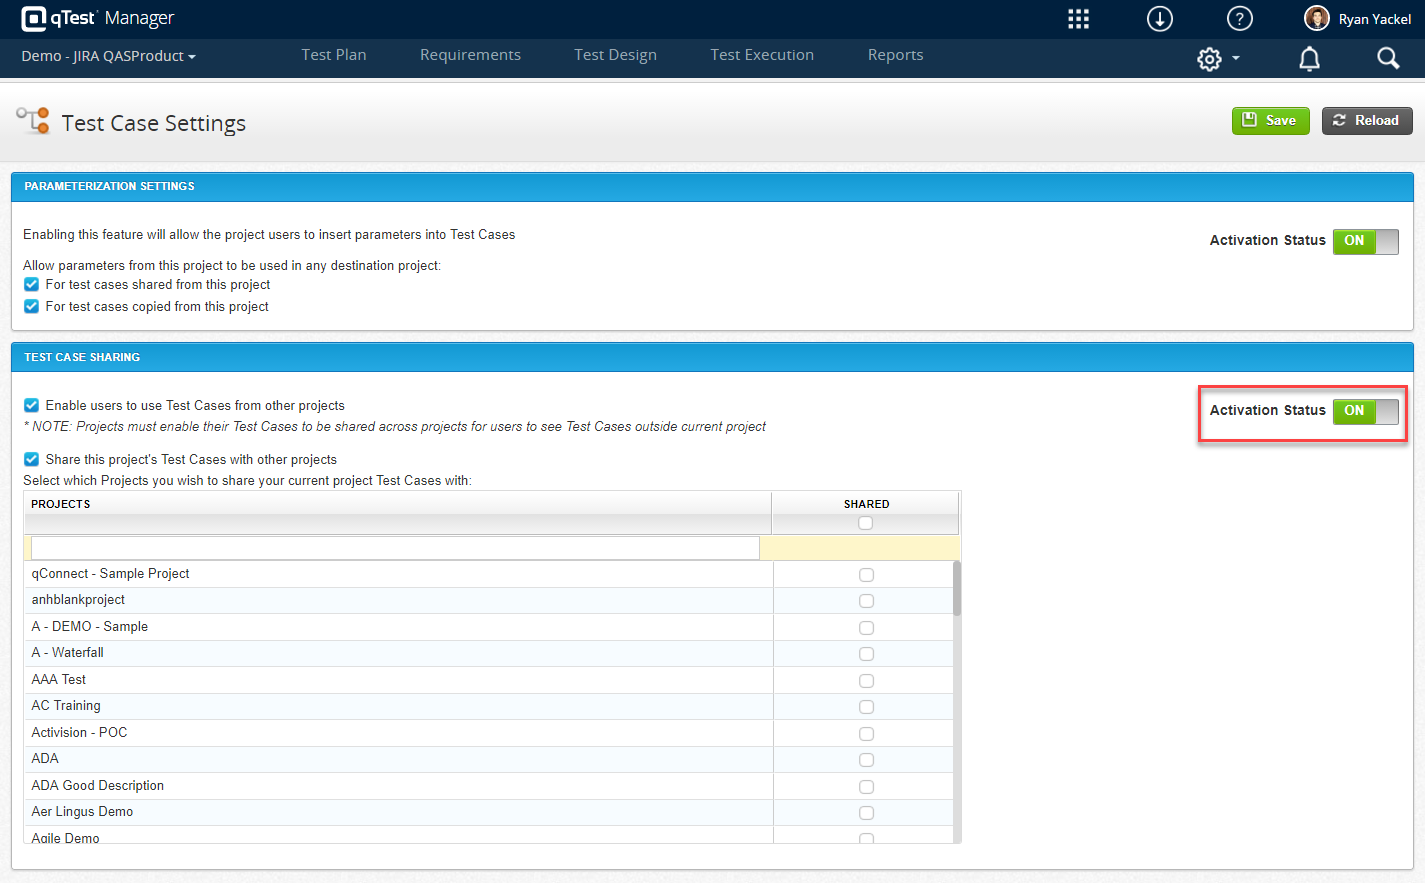
Refer to the "Test Case Sharing" area of the screen. Then, select the Activation Status icon located on the right side of the screen to turn the Activation Status ON.
-
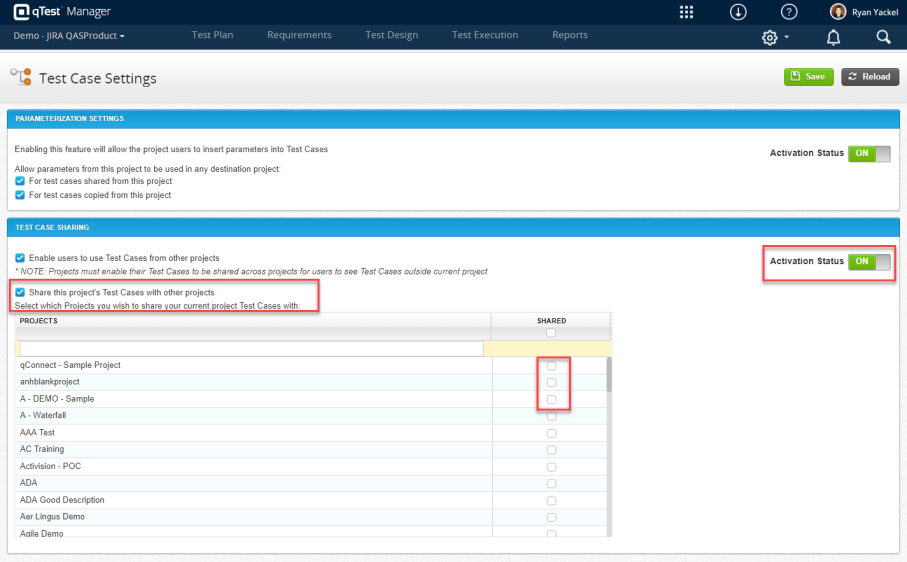
Select the boxes associated with "Activation Status," "Enable Users to use Test Cases from other projects," and "Share this project’s Test Cases with other projects."
-
In the "Projects" field, select the project you want to borrow this project’s Test Case(s).
-
Select the Save icon. The Confirmation dialog displays. Select Refresh.
-
Select Save.
Share Test Cases
-
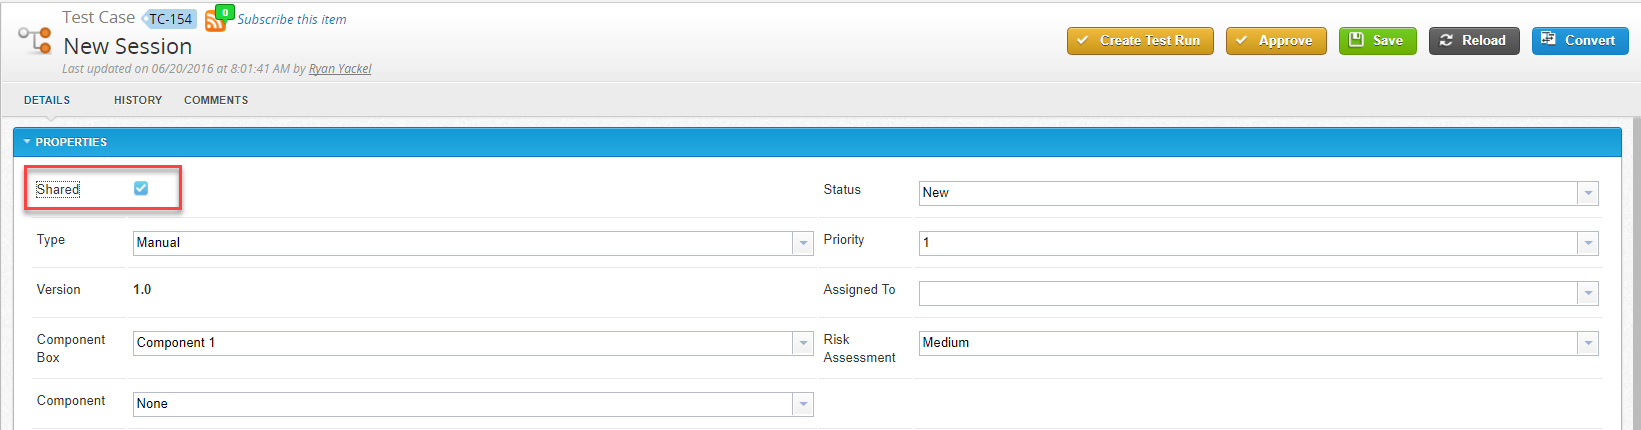
Select the project where the Test Case that you will share originates. Select Test Design.
-
From the left navigation panel, either select a Test Case or a folder of Test Cases you will share. The ‘Shared’ checkbox, located in the top of the Properties area of the screen, is checked indicating this Test Case (or folder of Test Cases) can be shared with other projects.
 NEXT STEPS: See the article Add Test Run using Test Case from Another Project
IMPORTANT:
-
If a Test Run has been created off of a shared Test Case, it cannot be edited via the TestPad. We do not allow to edit shared Test Cases. Test Cases are shared for execution only. The limitation is that the system cannot check user permissions across projects while editing Test Cases in TestPad.
-
A shared Test Case needs to be approved at least once so that other projects' users can create Test Runs from it.
-
When a Test Case is unshared, its associated Test Runs in other projects will become read-only and unexecutable.
-
You cannot automate a shared Test Case/Run.
Shared Test Cases are only executable manually through the TestPad. You cannot execute them through our API, so Launch/Automation Host cannot touch them.
Our API locates a Test Run by matching the Automation Content’s value in your JSON payload to the Automation Content of the Test Case. All of our endpoints require a project ID in the URI, so you are only going to scan the specified project for a matching Test Case.
You can also tell that the shared Test Case isn’t supported because the Test Run will have the Automation Content stripped from it after it is shared to another project.
HINTS:
-
When you share a Module, its sub-Modules are automatically shared. If you are granted Edit Test Cases permission, the existing Test Case under the Module is also shared.
-
When you create a new Test Case or a sub-Module under a shared Test Case, it is shared by default and you can unshare it.
-
When you copy/move Modules or Test Cases into a shared Module, the system will ask if you want to share them.
-
When you unshare a Module, the system will ask if you want to automatically unshare its sub-Modules and Test Cases. If you are not granted with Edit Test Cases permission, the Test Cases will not be unshared.
-
When a Test Case is unshared, its associated Test Runs in other projects will become read-only and unexecutable.
Add Test Runs using Test Case from Another Project
The steps needed to setup this functionality are now complete. Once you have shared a Test Case, you can use the shared Test Case when you add a Test Run. See Add Test Run using Test Case from Another Project.