Connect to Jira Cloud
qTest offers a seamless connection between qTest SaaS and your Jira Cloud instance. There are two ways to establish this connection: using an API token and using an OAuth token.
This article will walk you through how to set up and configure this connection using both methods.
Prerequisite Information
Before configuring your connection, you must first install the free Jira Integration: qTest Enterprise add-on from the Atlassian Marketplace.
Configure Jira Cloud with the API Token
Create a New Jira Cloud Connection with the API Token Video
Create a New Jira Cloud Connection with the API Token
Follow these steps to configure a connection between Jira Cloud and qTest using the API token.
-
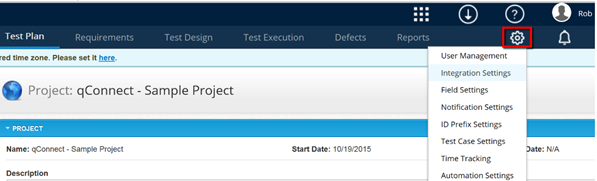
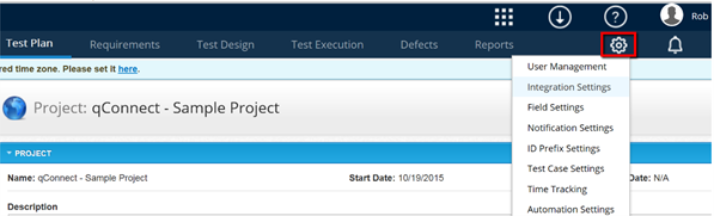
Navigate to the qTest project, and select the gear icon in the toolbar.
-
Select Integration Settings. The Configure Integrations page displays.
-
Select Jira in the External Systems panel. The Configure Integration: Jira page displays
-
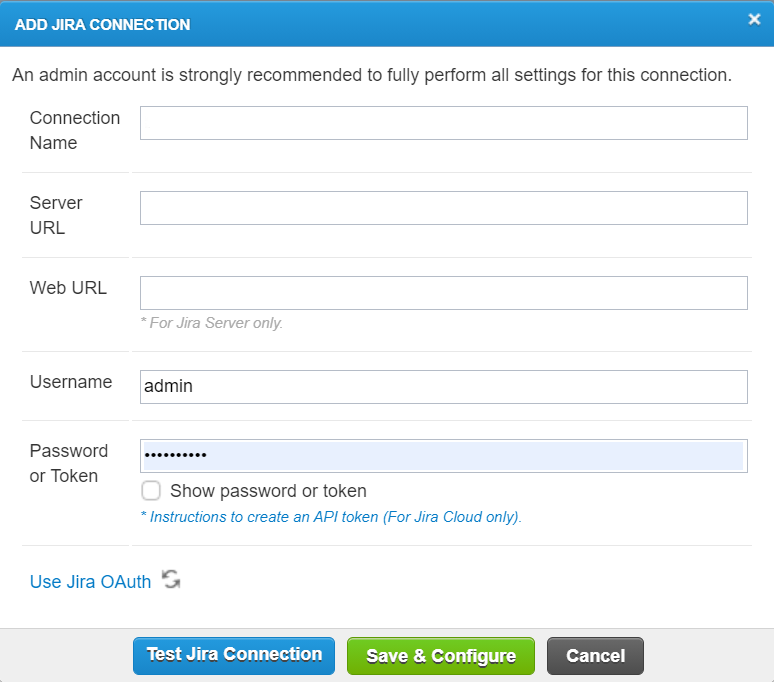
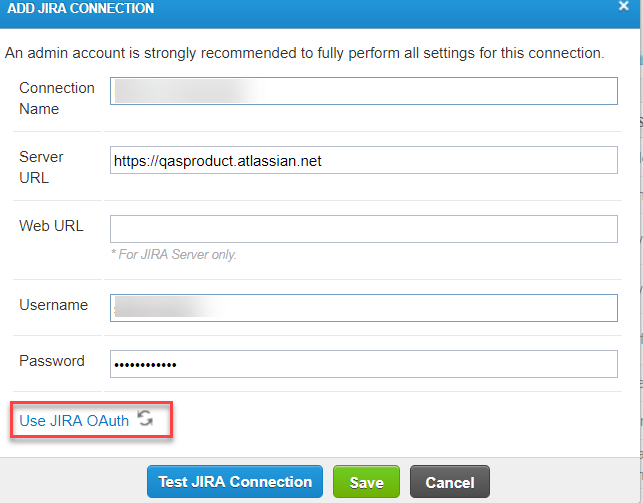
Select Add Jira Connection. The Add Jira Connection page is displayed.
-
Enter information in the fields as described below:
-
Connection Name: Enter a name that represents your Jira instance.
-
Server URL: Enter the URL of your Jira instance.
-
Web URL: This field is only needed when setting up the connection between qTest Manager and Jira Server.
-
Username: Enter a Jira Global Admin username in this field. A global administrator in Jira is the same as a site administrator. For information on setting up Jira administrator permissions, refer to Manage Jira Global Permissions.
-
Password or Token: A connection can be established using a Jira Token or the Jira username/password of a Jira Global Admin. However, Atlassian is deprecating the username/password authentication option on December 1, 2018. For more information, refer to the following Atlassian Announcement: Deprecation Notice.
-
-
After entering the Jira connection details, select Test Jira Connection.
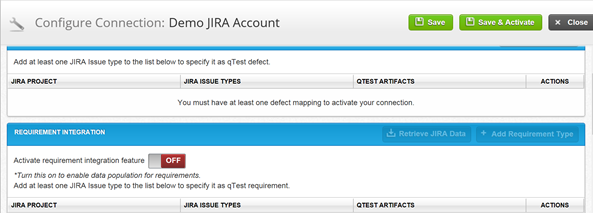
If the connection between qTest Manager and Jira is successful, the following message is displayed: "Connected to the server successfully." - Select Save and Configure.
The Configure Connection page displays. From this screen, you can both configure Defect integration with Jira and import requirements from Jira.
Edit an Existing Jira Cloud Connection to use the API Token
If you are editing an existing integration, connection follow these instructions:
-
Navigate to the qTest project, and select the gear icon in the toolbar.
-
Select Integration Settings. The Configure Integrations page displays.
-
Select Jira in the External Systems panel. The Configure Integration: Jira page displays
-
In the Connection Name column, select the blue hyperlink of your Jira Integration name.
-
The Add Jira Connection dialog opens, and select the blue hyperlink for 'Instructions to create an API token' which redirects you to the Atlassian instructions.
-
Once you retrieve the API Token, enter it in the Password or Token field.
-
Select the Test Jira Connection icon.
-
When the connection is tested, you can select Save and Configure.
The Configure Connection page displays. From this screen, you can both configure Defect integration with Jira and import Requirements from Jira.
Configure Jira Cloud with OAuth Token
Configure Jira Cloud Integration with OAuth Token Video
Configure Jira Cloud to Use OAuth
The following procedure is an alternative way to allow qTest Manager and the Jira cloud application to connect.
-
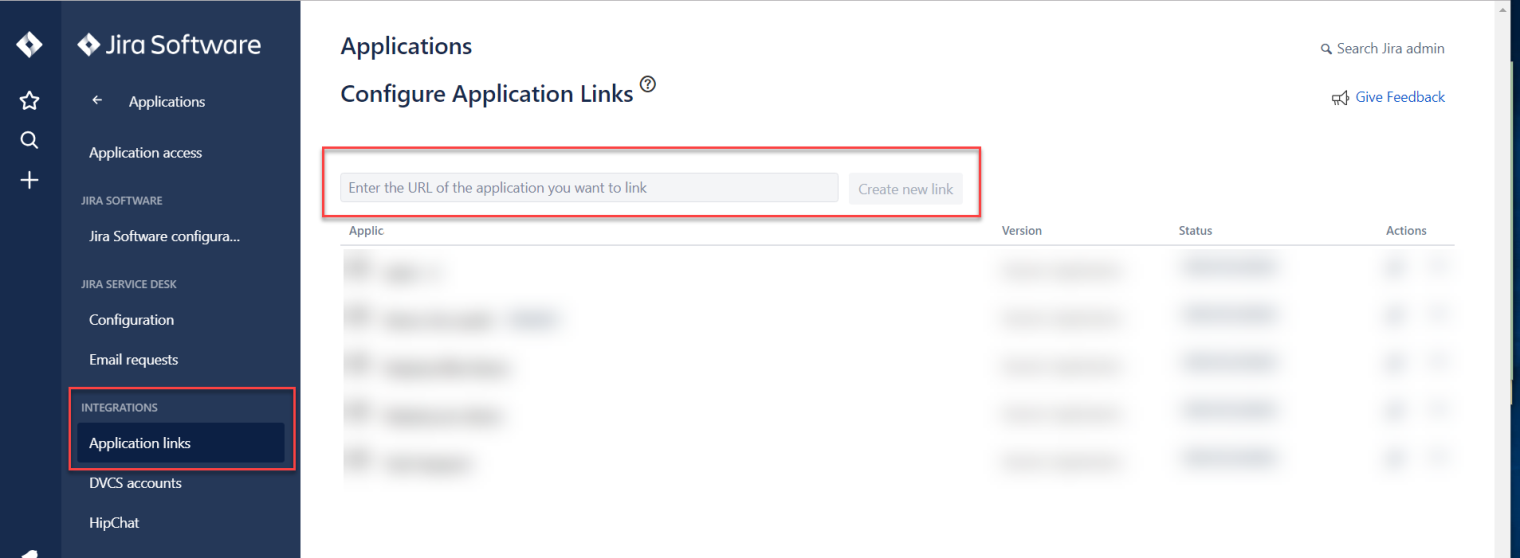
From your Jira instance, select Jira settings in the left navigation pane.
-
The navigation pane updates, and select Applications.
-
The navigation pane updates again, and select Applications links in the Integrations section of the navigation pane.
-
The Configure Application Links page loads.
-
To create a new application link, enter your qTest Manager instance’s URL in the text field and select the Create new link icon.
-
The Create link window displays. Under Application type, select Atlassian product.
-
Make sure you have the correct URL for the qTest instance you are connecting in the Application URL field before you select Continue.
-
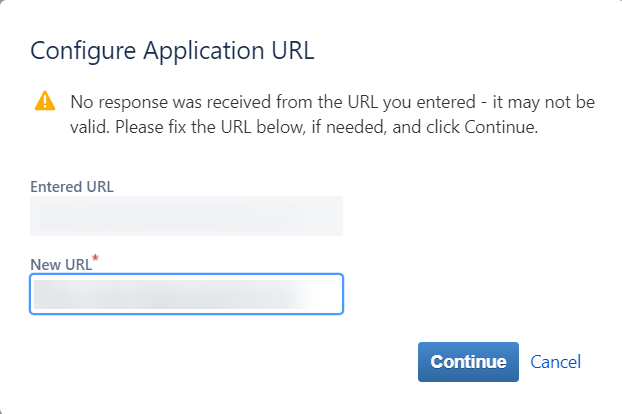
When Configure Application URL window loads, select Continue. If you receive an error message, as seen in the screenshot below, select Continue a second time and you will be directed to the next screen.
-
After the link is created, the Link applications pop-up opens.
-
Enter a name in the Application Name field.
-
The Application Type will default to Generic Application. Do not change this.
-
Select Continue (as no other fields are required for connection on this pop-up).
-
A 'Processing' message will appear, and once completed you will be sent back to the Configure Application links screen and receive an "Application Link your application name here> created successfully" message.
-
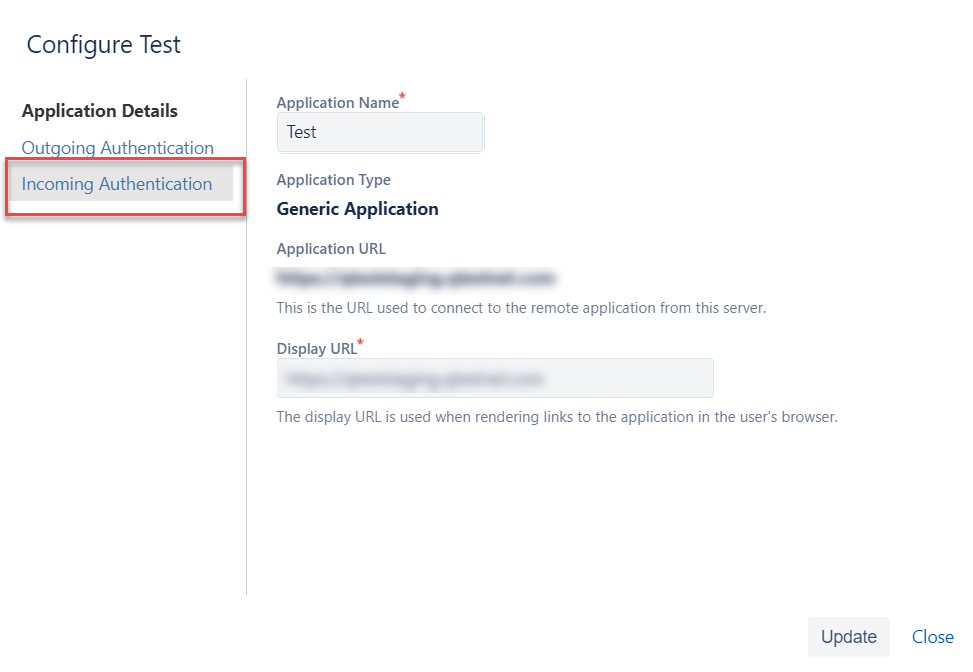
Locate the application you just created, and in the Action column, select the pencil icon to edit.
-
The Configure application pop-up opens and select the Incoming Authentication tab.
-
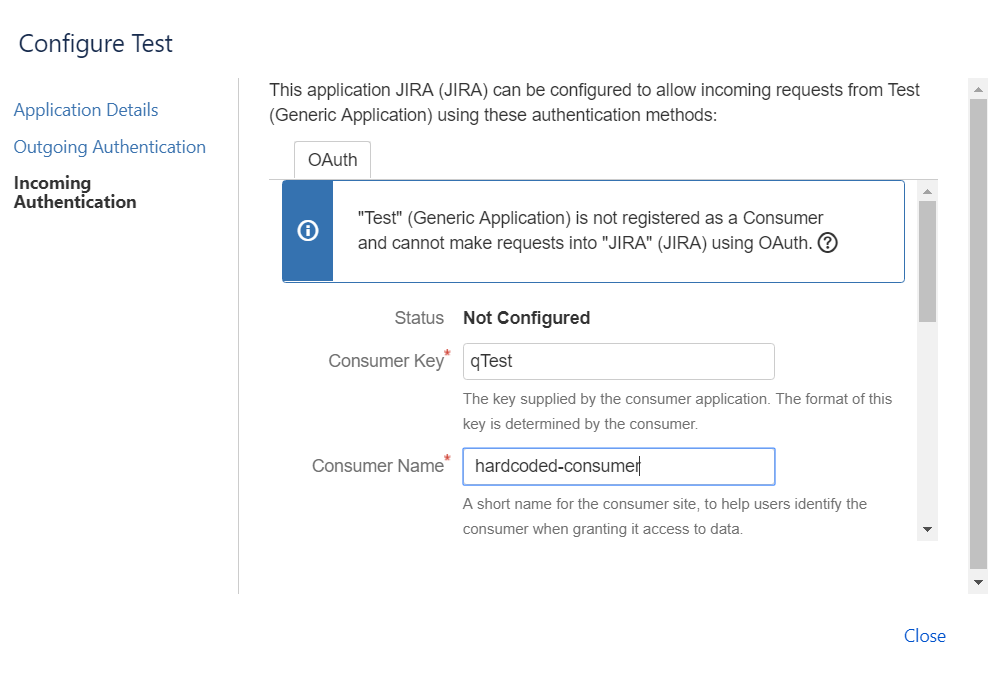
In the Incoming Authentication tab, and enter the following values in the required fields:
-
Consumer Key: qTest
-
Consumer Name: hardcoded-consumer
-
Public Key:
CopyMIIBIjANBgkqhkiG9w0BAQEFAAOCAQ8AMIIBCgKCAQEAxZDzGUGk6rElyPm0iOua0lWg84nOlhQN1gmTFTIu5WFyQFHZF6OA4HX7xATttQZ6N21yKMakuNdRvEudyN/coUqe89r3Ae+rkEIn4tCxGpJWX205xVF3Cgsn8ICj6dLUFQPiWXouoZ7HG0sPKhCLXXOvUXmekivtyx4bxVFD9Zy4SQ7IHTx0V0pZYGc6r1gF0LqRmGVQDaQSbivigH4mlVwoAO9Tfccf+V00hYuSvntU+B1ZygMw2rAFLezJmnftTxPuehqWu9xS5NVsPsWgBL7LOi3oY8lhzOYjbMKDWM6zUtpOmWJA52cVJW6zwxCxE28/592IARxlJcq14tjwYwIDAQAB
(Optional) If you want to use your own private key, you will need to update your Jira configuration to account for the new private key you uploaded in the Security tab of Site Administration in qTest.
Existing OAuth users will need to complete the following if moving to the private key option:
-
Delete the current Incoming Authentication configuration in Jira.
-
Re-enter the Consumer Key, Consumer Name, and Public Key referenced above.
-
Save.
Create a New Jira Cloud Connection-OAuth Token
If you are creating a NEW integration connection follow these instructions. If you are editing an existing Jira integration connection, skip this section and read the "Edit an Existing Jira Cloud Connection to Use OAuth Token" section.
To create a new connection, follow these steps:
-
Navigate to the qTest project, and select the gear icon in the toolbar.
-
Select Integration Settings. The Configure Integrations page displays.
-
Select Jira in the External Systems panel. The Configure Integration: Jira page displays.
-
Select Add Connection. The Add Jira Connection page displays.
-
Enter the Connection Name and Server URL of your Jira instance.
Server URL is the base URL of your Jira instance and is found in your Jira System Settings. -
Select the Use Jira OAuth hyperlink and qTest will create an authorization URL.
-
Select the Authorize URL hyperlink and select Allow on the Welcome to Jira pop-up.
-
An 'Access Approved' message will display and you will need to obtain the verification code from the text on the webpage.
-
Enter the Verification Code and select Submit.
If you are an existing OAuth user and want to use the private key option, you will need to reconfigure your Manager application and authorize the URL again with a new verification code.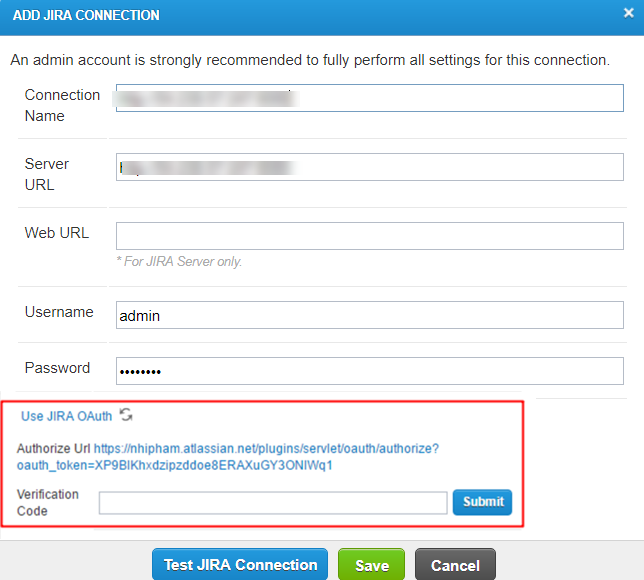
-
Once you submit the connection Information, select the Test Jira Connection button.
-
Once the connection is tested, you can select Save and Configure.
The Configure Connection page displays. From this screen, you can both configure Defect integration with Jira and import Requirements from Jira.
Edit an Existing Jira Cloud Connection to Use OAuth Token
If you are editing an existing integration connection, follow these instructions:
-
Navigate to the qTest project, and select the gear icon in the toolbar.
-
Select Integration Settings. The Configure Integrations page displays.
-
Select Jira in the External Systems panel. The Configure Integration: Jira page displays
-
In the Connection Name column, select the blue hyperlink of your Jira Integration name.
-
The Add Jira Connection dialog opens, and you will select the Use Jira OAuth icon.
-
Once you select the Use Jira OAuth hyperlink, qTest will create an authorization URL.
-
Select the Authorize URL hyperlink and choose Allow in the Welcome to Jira pop-up.
-
An 'Access Approved' message will display, and you will need to obtain the verification code from the text on the webpage.
-
Enter the Verification Code and select Submit.
If you are an existing OAuth user and want to use the private key option, you will need to reconfigure your Manager application and authorize the URL again with a new verification code. -
Once you submit the connection Information, select the Test Jira Connection button.
-
Once the connection is tested, you can select Save and Configure.
The Configure Connection page displays. From this screen, you can both configure Defect integration with Jira and import Requirements from Jira.