Site Fields
Managing fields for multiple projects can be done using Site Fields. You will create field templates and apply them to projects, which allows for simple bulk changes across your projects.
Why Use Site Fields?
Managing fields at the site-level standardizes testing across projects for enterprise-wide reporting with qTest Insights.
Prerequisites
In order to proceed with the Site Fields administrative features, the user must have the Manage Site-Level Field permission located in the Groups tab of the Administration screen. The system generated Administrators profile automatically includes this permission.
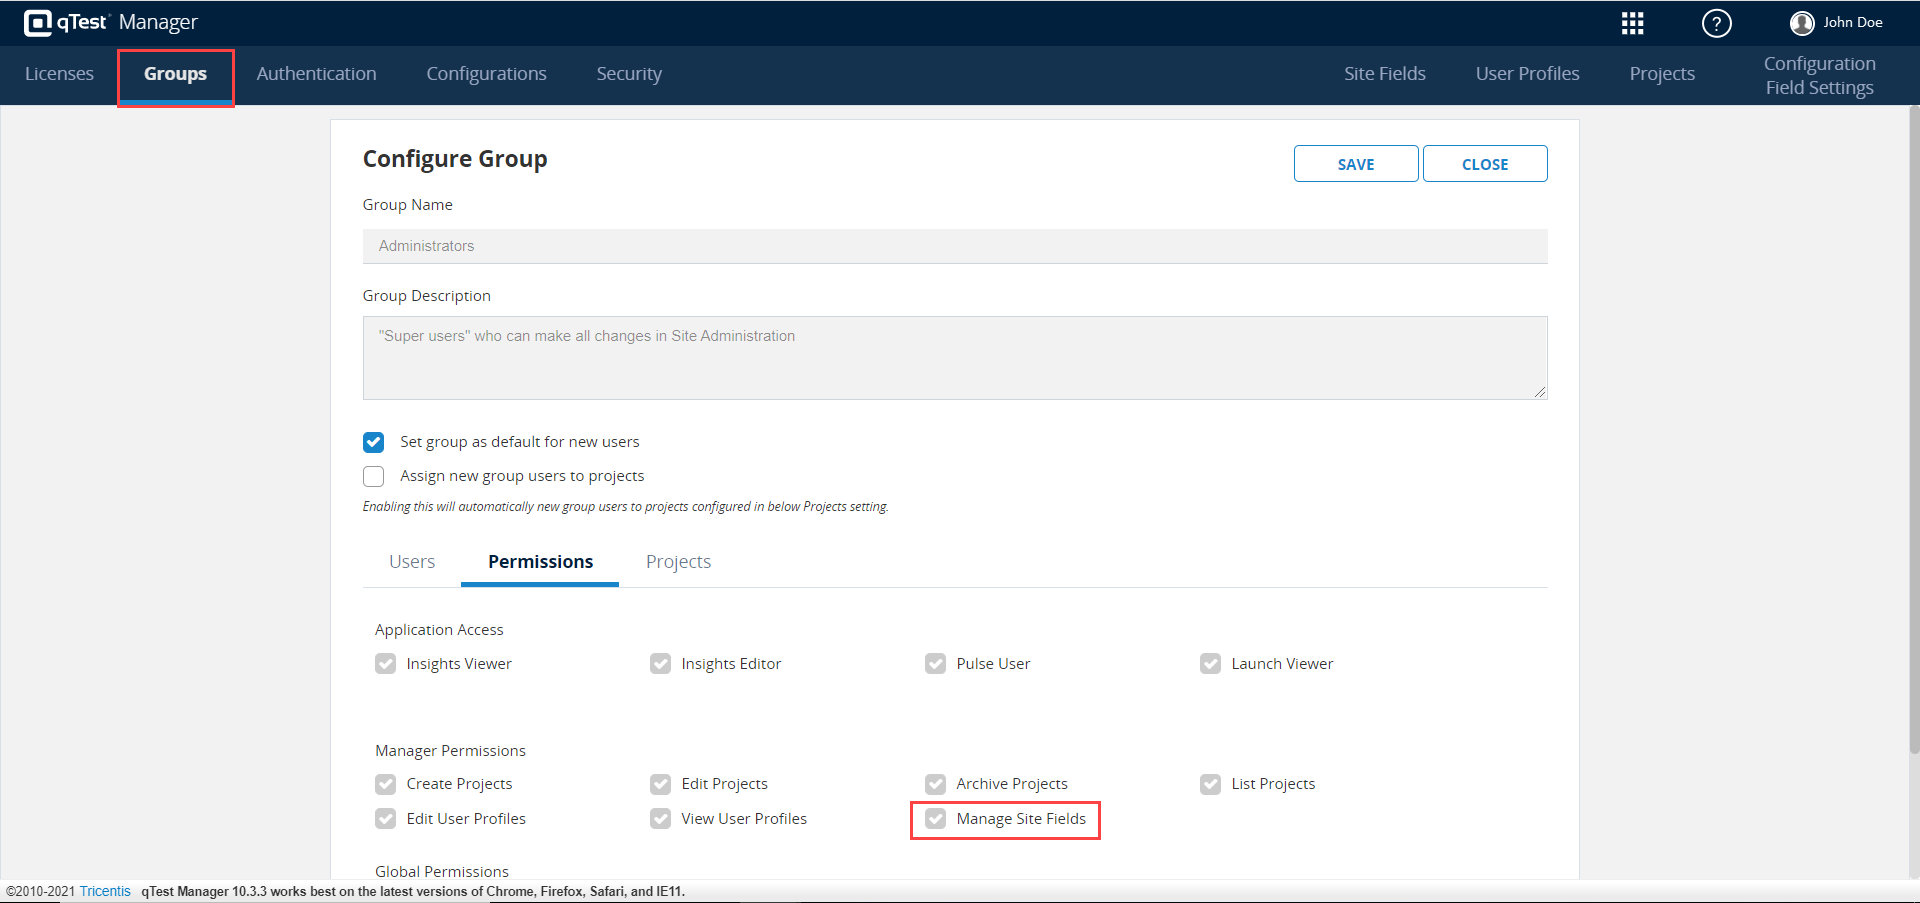
If you would like to grant this permission to a user who does not need other site administration permissions, you can create a custom Admin Profile with only the Manage Site-Level Field Settings permission.
Summary of Site Fields Process
-
Manage Site Fields: Create Site Fields and their values.
-
Build a Site Template: Select the Site Fields to include in the Template.
-
Review a project's Field Settings: Make any necessary changes in the project before you apply the Site Template to that project.
-
Apply the Site Field Template to the Project: The system detects any duplicate fields and allows you to review the suggested field merges before you confirm the changes.
Read below for details on each of these steps:
Manage Site Fields
The Manage Site Fields page is similar to a project's Field Settings. It displays a list of fields (system and custom fields) for each artifact type (Release, Test Case, etc.). Use the left navigation panel to switch from one object type to another. Within this page, you have the ability to:
-
Modify system fields
-
Create and modify custom fields
-
Define values for picklist type fields
-
Reorder fields
-
Unlike the Project Field Settings, you cannot deactivate a Site Field. Instead, you can choose to deactivate Site Fields within specific projects or delete the Site Field altogether.
However, once you have edited the Template's Site Field order and the Template is applied to a specific qTest Project, the field order will need to be changed at this specific qTest Project's level. Any further changes made at the Template level do not take precedence over changes made at the individual project level.
Clone Site Fields and Values from an Existing Project's Field Settings
-
If you would like to save time creating Site Fields, rather than creating these fields and values from scratch, you can clone Site Fields from an existing project following these steps: Navigate to Site Administration and select the Site Fields tab.
This page displays two sections:
-
Site Fields
-
Site Field Templates
-
-
Select Manage Site Fields in the Site Fields section.
-
Select Clone to Site and a pop-up dialog displays.
- Select the project with the fields you would like to clone.

Create Custom Site Fields and Values
To perform these types of actions, follow these steps:
-
Navigate to Site Administration and select the Site Fields tab.
-
In the Site Fields section, select Manage Site Fields.
-
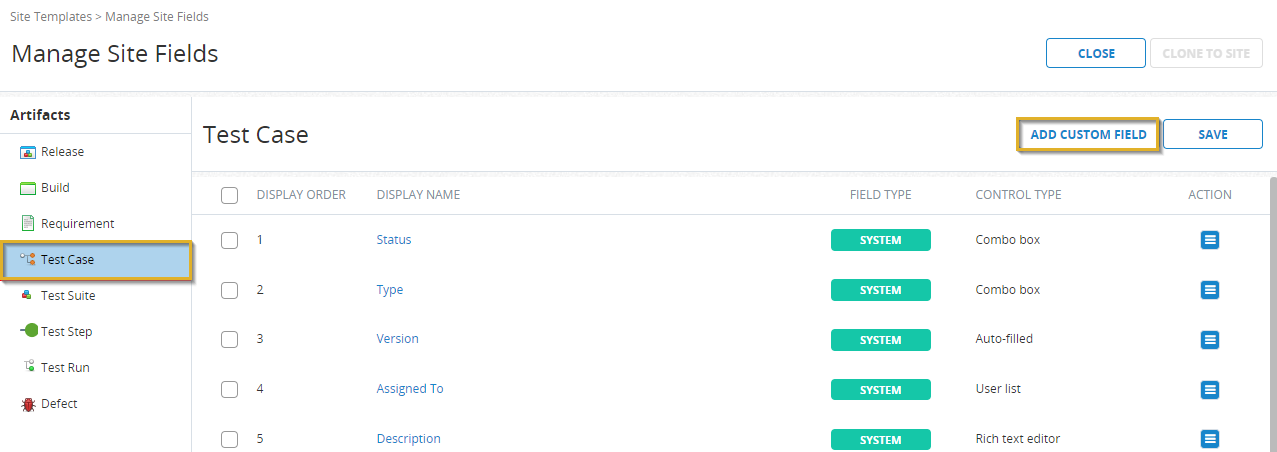
From the Artifacts menu, select where to add the new field to. You can add custom fields to any of the artifacts.
-
Select Add Custom Field and define your field name, field type, and values (for combo box fields).
-
Select the field name to modify an existing system or custom field. For example, you can change a field name, add/edit/remove values, or make the field required.
-
To re-order fields, use the Move Up or Move Down options in the Actions column.
To re-order fields in bulk, select the checkboxes next to the fields and drag and drop the row into your desired order.
Manage Field Templates
A Field Template is a grouping of Site Fields. You can add a Site Field to multiple Field Templates. Multiple projects can associate with a single Field Template, but a given project can only associate with Field Template.
View Existing Field Templates
In the Field Templates section, you can view the existing Field Templates and their relationships to projects.
The Sample Field Template has been generated by the system to serve as an example of how to use a field template. Consider this as a practice template. By default, the Sample Field Template includes all systems fields and does not associate with any projects. However, you can make changes to the Sample Field Template (such as add more fields, modify the template name) and apply it to projects to experiment with the Site Fields feature.
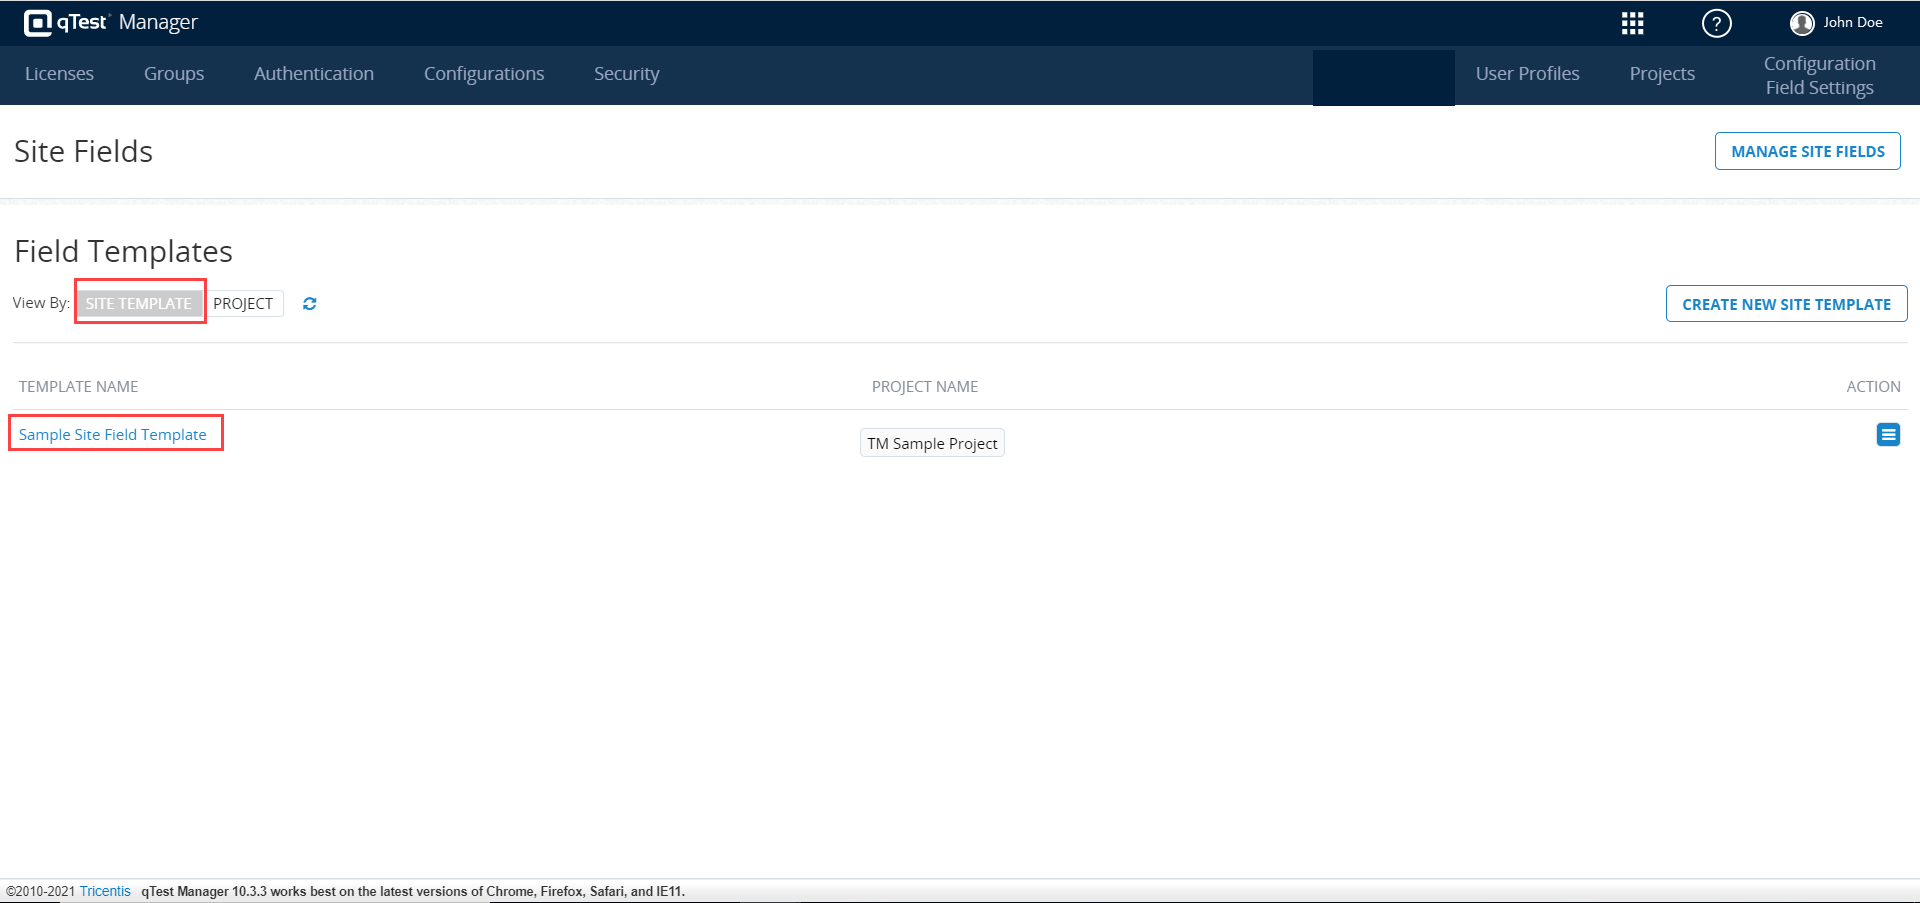
There are two ways to view your existing Field Templates. Select the View By option to either "view by template" or "view by project." When you view by project, all projects are displayed, including the projects not associated with templates.

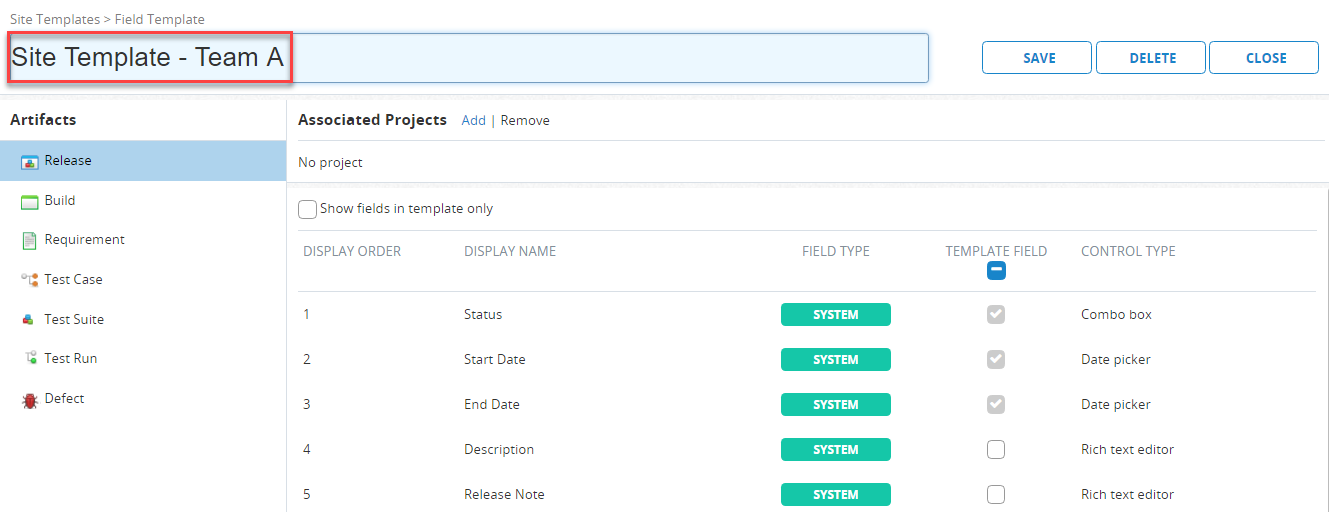
Create a New Field Template
-
From the Site Fields tab of Site Administration, select Create Template.
-
Input a Template name. The example below uses "Site Template - Team A" to eventually apply this template across three existing projects that all correspond to Team A (Team A - Project 1, Team A - Project 2, Team A - Project 3).
-
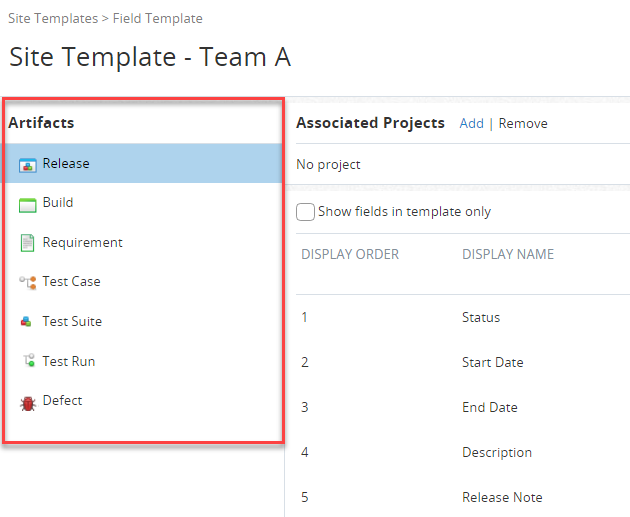
Browse through each object type by using the navigation panel on the left to see a list of all available Site Fields for each object type.
-
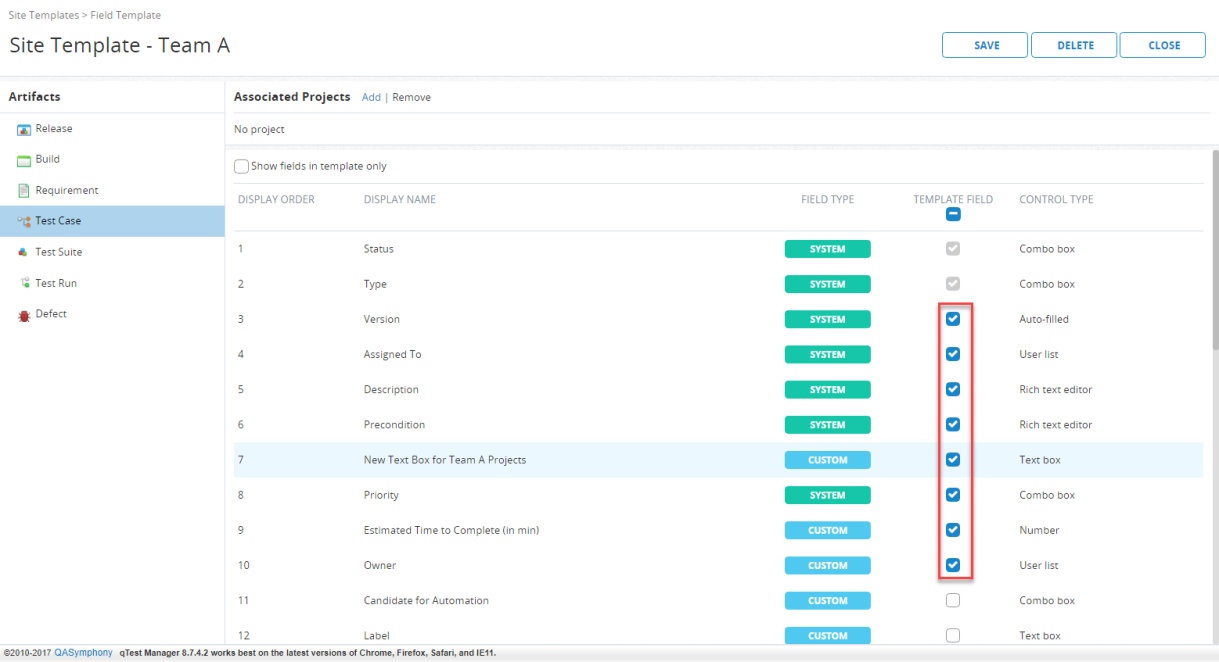
In order to include a Site Field to your Template, select the check box in the Template Field column. I also create a combo box called "New Textbox for Team A Projects" that I would like to standardize across all projects. Keep in mind that all Templates (Test Run Status) must include some system-generated Site Fields.
-
Once you finish selecting the Site Fields for this template, select Create to save the new template, or select Save if you edited the template.
View or Modify an Existing Field Template
-
From the Site Fields tab of Site Administration, click on the name of a Field Template. From the Field Template page, you can perform these actions:
-
Modify Field Template Name
-
Select Site Fields to include or exclude in the Field Template using the check box in the Template Field column.
-
Add projects to apply the Field Template (see section below called Apply Field Template to Project)
-
-
Once you finish making the changes to the Field Template, select Save.
-
If you do not apply the template to any projects, the template saves without any further steps.
-
If the Template associated with at least one project, you need to review the fields mapping (to compare any impacted project / Site fields) before confirming the changes.
Apply a Field Template to a Project
To ensure that the project fields are mapped and merged correctly, project administrators need to review the project's field settings before applying the Site Template to the project. It's important to make sure that the project field name and any values match up with the respective Site Field name and values, so that duplicate fields are adequately merged.
Example:
-
In Project P, F has 3 values V1, V2, and V3
-
In Site Fields, F has three values: V1, V2, and V4
If you select option 1, V3 is merged to the Site Field, which means F in Site Fields AND project P will then have 4 values V1, V2, V3 and V4.
If you select option 2, V3 is kept in Project P and it can only be used in P, which means F in Site Fields has 3 values (V1, V2, and V4) but it has 4 values in project P (V1, V2, V3 and V4). You cannot add more private values in project P after adding it to the template.
Method one:
-
From Administration, select the Site Fields tab.
-
The Site Fields page loads. Choose to "View By" Site Template.

-
Select the Template Name that you want to apply to a project.
-
Select the appropriate Artifact in the left column to locate the Site Field you want to mark as private.
-
The Template page displays. Next to Associated Projects, select Add.
-
On the Add Project Associations From this Template dialog, select your projects. Select Save.
Only projects that are not already associated with a Field Template are listed in this dialog. If the project is associated with a Field Template, and you want it to associate with a different Field Template, you must first remove the project from the original Field Template. Then, you can apply the preferred Field Template to that project. -
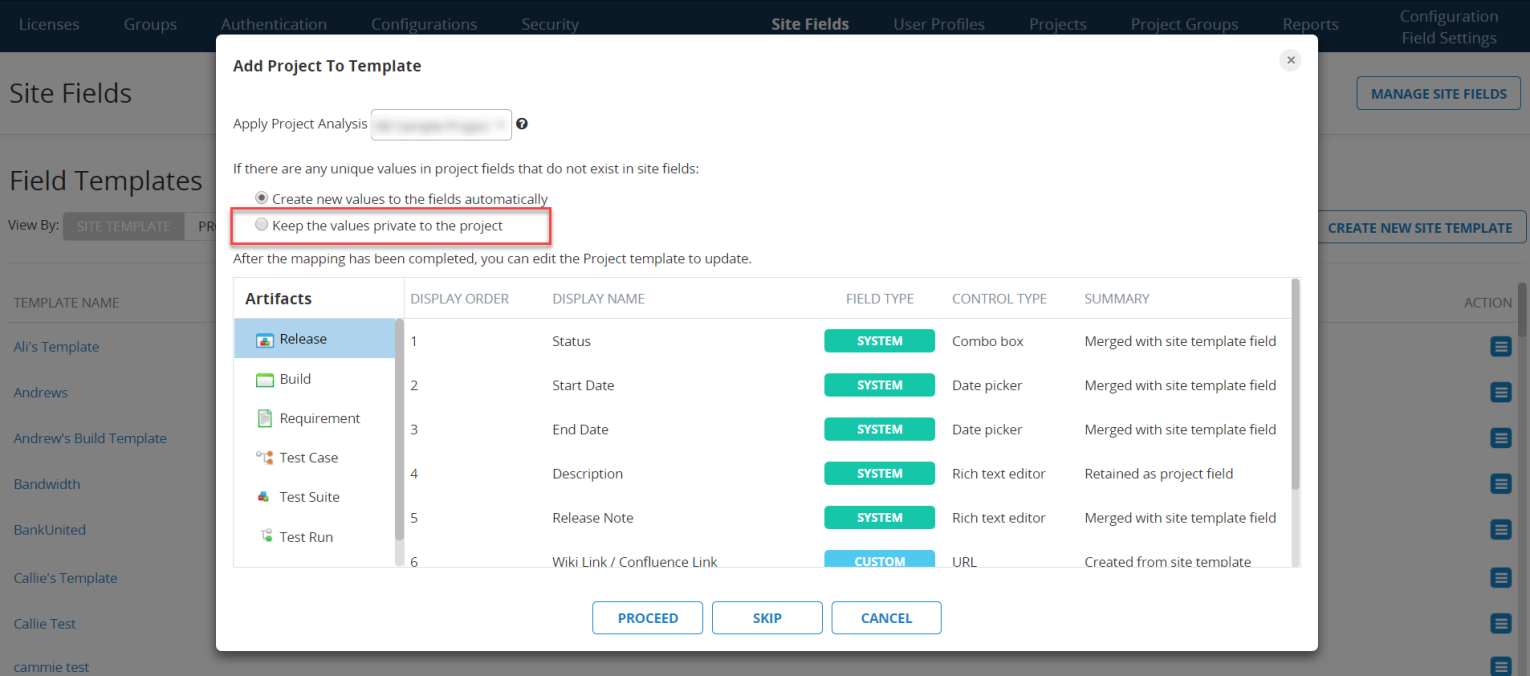
The Add Project to Template dialog displays. Under If there are any unique values in project fields that do not exist in Site Fields:
-
If you want to keep certain values private, select Keep the values private the project.
-
If you want to create new values, select Create new values to the fields automatically
-
-
Select Proceed.Your changes are now saved.
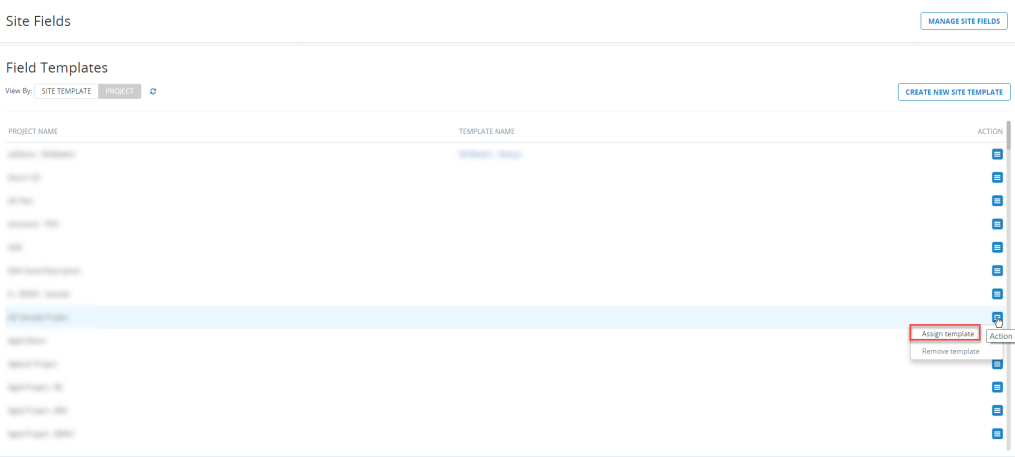
Method Two:
-
In the Field Templates section of the Site Fields page, choose to view by Project.
-
Find the project onto which you want to apply your field template. Select the Action icon corresponding to that project.
-
The Assign Template dialog displays. Here, select the template you wish to be applied. Select Save.
-
Select whether you want to keep your values private or not. Select Proceed.
Limiting Site Field Values to Certain Projects
Administrators can also limit the usage of a Site Field Value within certain projects. To do so, follow these steps:
-
From Administration, select the Site Fields tab.
-
The Site Fields page loads, and select the Manage Site Fields icon in the top, right.
-
Select the appropriate Artifact in the left column to locate the Site Field you want to mark as private.
-
In the Display Name column, select the blue hyperlink for the Site Field name to edit.
-
The Edit Site Field pop-up opens.
-
Locate the Site Field value you want to mark as private and select the Gear icon in the Action column.

-
The Configure Value pop-up displays and allows you to exclude this Site Field Value from a specific projects.
-
Select the Project from the Include this value in the following projects list and then use the right-arrow to move the selected project to the Exclude this value from the following projects project list.
-
Select OK to save, and now the selected Site Field value will be excluded from the selected project.
Field Mapping Behavior
When applying a Field Template to project, the system attempts to merge any duplicate fields so that you do not end up with redundant fields going forward. The system allows you to preview the suggested mapping between project fields and Site Fields before applying these changes:
-
System fields are merged using the original names
-
Custom fields are merged using field names and field types
-
Custom Site Fields not matching any project custom fields become new custom fields in applied projects
-
Custom Project fields not matching any site custom fields remain as internal project fields
-
-
For picklist type fields, values from the Site Fields and projects fields are merged. Below is an example of how the merging takes place:
-
If you select option one, V3 is merged to the Site Field, which means F in Site Fields AND project P will then have 4 values V1, V2, V3 and V4.
-
-
There is a second option in which you can keep a value private to a project. See the example below:
-
If you select option two, V3 is kept in Project P and it can only be used in P, which means F in Site Fields has 3 values (V1, V2, and V4) but it has 4 values in project P (V1, V2, V3 and V4). You cannot add more private values in project P after adding it to the template.The private values only show up with a Projects' Field Settings, you cannot see it in the Site Fields.
-
If the suggested field mapping is as you expect, select the Proceed icon to apply the template to the project. If selecting multiple projects, you can preview the field mapping one project at a time.
Managing Fields at the Project Level
When applying a Field Template to a project, the project's Field Settingsdisplay the following information for each field:
-
Fields associated with a Field Template are labeled as Site Field
-
Fields specific to that project (independent of any Field Template) are labeled as Project Field
You can only make certain changes to Site Fields within a project's Field Settings page:
-
Properties of Site Fields cannot be edited within a project's Field Settings. Make this change in the Manage Site Fields page in Site Administration.
-
Site Fields cannot be deactivated within a project's Field Settings.You can either delete the Site Field altogether or remove the Site Field from the respective Field Template so that it doesn't show up in the project.
-
Picklist type Site Fields: You can select which values are active or inactive in the project. If you would like to hide certain values from users in the project, you can mark the field as inactive.
-
You can reorder the fields within a project's Field Settings (both Site Fields and Project Fields).
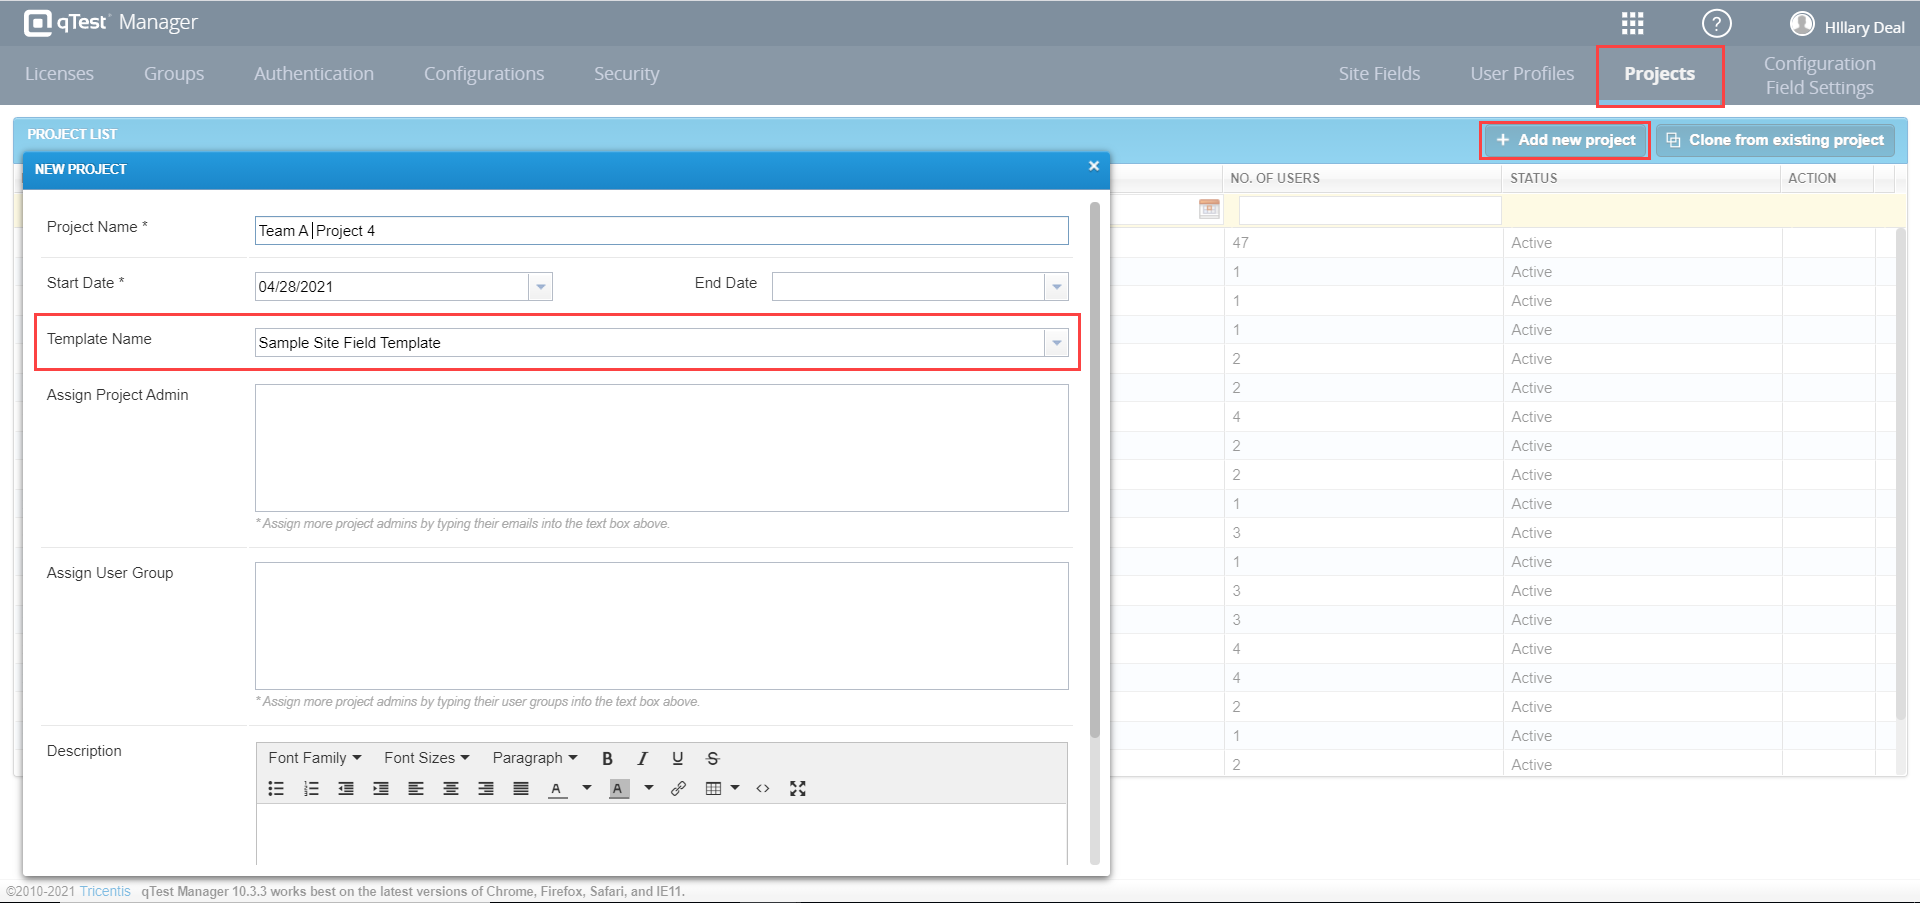
Creating New Projects with Templates
After you have created Site Fields and site templates, you can then use these templates when creating a new project.
For example, I have standardized three Team A projects so that, now, when I add a new project called "Team A - Project 4," I can instantly standardize my projects fields and values with the template called "Site Template - Team A."
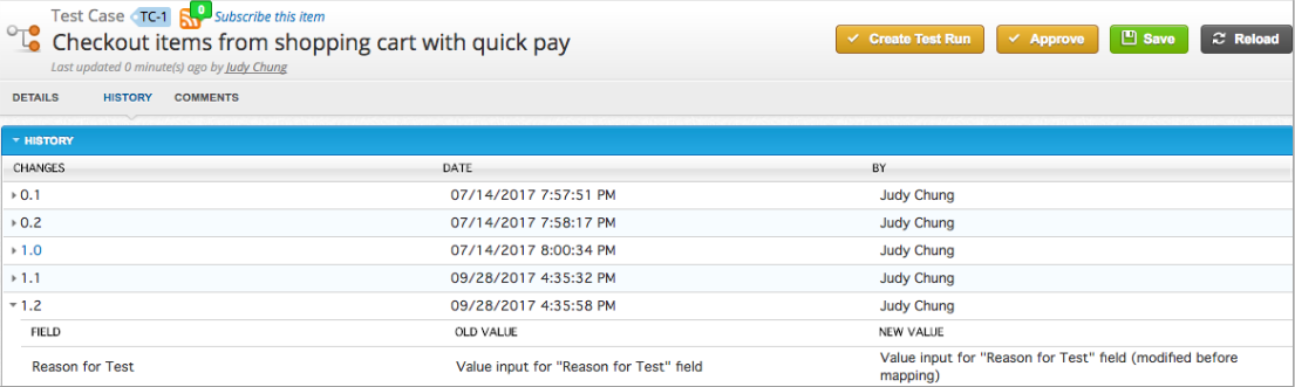
Object History
Currently, if you edit the name of afield or value, the affected object history will show the new field name or value name. This behavior makes sense because the old field/ value was mapped to an equivalent field/ value and is not a change in the object itself. Similarly, if a project field merges with a Site Field, the previous object history is retained. However, if you made any changes to the field name before the field template was applied to the project, the object history will refer to field name based on the current name (even if it was referred as a different field name).