Image-based test automation for mobile applications
With the Mobile Engine 3.0, you can steer screen objects in mobile applications by using image-based test automation.
Follow the instructions in this chapter to:

|
Image-based test automation for Mobile Engine 3.0 depends on screen resolution. If you create an image-based Module on a specific mobile screen resolution, it might not work when you execute tests on another device with different screen resolution. |
Create image-based Modules
To automate mobile controls with image-based test automation, follow the steps below:
-
In Tosca Commander, right-click on a Module folder and select Create->Create Mobile image based control.

Create Mobile image based control in the context menu of a Module folder
-
In the Connect To Device window, enter the necessary information for the device and application as described in the table below.
|
Option |
Description |
|---|---|
|
Type |
Select Android if you want to connect to an Android device or emulator. Select iOS if you want to connect to an iOS device or simulator. |
|
Configuration |
Apply a custom configuration as described in chapter "Set Desired Capabilities for a scan". |
|
Name |
Enter the device ID of your mobile device. You can also enter Auto in the following situations:
|
|
Appium Server |
Enter the address of the Appium server. To get the Appium server address, start the server manually. The Appium server address consists of:
Example: http://192.168.43.142:4723/wd/hub To verify if the Appium server address is correct, open it in your browser. You can also add a locally connected Android device or emulator. To do so, enter Local. |
|
Radio button: Mobile App |
Select to add a native or hybrid application. |
|
Radio button: Web App |
Select to add a mobile web application. |
|
Path |
Enter details about your mobile application, depending on the mobile operating system you use.
|
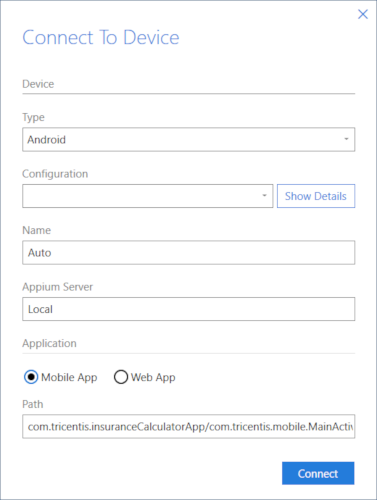
Configuration for a native application on a locally connected Android device
-
Click Connect.
Tricentis Tosca automatically opens Live View with a preview of the device and application. By default,Live View is in the Live mode, which means that you can use Live View interactions to navigate the mobile application.
-
Interact with the Live View window to go to the screen that contains the control you want to scan.
-
Click the Scan button to start creating image-based controls.
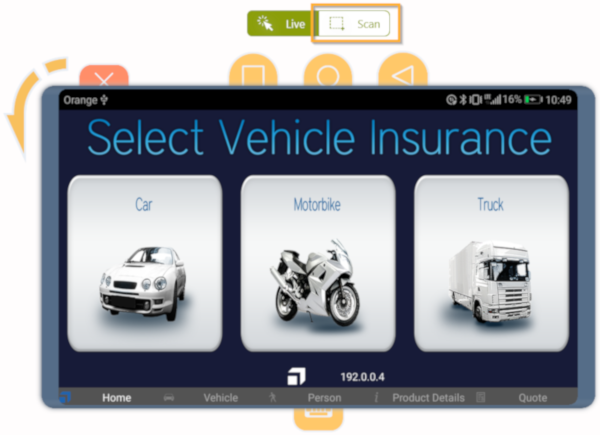
Scan button in the Live mode
|
|
When you select the controls, you can no longer interact with the mobile device using Live View. If you want to enable interactions, click the Live button. |
-
To select the control, drag the cursor over it in Live View.
The Add Control window opens.
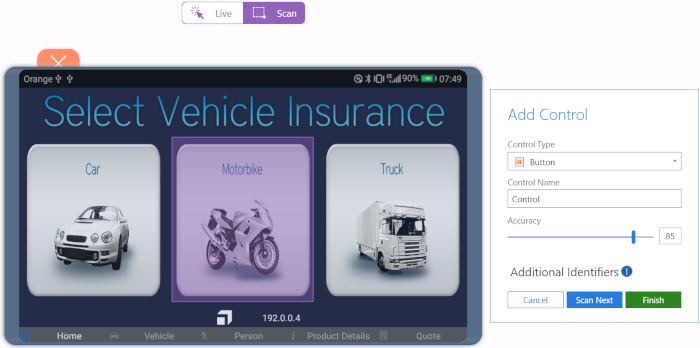
Live View and the Add Control window in the Scan mode
-
In the Add Control window, enter the information for the control you selected.
|
Option |
Description |
|---|---|
|
Control Type |
Select Button for a Button control. Select Textbox for a Textbox control. Select Generic for other controls. |
|
Control Name |
Specify the name for the control. If the name already exists, Tricentis Tosca adds a number to the control name. If you don't select a name, Tricentis Tosca assigns the default name Control. |
|
Move the slider to adjust the value for Accuracy. The higher the accuracy, the more the area of the control has to match the image-based Module. The default value is 85%. |
-
Optionally, you can select additional identifying images to improve the stability of the image-based recognition.
-
To proceed, click one of the following buttons:
-
Cancel to close the Add Control window without saving the Module. You can select another area on the screen or close the Live View window.
-
Scan Next to save the control and select other controls in the Live View window.
-
Finish to save the Module and close the Add Control and Live View windows.
-
|
|
The Mobile Engine 3.0 does not support the Edit images function. |
Create additional identifying images
You can identify image-based controls with additional images as reference points. This allows you to scan and steer the controls more precisely. To do so, follow the steps below:
-
Scan a control as described in chapter "Create image-based Modules".
-
In Live View, drag the cursor over an image that you want to use as a reference point.
The reference image appears in the Additional Identifiers section of the Add Control window. You can now adjust its Accuracy by moving the slider next to it.
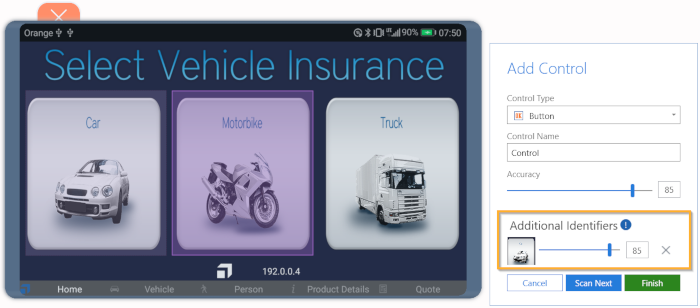
Additional Identifiers in the Add Control window
-
To scan additional reference images, drag the cursor over another image in Live View.
If you want to delete reference images, click on the
 icon.
icon. -
After you have added all reference images for your image-based Module, you can select:
-
Cancel to close the Add Control window without saving the Module. You can select another area on the screen or close the Live View window.
-
Scan Next to save the control and select other controls in the Live View window.
-
Finish to save the Module and close the Add Control and Live View windows.
-