Use the context menu and mini toolbar
Options in Tosca Commander are provided via the context menu: simply right-click onto an object to access these options. Many context menu options are also provided via the dynamic menu.
The upper part of the context menu includes a mini toolbar. This is part of the context menu and it contains options that are frequently used, such as options for creating new objects. Hover over the icons in the mini toolbar to view the option name in the tooltip. Click onto the drop-down menu icon ![]() to expand the list of available options.
to expand the list of available options.
If you would like to apply an option from the mini toolbar to several selected objects, please release the Shift key so that the mini toolbar is shown.
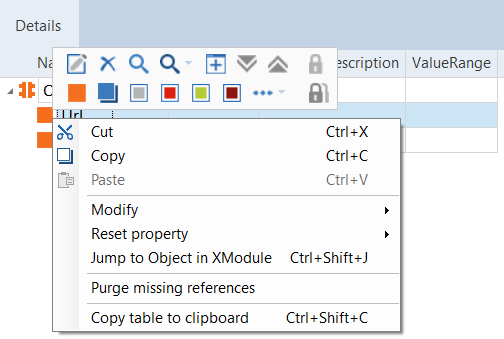
Context menu with mini toolbar
The first line of the mini toolbar provides you with the standard options. These options are always shown.
Rename ![]()
This option allows you to rename objects. Alternatively you can either hit the F2 key, or you double-click on the required object.
Delete ![]()
This deletes the selected object(s). Alternatively, you can hit the Del key.
This option opens the search function. Which search parameters are available depends on the selected object (see chapter "Searching, finding and modifying objects").
Open in new window ![]()
This opens a new window. The object you select here will be the root element in the new window.
Expand all ![]() / Collapse all
/ Collapse all ![]()
This option allows the view of objects in a tree structure to be either expanded or collapsed.
If the option Expand all is applied to object types that are located hierarchically above TestCases, Modules or ExecutionLists this affects all levels down to these objects.
If you select Expand all starting from the TestCases, Modules or ExecutionLists level, this affects all levels beneath these objects.
Checkout ![]() / Checkout Tree
/ Checkout Tree ![]() (multiuser workspaces)
(multiuser workspaces)
In multiuser workspaces, the right section of the mini toolbar provides you with checkout options (see chapter "Checkin and Checkout mechanisms").
Generally valid options
The following options are provided in the context menu of Tosca Commander objects.
Copy table to clipboard
This option can be selected in the details view of all Tosca Commander objects. All information of the selected row is copied to the clipboard, including the names of the header columns.
Copying, cutting and pasting objects
Tosca Commander allows you to copy, cut or paste objects. Please make sure that you maintain the Object hierarchy. This means for instance that TestCase folders cannot be copied to TestStep folders or Module folders.
Tosca Commander won't allow inadmissible paste operations such as nested virtual folders or test cases.
-
Select the required object and hold the Ctrl key down to select multiple objects, if required.
-
Select Cut or Copy from the context menu or the dynamic menu. You can also use the key combinations Ctrl + X or Ctrl + C respectively.
-
Click on the target object where you would like to insert your selection.
-
Select Paste in the context menu or the dynamic menu. You can also use the key combination Ctrl + V.
-
The selected object is inserted at the required position.
Jump to <ObjectType>
The option Jump to is available in the context menu and in the dynamic menu of all objects that are uniquely linked to another object. This function is used to switch the focus to the linked object.
These linked objects provide the basis for creating other objects on the one hand, and form the basis for the object hierarchy on the other (see chapter "Object hierarchy").
New objects can be created by using existing objects. Thus a unique link between these two objects is created. Two examples:
-
An automated TestStep can only be created by assigning a Module to a TestCase.
-
An ExecutionEntry can only be created by assigning a TestCase to an ExecutionList.
Jump to Object in <superior ObjectType>
The focus jumps to the superordinate object, whose object type is located hierarchically above of the object's object type selected in the Object hierarchy. If this object does not exist in one of the opened windows, a new window will open. Alternatively, the key combination Ctrl + Shift + J can be used.
Any missing links between objects are removed via this option.
Examples of missing references:
-
An object which is linked to another objects has been deleted.
-
Objects do not yet exist in the current workspace (individual updates, check in, etc.). In this case, removing missing references is not recommended since the workspace is not completely up-to-date.
Reset property
In Tosca Commander™ you can add customized properties to some objects (see chapter "Specify properties").
The property value, which has been modified on the object level, can be reset to the default value via the context menu. Properties, whose values do not equal the default value, are displayed in bold.
Procedure
-
Select the object whose property value should be reset.
-
Select the option Reset property from the context menu. If several properties are specified for an object, the required property value can be selected via the option's submenu.
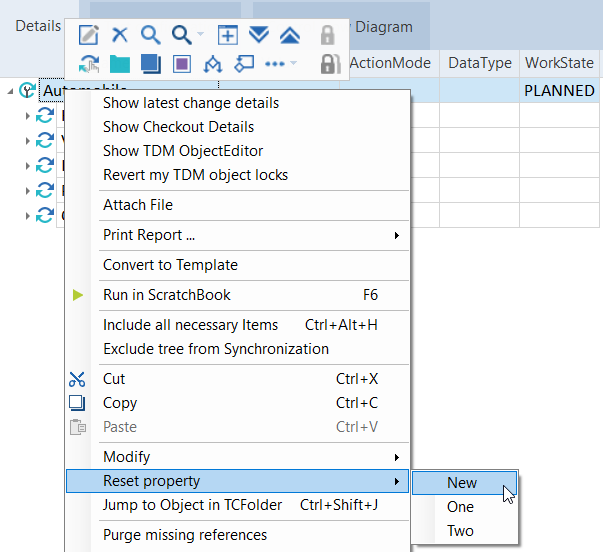
Reset property
Creating folder structures in Excel
Most test projects use Microsoft® Excel for structuring automated test cases. The objects are hierarchically structured in columns that range from left to right. Objects of the same hierarchical level are located in the same column.
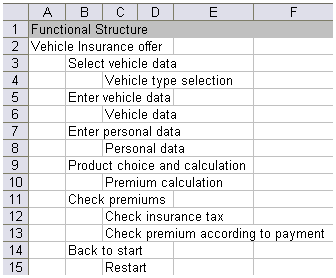
Example of a folder structure in Excel
Tosca Commander enables to import tree structures from Microsoft® Excel. These structures are transferred to Tosca as folder structures which can be merged with existing folder structures.
Prerequisites
Tree views must fulfil the following requirements when you create them in a Microsoft® Excel worksheet:
-
the ranking of an element is defined by its relative column position in relation to the element of the previous row
-
a value in a row describes exactly one element within the superior level
-
several elements can exist on one level
-
there is exactly one value per row
-
the structure has less than 15 levels
Procedure
-
Select the rows on the worksheet, whose structure should be transferred to Tosca Commander™.
-
Copy your selection to the clipboard.
-
Select a folder in Tosca Commander which is located hierarchically above a basic object (Module, TestCase, ExecutionList).
-
Click on Create Folder structure in the context menu. You can also left-click on the required folder and select
 Create Folder->Folder structure from the dynamic menu.
 -
Tosca Commander™ creates a folder structure based on the tree view copied from Microsoft® Excel beneath your selected object.
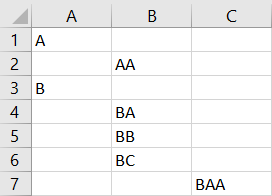
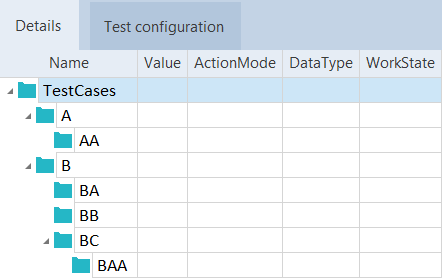
Example - creating a folder structure