Create TestCases
In this chapter you can create a TestCase with TestSteps which maps the vehicle insurance quote for an automobile. To do so, you need to specify the automobile data in the TestSteps to create the quote. Finally, you verify a specific value of your quote.
In the previous chapter "Create Modules" you have already scanned all the required Modules, and in this chapter you can create a TestCase with TestSteps which include the test data required for running this TestCase in the end.
Create a TestCase
Create the TestCase Automobile in your TestCase folder Vehicle Insurance. You have already created this folder in chapter "Context menu and mini toolbar".

|
Right-click on the TestCase folder Vehicle Insurance and select Create TestCase from the mini toolbar. Alternatively, you can click on the TestCase folder and click on |
|
|
Assign the name Automobile to the new TestCase. |

Automobile TestCase
The TestCase starts off with the start screen of the Tricentis Sample Application.

Tricentis Sample Application: start screen
TestStep 1: Start screen (Home)
Your first TestStep should instruct Tricentis Tosca to click on the Automobile menu in the Tricentis sample application to start the vehicle insurance calculator.

Navigation bar
You have already created the Module Home earlier (see also "Module 1: Start screen (Home)"), and you use this Module now for your first TestStep.
|
|
Switch to the Modules window, drag the Home Module onto your Automobile TestCase and drop it there. |

|
If you use Tosca Commander in multiuser mode, ensure that you check out your TestCase. To do so, click yes in the subsequent dialog. (For more information, see chapter "Checkin and Checkout mechanisms".) |
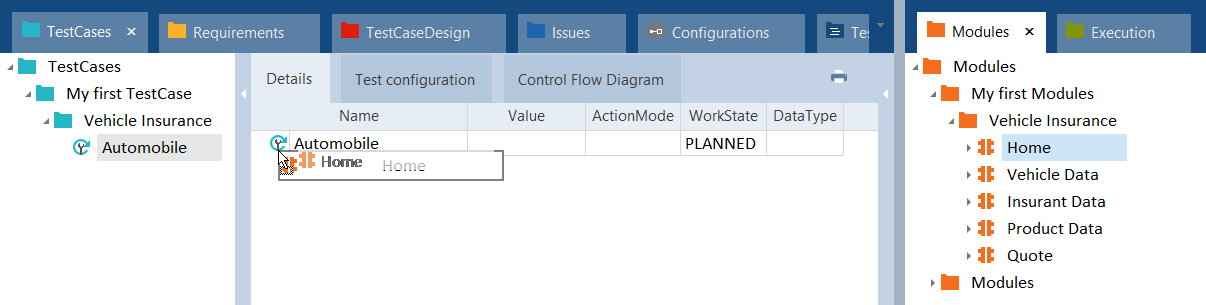
Creating the Home TestStep
Tricentis Tosca creates the TestStep Home, automatically assigning the name of the corresponding Module to the TestStep. All the TestStepValues that can be steered are located beneath this TestStep - in our case, the Automobile link. The TestStepValue icons are grayed out until you define actions for these values.
|
|
TestStepValues which are grayed out due to lacking values can either be hidden from view or shown via the F9 key. |
|
|
Open the drop-down menu in the Value column for the TestStepValue Automobile, select {Click} and press Enter to confirm your selection. Alternatively, you can enter X into the Value field in place of {Click}. X and {Click} are interchangeable. |
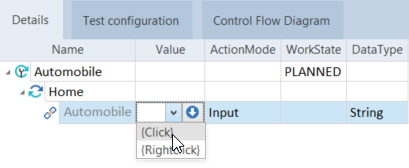
Defining actions for the Home screen
The ActionMode column is automatically set to Input since you have defined an input action.
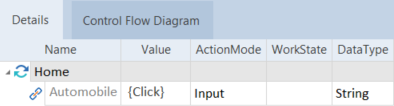
Finalized Home TestStep
You've just created your first TestStep!
TestStep 2: Vehicle data
This TestStep should enter vehicle data and should then click on Next.
|
|
Return to the Modules window and drag and drop the Vehicle data Module onto your Automobile TestCase. |
The Vehicle data TestStep is inserted beneath the Home TestStep.
|
|
Enter the data into the TestStep as shown in the illustration below. |
|
|
TestStepValues provide values that are stored in the ValueRange column of the corresponding ModuleAttribute in a drop-down list. If your required value is not available in this list, you can also enter this manually. |
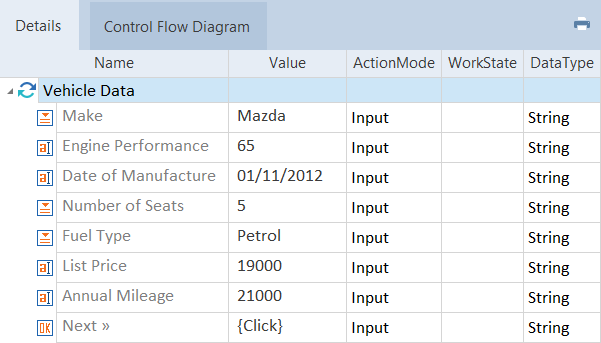
Finalized Vehicle data TestStep
The ActionMode column of the TestSteps is automatically set to Input again since you have defined input actions.
TestStep 3: Insurant
In this TestStep enter insurant data and then click Next.
|
|
Return to the Modules window and drag and drop the Insurant Module onto your Automobile TestCase. |
|
|
If you use Tosca Commander in multiuser mode, ensure that you check out your TestCase. To do so, click yes in the subsequent dialog. (For more information, see chapter "Checkin and Checkout mechanisms".) |
The Insurant TestStep is inserted beneath the Vehicle data TestStep.
|
|
Enter data into the TestStep as shown in the illustration below. |
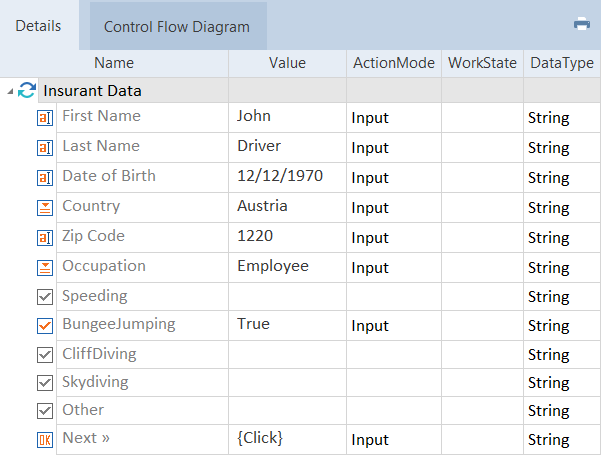
Finalized Insurant TestStep
Let's continue with the next TestStep.
TestStep 4: Product Data
Select the required product, then click Next.
|
|
Return to the Modules window and drag and drop the Product Data Module onto your Automobile TestCase. |
The Product Data TestStep is inserted beneath the Insurant TestStep.
|
|
Enter values into the TestStep as shown in the illustration below. |
|
|
Enter a date for the TestStepValue Start Date that is more than one month in the future. In this tutorial we used the date 10/12/2018. |
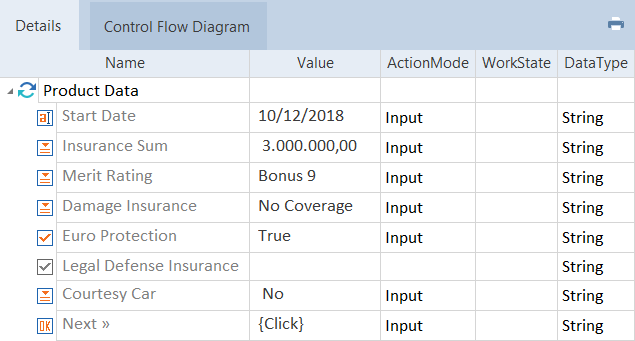
Finalized Product dataTestStep
TestStep 5: Quote
This is the final TestStep in your TestCase. Here Tricentis Tosca should verify whether the Price per Year ($) for the Ultimate package equals a specific value.
The vehicle insurance calculator shows the calculated values along with various options in a table. Your Price per Year ($) value may differ from the one in this tutorial (685,00). You may use the value Tricentis Tosca calculated for you in your sample application.

Quote data
|
|
Return to the Modules window, drag the Quote Module onto your Automobile TestCase and drop it there. |
The Quote TestStep is inserted beneath the Product data TestStep.
Define the cell which includes the value to be verified in the TestStepValue PriceTable. The amount is shown in the first row of the last column.
|
|
Expand the view for the TestStepValue priceTable and open the drop-down menu of the TestStepValue <Row>. |
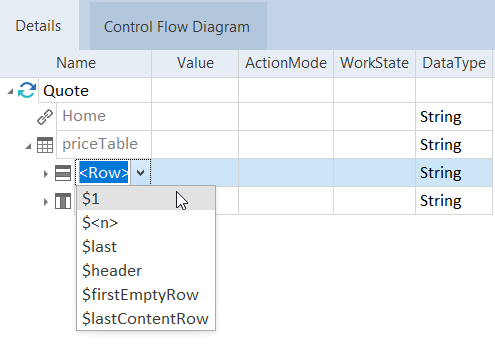
Selecting a row from the priceTable
|
|
Select $1 from the drop-down list and press Enter. This specifies the row which holds the value to be verified. |
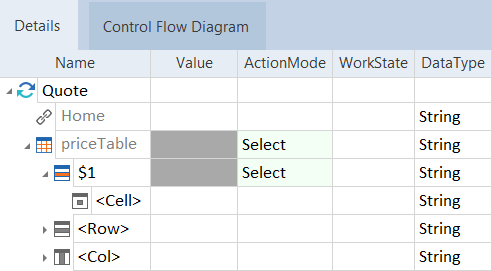
$1 row
|
|
Click on the TestStepValue <Cell> beneath the TestStepValue $1. |
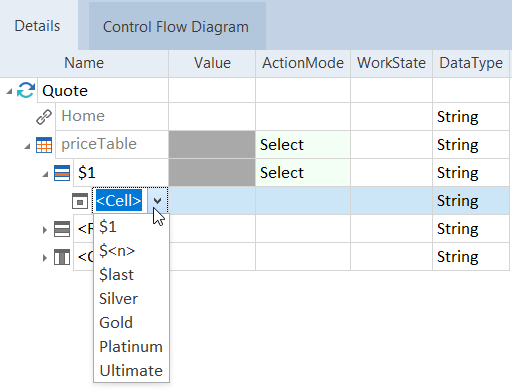
Specifying the cell
|
|
Select $last from the drop-down list and press Enter. This specifies the last cell of the row which includes the value to be verified. |
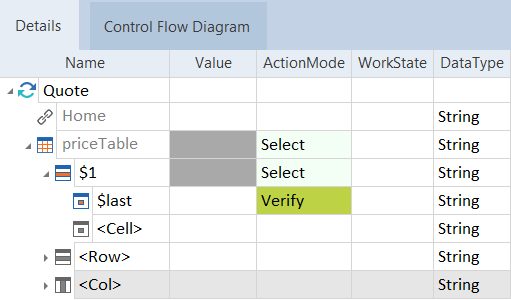
Specifying the cell
|
|
Enter the value that should be verified into the Value column of the new TestStepValue $last. |
|
|
Use a comma as thousand separator and a dot as decimal separator when you enter the value to be verified. |
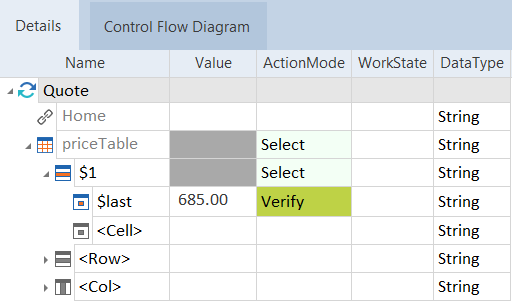
Finalized Quote TestStep
You may have realized that the ActionMode column has automatically been set to Verify. Unlike in your previous TestSteps where Tricentis Tosca is supposed to input data (Input), in this TestStep Tricentis Tosca should verify data.
In the first step of this verify operation, Tricentis Tosca selects the TestStepValue priceTable and the first row ($1) by using the ActionMode Select. In the next step it uses the TestStepValue $last to verify whether the value of the last cell equals 685.00.
Congratulations! You're done with your Automobile TestCase. In the next chapter you will learn how to create an ExecutionList in order to run your TestCase (see chapter "Execute TestCases").
Related chapters