ActionModes
ActionModes are used to steer the test object. They define how the value in the Value field should be applied for XTestStepValues in order to steer the control. For further information on how to specify values in the Value column, please refer to chapter "Specify values".
The ActionModes available to an XTestStepValue depend on the InterfaceType of the referenced XModule.
ActionModes perform reading or input operations on a control. Reading operations read the property that is defined for a control. Input operations modify the defined property during test execution.
ActionModes for input operations:
-
Input
-
Insert
ActionModes for reading operations:
-
Buffer and XBuffer
-
Constraint
-
Verify
-
WaitOn
-
Select
ActionMode Buffer
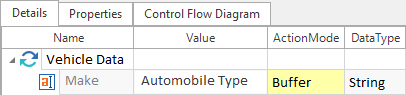
If input values are needed more than once, they can be buffered using the ActionMode Buffer.
Values or control properties can be saved to a global variable buffer and read out at any point of the test execution.
Any existing or temporarily saved buffer values can be accessed via the Settings dialog at Settings->Engine in the Buffer section. To buffer a value in the Settings dialog, a Buffer name and a Buffer value are required.

|
In this example the value Automobile Type is set as buffer name. The value for the control Make is taken from the application and copied to the Settings dialog as a buffer value for the buffer Automobile Type.
Setting the buffer value |
Previously buffered values can be extracted and used at any position during test execution.
Buffer values are read from the Value column with the following syntax:
|
Syntax: |
{B[<Buffername>]} |

|
The auto-completion function allows buffer variables to be entered. Any values that have been previously saved can be selected from a drop-down list. |
|
|
In this example, the value stored under the name automobile is extracted from the buffer during test execution.
Extracting the buffer value |
Dynamic comparisons - XBuffer
The XBuffer allows you to read dynamic values of a string and to buffer them using the ActionMode Verify. The following syntax is used within strings:
|
Syntax: |
{XB[<Buffername>]} |
|
|
The area between Transfer order and has been created is excluded from verification. This area is buffered under the buffer name OrderID.
Dynamic comparisons |

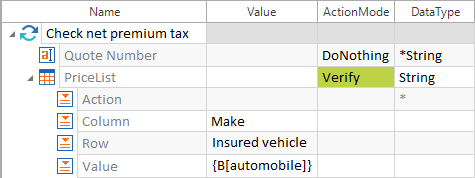
ActionMode Constraint
The ActionMode Constraint limits the search for a superordinate node. You can limit the search until it renders a single element.
If more than one element is found, you can also limit the number of results to only one element by entering #<n> in the superordinate node.
Examples of its usage include business-based table steering or the selection of a certain XML node.
|
|
In the following example we use a table containing simple personal data.
Table containing personal data A row, which has the attribute First name including the value Julia and the attribute Last name including the value Jones, is searched for in the table. In the row which contains these values, the engine should verify whether the attribute Date of birth including the value 9/26/1977 exists.
ActionMode Constraint |

|
|
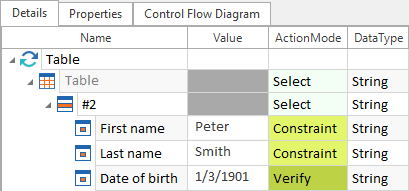
The following example uses the table containing simple personal data from the previous example. In the table, the second row with the attribute First name including the value Peter and the attribute Last name including the value Smith, is searched for. The value #2 has to be entered for selecting the row. In this row, the engine should verify whether the attribute Date of birth has the value 1/3/1901.
Verifying values |
ActionMode Input
The ActionMode Input can be used to transfer values to the test object. This can, for example, include the input of values into an Editbox, clicking buttons or selecting a ComboBox, etc.
If a ValueRange is specified in the ModuleAttribute of the linked XTestStepValue, these values are provided for selection in the drop-down menu of the XTestStepValue. In addition, any user-specific values can be entered.
Multi-line text is inputted via a forced line break using the key combination Shift + Enter. The drop down menu must be converted into an edit box to be able to enter a multi-line value in a drop down menu. For this purpose, the key combination Ctrl + Shift + T must be applied to the selected XTestStepValue.
|
|
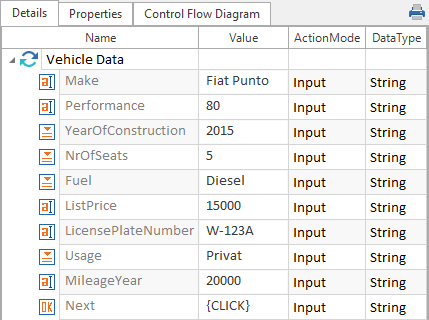
In this example, values are entered into the input fields of the Tosca Sample Application. A click operation is performed on the Next button.
Example illustrating how to use the Input ActionMode |
ActionMode Insert
The ActionMode Insert allows you to create objects in non-visual, non UI, interface environments.
|
|
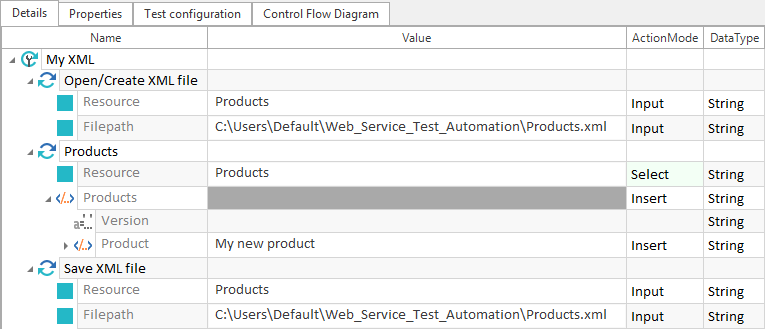
In this example the ActionMode Insert is used to write the new entry My new product to the XML file Products_new.
Adding a new entry to an XML file - ActionMode Insert |
ActionMode Select
The ActionMode Select allows you to select specified nodes. The required node must have a unique name.
|
|
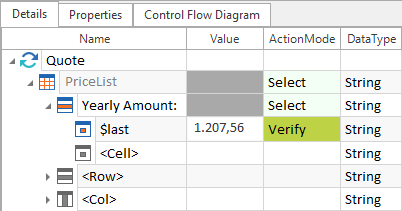
In this example the table row Yearly Amount is selected. Then the system should verify whether the last cell of this row includes the value 1.207,56.
Example: selecting and verifying the Yearly Amount |
ActionMode Verify
The ActionMode Verify allows values and control properties in test objects to be verified. Control properties are verified via the Value column of an XTestStepValue.
The target node must be specifically defined for this ActionMode to be executed. If no control property has been specified, the default property of the control is verified instead (see chapter "Using properties of controls").
Please note that the defined values are case-sensitive. The entire string is precisely verified. Regular expressions can be used.
|
|
This example verifies whether the value Truck over 1t (payload) is selected in the drop-down menu Type of Vehicle in the Tosca HTML sample application.
Verifying a value |

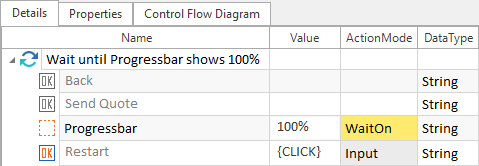
ActionMode WaitOn
The ActionMode WaitOn interrupts the execution of the TestCase until the indicated property has the specified value. The system waits until the control value matches the value specified in the Value column, or until the control has adopted the specified property. The wait time is defined by the setting Synchronization Timeout during WaitOn.
|
|
In this example, the Restart button only becomes active when the progress bar reaches 100%.
Progress bar In this example the system waits until the value of the control Progressbar has reached 100%. The Restart button is clicked as soon as this value is reached.
ActionMode WaitOn |