Menus can either be shown in single-line or multiline view in Tosca TBox.
Steer popup and context menus
Context menus are steered like menus.
To steer context menus, manually create the steering param UserSimulation and set it to True.

|
In order to scan a context menu, start Tosca XScan, select the application and open the context menu before scanning has finished. |
Single-line view
Tosca automatically creates single-line Menus when they are scanned with Tosca XScan.
These Menus are steered by specifying the path to the according entry. You have to use the string -> to represent path nodes.
|
ActionMode |
Value |
Description |
|---|---|---|
|
Input |
<path> |
This selects the entry by using the specified path. If the entry includes a RadioButton, this is also selected. If the entry includes a CheckBox, the state of the CheckBox toggles between disabled and enabled. |

|
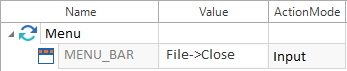
In this example, the engine selects the entry Close, which is below the entry File, from the Menu MENU_BAR.
Select a Menu entry by specifying the path |
Multiline view
In order to display Menus in multiline view, build structured entries with Tosca XScan.
Depending on the engine you used for scanning, Tosca allows you to:
-
select the Menu and each required entry. Each entry is copied to the Module as a MenuItem.
-
select the Menu and create entries manually as ModuleAttributes.
In addition to the general properties, you can verify the following properties for Menu entries:
|
Property |
Description |
|---|---|
|
Selected |
Specifies whether an entry is selected or deselected. This also applies for embedded RadioButtons or CheckBoxes. For embedded RadioButtons or CheckBoxes, this property can be verified. |
|
Name |
Name of the menu entry |
If multiline Menus are steered, the ActionMode Select must be specified for the Menu. You also have to set ActionMode Select for all entries that are located hierarchically above the selected entries.
The table below lists all ActionModes available for Menu entries. If the property is not specified in the TestStepValue, the system uses the property listed in the Default property column.
|
ActionMode |
Value |
Default property |
Description |
|---|---|---|---|
|
Input |
x, X |
Selected |
This selects or deselects an entry. |
|
Verify |
True, |
Name |
This verifies either the value or the property. |
|
Buffer |
<Buffer name> |
Name |
This saves the name of the entry in the buffer <Buffer name>. |
|
|
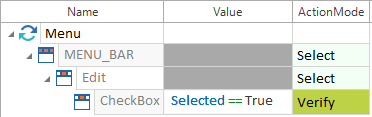
In this example, the engine verifies that the CheckBox entry below the Edit entry is selected:
Verifying a property of a Menu entry |
Create generic Menu entries
The multiline view allows you to manually create entries for Menu controls in the Module.
-
In the Module, right-click a Menu control to which you would like to add entries.
-
Choose Create ModuleAttribute from the context menu.
-
Define a name for the entry, e.g. <generic entry>. You can change this name in the TestStep.
-
Expand the Properties pane by clicking the Properties button or the expand arrow
 on the right side of the workspace window.
 -
Change the BusinessType to MenuItem.
-
Change the Cardinality to 0-N.
-
Create the configuration param BusinessAssociation with the value Nodes (see chapter "Configuration Param").
-
Create the configuration param Engine and specify the engine to be used to steer the application.
-
Create the configuration param ExplicitName with the value True (see chapter "ExplicitName").
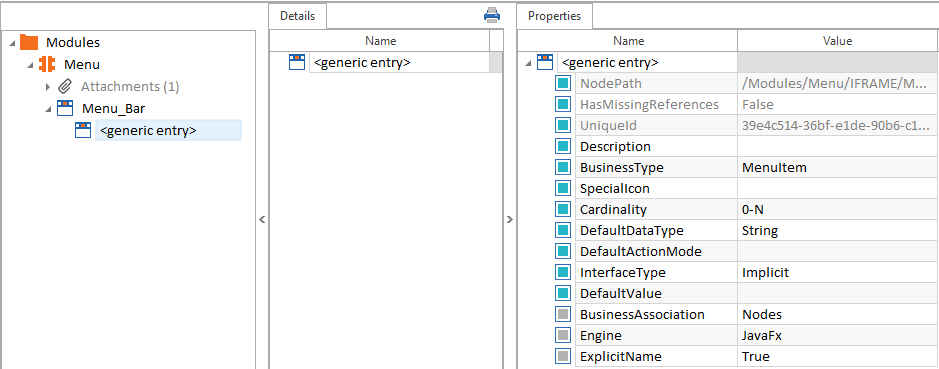
ModuleAttribute <generic entry> - MenuItem properties
Define mouse movement for user simulation
If you would like to define in which direction the mouse pointer should move when placed on an entry in multiline view, follow the steps below:
-
Select the MenuItem and switch to the Properties tab.
-
Define the steering param UserSimulation with the value True.
-
Create the steering param MouseMove and use one of the following values:
|
Value |
Description |
|---|---|
|
VerticalFirst |
The mouse pointer moves first vertically and then horizontally. This is the default setting. |
|
HorizontalFirst |
The mouse pointer moves first horizontally and then vertically. |