Installing the Java Runtime Environment
-
Download the JRE setup file.
-
Execute the setup file and follow the instructions of the installation wizard.
-
Make sure that the environment variable starts with <JRE_HOME>\bin
-
Enable the installed Java Runtime Environment so that this can be used with the Tosca Java Engine. To activate the Java Runtime Environment, use the Tosca Enabler program as described in chapter "Enabling the Java Runtime Environment with Tosca Enabler".
You can also enable the Java Runtime Environment manually (see chapter "Activating the Java Runtime manually").

|
Please note that you need local administrator rights to enable the Java Runtime Environment. |
Java Runtime Environment: security settings
Security settings of the Java Runtime Environment need to be adapted to be able to steer applets of Java Version 7 Update 21 or later.
-
Go to the Windows start menu and open the security settings: Start->Control Panel->Java (Java Control Panel).
-
Switch to the Security tab. If you are using a version of Java earlier than version 8 Update 20, set the security level to Medium. If you are using Java version 8 Update 20 or later, set the security level to High.
-
If you set the security level to High, add Java applications which are launched from untrusted websites to the Exception Site List.
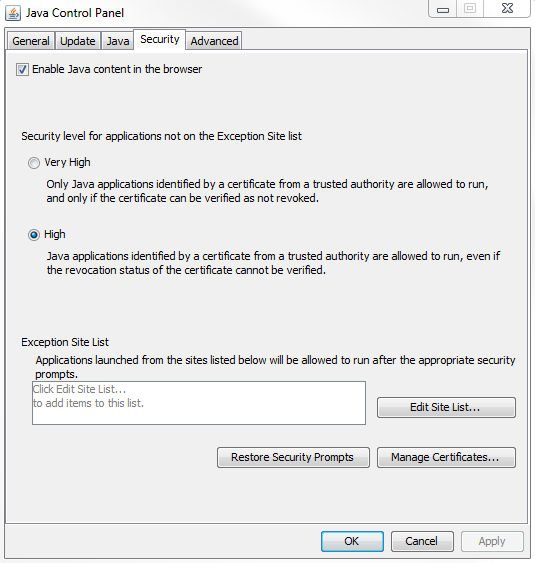
Security settings - Java Control Panel
Steering Java applications 64 bit
The following has to be taken into account when steering applications that are based on a 64 bit Java Runtime Environment:
-
In addition to the 64 bit Java runtime environment, the 32 bit Java runtime environment also needs to be installed.
-
Tosca Enabler enables the Java runtime to be used by the 64 bit application. If a 64 bit Java runtime is selected in Tosca Enabler, the 32 bit Java runtime must then be selected in a separate window.
-
The JNativeWrapper64.dll file has to be entered into the Java Policy instead of the JNativeWrapper.dll file.
The path to the 32 bit JRE is saved to the setting Special Engines->JavaEngine->x86Runtime and can also be modified there, e.g. in case of version upgrades (see "x86Runtime").
|
|
Java applets cannot be executed in Windows Internet Explorer 10 in 64 bit mode. |
Enabling the Java Runtime Environment with Tosca Enabler
With the program EnablerGUI.exe, various applications can be activated. The file EnablerGUI.exe can be found under %TRICENTIS_HOME%\dll\Enabler. The following technologies are supported by Tosca Enabler:
-
Java Engine
-
Powerbuilder Engine
The desired component is selected in the main window of Tosca Enabler.
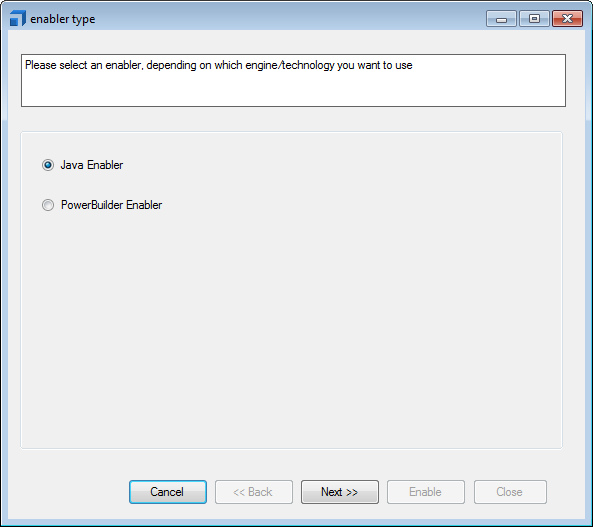
Start window of Tosca Enabler
Procedure
-
Select the desired Java technology. The options are Swing/AWT or SWT/RCP.
-
If Swing/AWT is selected, the next window offers to select security entries in thejava.policy file of the runtime. These entries are required for both Java applets in general and Java applications from version Java 6 Update 29.
-
If the option Set java.policy entries has been selected, directory paths can be added in the subsequent window via the Add button (for instance C:\Program Files (x86)\Internet Explorer). The directories added here, are added to the java.policy file, including read and write permissions. These directories can be used in the following settings as an alternative for logging or for custom controls:
-
Special Engines->JavaEngine.Logging->Log-Directory
-
Special Engines->JavaEngine->CustomControls.->CustomControl paths
-
Special Engines->JavaEngine->CustomControls->CustomControl XMLs
This means that directory paths, which are used in these settings, have to be considered in the java.policy file.
-
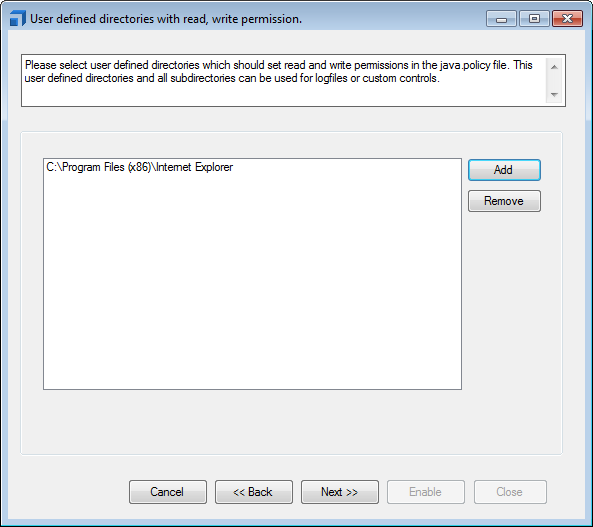
Add customized directories
-
In the next step, decide whether you would like to search automatically for Java Runtimes, or enter them manually.
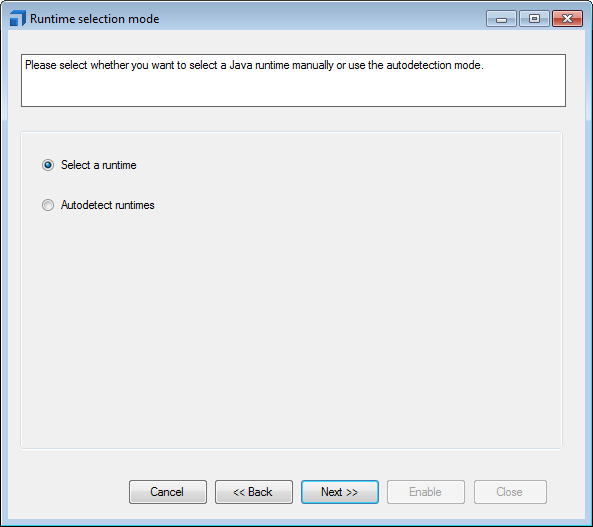
Tosca Java Enabler: selecting runtime mode
Selecting the runtime manually
Choose the option Select a runtime and the path to the Java runtime directory. The subsequent dialog indicates if the specified runtime has already been enabled. Depending on the status you can either enable or disable the Java Runtime Environment.
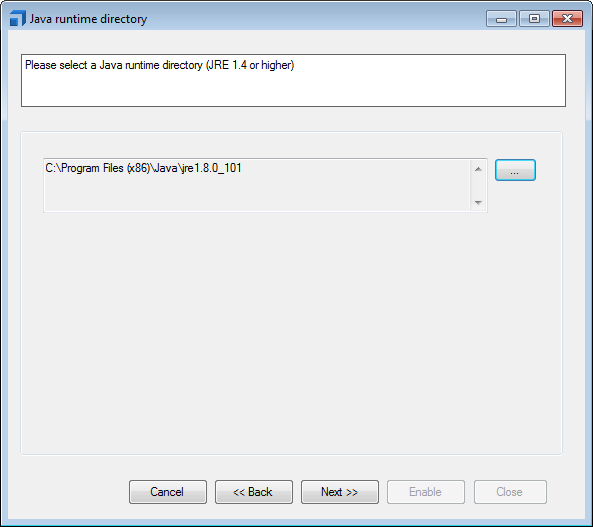
Tosca Java Enabler - manual mode
Detecting runtimes automatically
Select the option Autodetect runtimes and the drive to be browsed. Click on the Search button to start searching.
The search process may take several minutes, depending on the size of the drive.
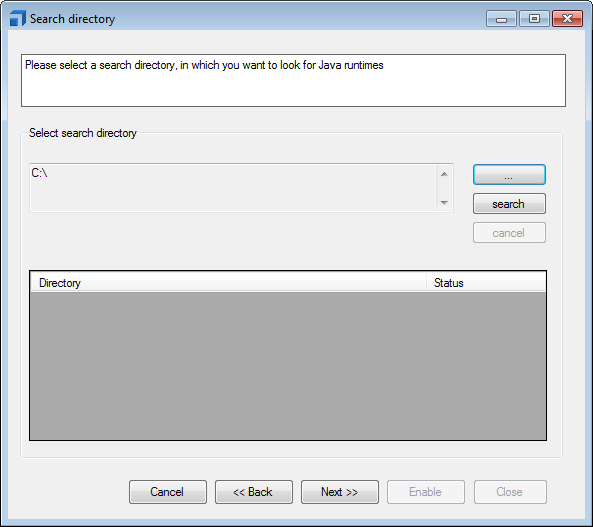
Tosca Java Enabler - search directory
You can cancel the search at any time by using the Cancel button. If the search is canceled, only those runtimes will be displayed that were found until the search was canceled.
After the search is completed, the detected runtimes are shown. They are displayed as disabled or enabled in the Status column.
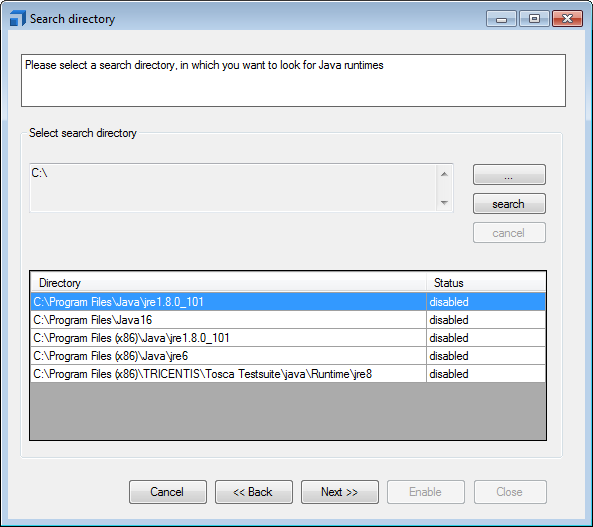
Tosca Java Enabler - search results
One or more runtimes can be activated or deactivated. To do so, select the desired Java runtime and click on the button Next.
After selecting a 64-bit Java runtime in the Search directory window, the 32 Bit Java Runtime directory will open automatically. Select also the directory for the 32-bit Java runtime since this is required for steering 64-bit applications. The selected directory is saved to the setting x86Runtime and can be modified there without having to launch Tosca Enabler again.
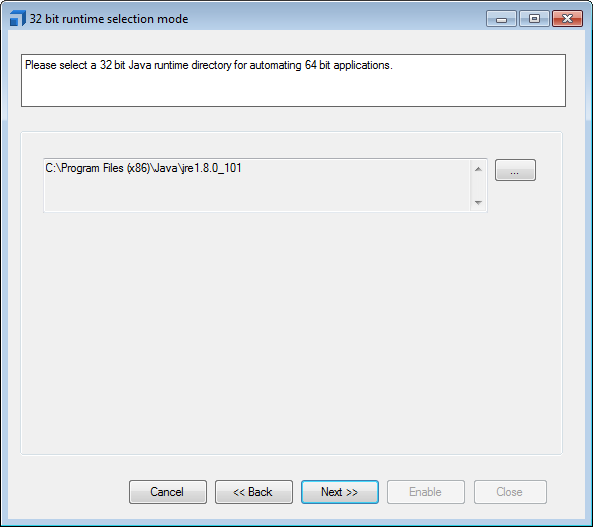
Select 32-bit Java runtime directory
Confirm your selected directory by clicking the Next button.
In the dialog box that appears, you will be provided with the options enabled and disabled under select new configuration. Depending on the selected option, you can confirm the current selection via Enable or Disable.
If the selected Java runtime is already activated, you can view the status of the individual runtime tasks by clicking on the [>>] button in the current configuration section.
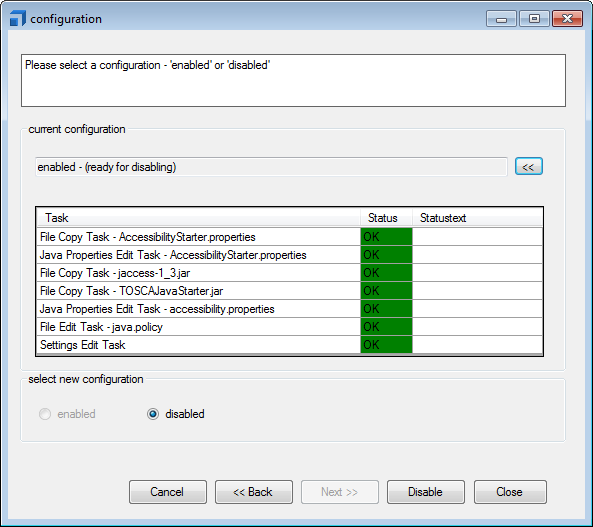
Tosca Java Enabler - configuration
Tosca Java Enabler can be accessed via the command line. Any occurring errors are shown in an error message. The program EnablerCmdLine.exe is located at %TRICENTIS_HOME%\dll\Enabler\. The program is applied according to the following schema:
EnablerCmdLine.exe -language <language> -enabler java -application <apptype> [-policy <policy> -multidirectory <path>] -directory <dir> [-32BitJreDirectory <32 Bit JavaRuntime-directory>]-configuration <configuration>
|
Parameter |
Description |
|
<language> |
Valid arguments are en-US and de-AT |
|
<apptype> |
Valid arguments are swing or swt |
|
<policy> |
For Swing applications the valid value is policy_yes or policy_no. It specifies whether entries have to be made in the java.policy file. This is for instance required for testing applets. |
|
<path> |
Specifies a path, which should additionally be enabled with read and write access rights in the java.policy file. If several paths are specified here, they have to be separated by semicolons. If no additional path is specified, "" will be specified instead. Example: "C:\Program Files\Intel";"C:\Program Files\Internet Explorer" |
|
<dir> |
Swing applications require the path to the runtime to be specified, whereas SWT applications need the path to the application directory. |
|
<32 Bit JavaRuntime directory> |
Directory of the 32 bit Java runtime environment, which is required for steering 64 bit applications with the JNI server. |
|
<configuration> |
Indicates the activation status. The value is either enabled or disabled. |
With one command, one runtime can be enabled or disabled at a time.
To manually activate a Java Runtime, the following files must be copied to the directory <JRE_HOME>\lib\ext:
%TRICENTIS_HOME%\dll\JavaEngine\Accessibility\
-
jaccess-1_3.jar
-
TOSCAJavaStarter.jar
-
AccessibilityStarter.properties
Additionally, the file accessibility.properties must be copied from the directory %TRICENTIS_HOME%\dll\JavaEngine\Accessibility to <JRE_HOME>\lib.

|
Please contact Tricentis Support if the directory <JRE_HOME>\lib already includes the accessibility.properties file. |
Adding Java.Policy entries
To be able to steer applets in general and applications from version Java 6 Update 29, the following entry must be added to the <JRE_HOME>\lib\security\java.policy file. The specified directories (Tosca installation directory, JRE installation directory) may vary from the directories specified here, depending on the operating system. In this case we use Windows 7 (64 bit).
Enter your local IP address in line 4.
|
|
Policy entries are automatically set if either the option Set java.policy entries has been selected in Tosca Enabler when the Java runtime was activated, or if the parameter policy_yes has been transferred for the policy option upon activation via the command line. The JNativeWrapper64.dll file must be specified instead of the JNativeWrapper.dll file, in order to steer 64 bit applications. |
grant {
permission java.util.PropertyPermission "*", "read,write";
permission java.net.SocketPermission "localhost:1024-", "accept,connect,listen";
permission java.net.SocketPermission "<LOCAL_IP_ADDRESS_HERE>:1024-", "accept,connect,listen";
permission java.io.FilePermission "C:\\Program Files (x86)\\Java\\jre6\\lib\\ext\\AccessibilityStarter.properties", "read";
permission java.io.FilePermission "C:\\Program Files (x86)\\TRICENTIS\\-", "read";
permission java.io.FilePermission "C:\\ProgramData\\TRICENTIS\\Tosca Testsuite\\7.0.0\\-", "read,write";
permission java.io.FilePermission "C:\\Program Files (x86)\\Java\\jre6\\bin\\rmiregistry.exe", "execute";
permission java.lang.RuntimePermission "loadLibrary.C:\\Program Files (x86)\\TRICENTIS\\Tosca Testsuite\\dll\\JavaEngine\\libs\\JNativeWrapper.dll";
permission java.lang.RuntimePermission "modifyThreadGroup";
permission java.lang.RuntimePermission "modifyThread";
permission java.lang.RuntimePermission "getClassLoader";
permission java.lang.RuntimePermission "accessClassInPackage.sun.plugin2.main.client";
permission java.lang.RuntimePermission "accessClassInPackage.sun.plugin.viewer.frame";
permission java.lang.RuntimePermission "accessClassInPackage.sun.awt";
permission java.lang.RuntimePermission "accessClassInPackage.com.sun.deploy.util";
permission java.lang.RuntimePermission "getenv.TRICENTIS_HOME";
permission java.lang.RuntimePermission "getenv.XML_SETTINGS";
permission java.lang.RuntimePermission "accessDeclaredMembers";
permission java.lang.reflect.ReflectPermission "suppressAccessChecks";
permission java.lang.RuntimePermission "accessClassInPackage.com.sun.java.accessibility.util";
permission java.awt.AWTPermission "createRobot";
};
Entries for applets
In order to guarantee that the application is started at first, it is possible to delay the execution of the Java Engine. If the application is started via the command line using the command line parameter -Dtoscastartupdelay=<delay>, the execution is delayed by the specified value in milliseconds.

|
java -Dtoscastartupdelay=5000 -jar TestApplikation.jar |
After starting the application, the delay is shown in the CLI shell and only after the 5 seconds have expired, the Java-Engine is being loaded.
Applications based on the OSGi framework cannot be steered via the accessibility framework. To test OSGi frameworks, the following steps must be completed:
-
Copy the file TOSCAJavaStarter.jar from the directory %TRICENTIS_HOME%\dll\JavaEngine\Accessibility to the directory <OSGiApplication>\plugins.
-
The component must be registered in the file config.ini (application configuration) in the directory <OSGiApplication>\configuration\.
-
The entry osgi.bundles must be extended as follows:
osgi.bundles=<existing entries>,TOSCAJavaStarter

Some Java applications use neither AWT/Swing nor the OSGi framework. In this case, the required program parts of the target application must be started via the command line. The file BatchLauncher_Template.bat from the directory %TRICENTIS_HOME%\dll\JavaEngine\libs can be used as a template for the user's BatchLauncher.bat file.
-
The Batch Launcher.bat file starts the Tosca BatchStarter - at.tosca.javaengine.starter.BatchStarter which is located in the TOSCAJavaStarter.jar file.
-
Tosca BatchStarter starts the target application.
The path of the target application to be executed and the specified main class are located in the following properties: -Dtoscaautclasspath="%AUT_CLASSPATH%" and -Dtoscaautclassname=%AUT_MAIN_CLASS% (see "Explanatory notes about BatchLauncher_Template.bat").
Explanatory notes about Java command line parameter
This is described in greater detail below, where java.exe is opened along with a BatchLauncher_Template.bat file.
The command consists of the following components:
|
Syntax: |
java.exe [ options ] class [ argument ... ] |
-
options: this contains global settings.
-
class: this is the Tosca BatchStarter class at.tosca.javaengine.starter.BatchStarter.
-
argument: this contains the arguments of the target application.
Explanatory notes about BatchLauncher_Template.bat
|
BatchLauncher_Template.bat |
Description |
|---|---|
| SET AUT_CLASSPATH= |
The ClassPath for the target application is set here. Additionally, all the .jar files including their dependencies to the target application are listed. |
|
SET AUT_MAIN_CLASS= |
The class with the Main Method of the target application is set here. |
|
SET CLASSPATH= |
This is the general ClassPath. |
|
SET JMV_PARAMETERS= |
These are the [options] of the Java command. |
The following values are used to set the system properties at runtime:
-
-Djava.library.path="C:/Windows/System32;C:/Programm Files/eclipse/plugins/"
-
-Dtoscaautclasspath="%AUT_CLASSPATH%"
-
-Dtoscaautclassname=%AUT_MAIN_CLASS%
|
|
Accessing Win7x64 with a 32-bit JRE "C:\Program Files (x86)\Java\jre7\bin\java" %JVM_PARAMETERS% at.tosca.javaengine.starter.BatchStarter [Parameter of the target application] Description:The variable JVM PARAMETERS lists the [options] for the Java command (including the variables -Dtoscaautclasspath and -Dtoscaautclassname) in the target application. at.tosca.javaengine.starter.BatchStarter is actually a Tricentis class that is started using the .bat file. Parameters in the target application are optional and can only be specified if the target application expects arguments. |
Configuring the RMI host name
By default, Tosca uses localhost as RMI host name.
In order to change the RMI host name, you have to set the Java property as shown below when starting the Java application via the command line. Replace <host name> with the IP address of the host that Tosca should use instead of the local host.
|
Syntax: |
-Djava.rmi.server.hostname=<host name> |