Options for classic ModuleAttributes
You can assign a control type to a ModuleAttribute, provided that no type has been assigned to the ModuleAttribute yet.
The ModuleAttribute is assigned with the ObjectControl type ControlSimple![]() .
.
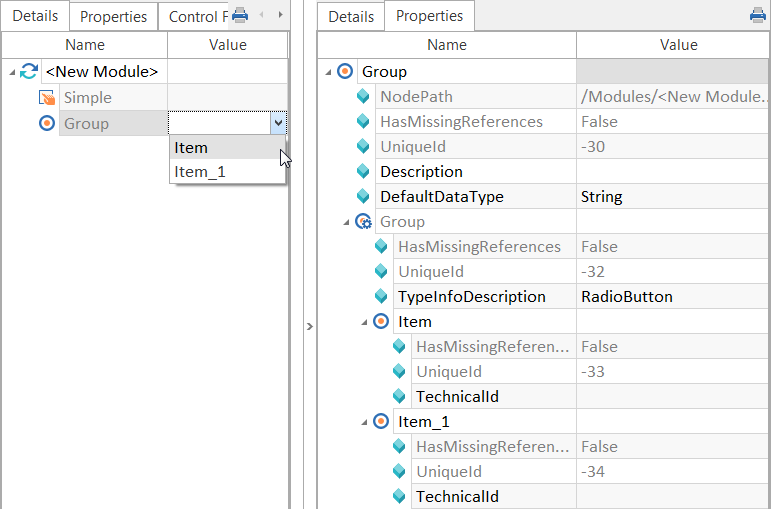
This option assigns the control type ControlGroup![]() (RadioButton) to a manually created ModuleAttribute. You can also left-click on the ModuleAttribute and select
(RadioButton) to a manually created ModuleAttribute. You can also left-click on the ModuleAttribute and select ![]() Create Object->ControlGroup from the dynamic menu Modules. This group contains the group element Item by default. Use the context menu option Create ControlGroupItem to create further group items.
Create Object->ControlGroup from the dynamic menu Modules. This group contains the group element Item by default. Use the context menu option Create ControlGroupItem to create further group items.
If you would like to change the control type, switch to the Properties tab, navigate to the property TypeInfoDescription, and enter for instance ComboBox into the Value field.
If control groups are used in the TestStep you can select the control group items from a drop-down list in the Value column.
Selecting a ControlGroup from the TestStep
Creates a new item for a ControlGroup.
Create Control CustomControl
This option assigns the ObjectControl type CustomControl![]() to a ModuleAttribute. You can also left-click on the ModuleAttribute and select
to a ModuleAttribute. You can also left-click on the ModuleAttribute and select ![]() Create Object->CustomControl from the dynamic menu Modules.
Create Object->CustomControl from the dynamic menu Modules.
By default, this control includes an ObjectCustomControlAttribute (Attr1). Use the context menu option Create ObjectCustomControlAttribute to create additional ObjectCustomControlAttributes, if required.

CustomControl
Convert to ControlGroup
Select one or more simple controls and convert them into a ControlGroup by using this context menu entry.
Convert to ControlSimple
This splits ControlGroup into several ControlSimples.
Create Param [Param]
This creates new parameters starting from an object in the ControlGroup (see chapter "ObjectControl"). You can also left-click on the object in the ControlGroup and select ![]() Create Object->[Param] from the dynamic menu Modules.
Create Object->[Param] from the dynamic menu Modules.
Create ObjectCustomControlAttribute
This option creates an attribute for a ModuleAttribute and it is available for custom controls and table controls.
Delete Control
Removes any associated control types of the ModuleAttribute.
Options for ObjectMaps and ObjectControls
Please see also chapter "Properties for classic Modules" for further details on ObjectMaps and ObjectControls.
Create ObjectMap
Creates an ObjectMap for a Module. This option can be applied to Modules which have not yet been assigned to an ObjectMap.
Generate ObjectMap Name
The option assigns a new, unique name to the selected ObjectMap. The name is generated with M + a timestamp.
Imports an ObjectMap and adds this to the selected folder or module. The imported ObjectMap replaces the ObjectMap that is currently assigned to the Module (see chapter "Importing ObjectMaps (classic Module)").
Removes an ObjectMap from the Module. This option is only available when an ObjectMap has been assigned to the Module.
Create Param [Param] (ObjectMap)
Creates a parameter for the selected ObjectMap. You can also left-click on the ObjectMap and select ![]() Create Object->[Param] from the dynamic menu Modules. This option enables you to create all the properties described in chapter "Properties for classic Modules", or you add new parameters. For further information on technology-specific parameters, please refer to the corresponding Engines documentation. Please note that these parameters are case-sensitive!
Create Object->[Param] from the dynamic menu Modules. This option enables you to create all the properties described in chapter "Properties for classic Modules", or you add new parameters. For further information on technology-specific parameters, please refer to the corresponding Engines documentation. Please note that these parameters are case-sensitive!
Create Param [Param] (ObjectControl)
Creates a parameter for the selected ObjectControl. You can also click on the ObjectControl and select ![]() Create Object->[Param] from the dynamic menu Modules. This option enables you to create all the properties described in chapter "Properties for classic Modules", or to add new parameters.
Create Object->[Param] from the dynamic menu Modules. This option enables you to create all the properties described in chapter "Properties for classic Modules", or to add new parameters.
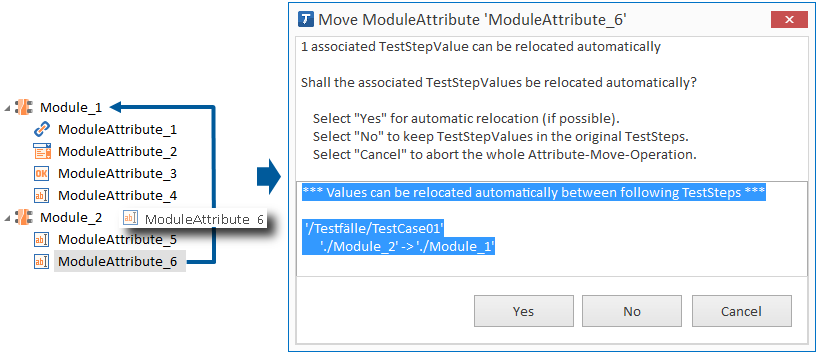
Moving ModuleAttributes between Modules
If you move ModuleAttributes from one classic Module to another, you can also move the values stored in the TestSteps. This requires that the affected TestSteps are located in the same TestCase, and the TestSteps need to be uniquely assigned.

|
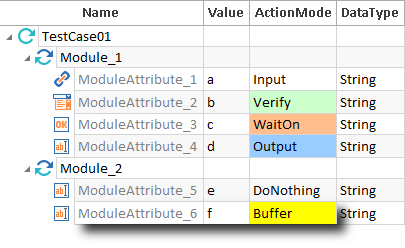
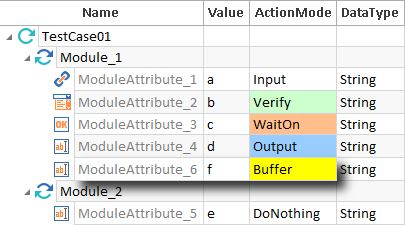
In the example below, ModuleAttribute_6 is moved from Module_2 to Module_1. The TestCase TestCase01 uses both Modules. The TestCase values (Value f and ActionMode Buffer) are automatically adapted.
|