
All objects in Tosca Commander™ have properties, which are found in the properties pane on the right side of the workspace window.
This pane is collapsed by default. To expand it, click on the ![]() Properties button on the top right corner of your window.
Properties button on the top right corner of your window.
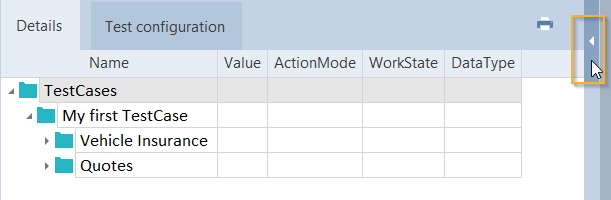
Expand properties pane
In addition to the standard set of properties, there are additional properties you can specify.
These properties do not have any impact on test automation, but save and manage additional information. For example, the property Responsible can save information on which user is responsible for a particular TestCase.
You can create properties on the project root and for ComponentFolders.
Create properties on the project root
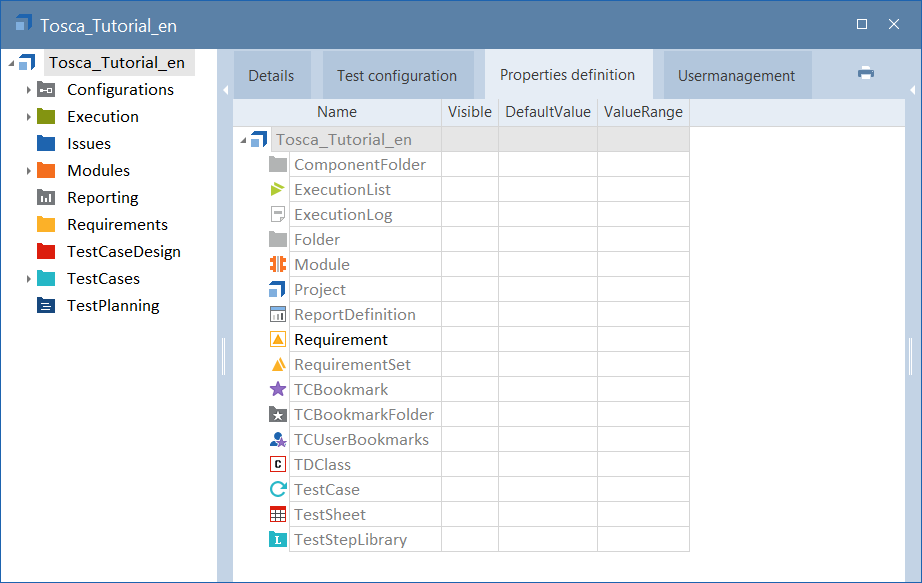
Properties created on the project root are defined in the Properties Definition tab of the project window.
You can create properties directly via the corresponding property definition for the following objects:
-
ExecutionList
-
ExecutionLog
-
Folder, ComponentFolder
-
Module
-
Project
-
ReportDefinition (ToscaReporting AddIn)
-
Requirements-Set (Tosca Requirements Management AddIn)
-
TestCase-Design Class (Tosca TestCase-Design AddIn)
-
TestCase
-
TestCase-Design Sheets (Tosca TestCase-Design AddIn)
-
TestStepLibrary
You can define properties for further objects in ComponentFolders (see chapter "Create properties for ComponentFolders").
Create properties
To create a property, follow the steps below:
-
In the project window, switch to the Properties definition tab.
-
Right-click the object that should receive the additional property.
-
Select Create Property from the context menu of the property definition or use the key combination Ctrl + N, Ctrl + P.
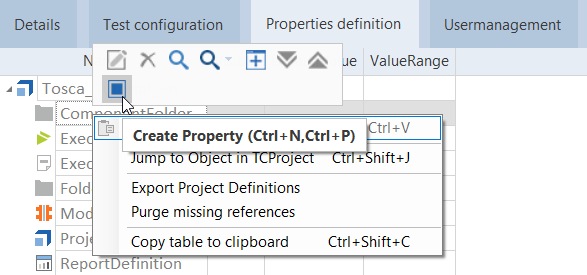
Create property
-
Tosca Commander creates a new property. The system automatically activates the renaming function and sets the property to Visible.
You can change the property name or press Enter to use the default name Property.

|
Property names may include characters, digits and the special character _. The first character must be alphanumeric. |
You can also add properties to the following objects, provided that you created an according property definition beforehand.
-
TestStep
-
TestStep folder
-
XTestStep
-
XTestStep folder
-
ExecutionEntry folder
-
ExecutionEntry (also applies to TestMandates)
-
XModule
-
Reusable TestStepBlock
To create property definitions, follow the steps below:
-
In the project window, switch to the Properties definition tab.
-
Right-click the project root element and select Create property definition <Objectname> from the context menu.
Create properties for ComponentFolders
You can add user-defined properties to all objects within a ComponentFolder.
You can define the properties for the desired ComponentFolder in the project window. You have to determine the object type of the object for which you want to create a property, prior to creating property definitions and properties.
-
Right-click the object for which you want to create a property and select the option Search from the mini toolbar, or use the key combination Ctrl + F. You can also click on the Search... icon in the Home menu. The TQL search opens in a new window (see chapter "TQL Search").
-
Enter the query =>SELF into the search dialog and click on Search. The object type is shown in the Type column.
Create property definitions
-
In the project window, right-click the ComponentFolder for which you want to create a property definition. Select either Create->Create Property definition from the mini toolbar, or use the key combination Ctrl + N, Ctrl + P.
-
The Name of PropertiesDefinition window opens. The name of the property definition must match the name of the object type to which the property definition should be applied (see chapter "Determine the object type").
-
Click OK. Tosca creates the property definition in the Properties definition tab of the ComponentFolder.
Create properties
-
Click on the property definition for which you want to create a property. Select Create Property from the context menu, or use the key combination Ctrl + N, Ctrl + P.
-
Tosca Commander creates a new property under the selected property definition and automatically activates the renaming function.
You can change the property name or press Enter to use the default name Property.
The newly created property is now available in the Column Chooser within the ComponentFolder.
|
|
Property names may include characters, digits and the special character _. The first character must be alphanumeric. |
Applying properties to the entire project
To add user-defined properties to the entire project, follow the steps below:
-
Click on the property definition with the property that you want to use in the project. In the Home menu, click on Cut or use the key combination Ctrl + X.
-
Switch to the Properties definition tab in the project window. In the Home menu, click on Paste or use the key combination Ctrl + V to paste the property definition into the tab.
You can also use drag and drop to move the desired property definition to the project root element.
Attributes of user-defined properties
You can additionally specify the following attributes for each customized property:
|
|
If some fields are missing from your current view, add them with the Column Chooser as described in chapter "Add or remove columns". |
The property Visible determines whether a property in the project is visible. Use invisible properties to store technical data that are not business-based. Every modification of this property and its specified value relate exclusively to newly created attributes.
You can assign a default value to a property. New elements receive this default value in the Value field of the respective property.
On the object level, you can replace the default value with any other value. Tosca highlights properties with values different from the default values in bold.
You can also specify ValueRange for properties. The values must be separated by semicolons.
When you create an ObjectMap, the system automatically copies the value ranges for the .list property. Additionally, you can copy and paste property values from the clipboard (see chapter "Steering Test Objects").
This column specifies whether the value of a property will be transferred along with an element of this object type. Every modification of this property and its specified value only relate to newly created attributes.
ValueType
This column specifies how a property value will be interpreted, for example as a string or a date. This is especially relevant for sorting purposes and for search queries that use relational operators.