Set up Tosca Distributed Execution with AOS
This chapter describes how to install and set up Tosca Distributed Execution with AOS (Automation Object Service).
For information on other setup options, see the chapters below. All chapters include the necessary set-up steps for Unattended Execution or a proxy server.
Before you start
If you haven't yet, check out the following chapters:
-
"Tosca Distributed Execution" for basic information on Tosca Distributed Execution.
-
"Distributed Execution checklists & best practices" to ensure that your environment is ready to install and set up Tosca Distributed Execution. The chapter also includes best practices.
Setup process
The subsequent chapters describe each setup step in detail. They are listed in the order that Tricentis recommends for your setup process.
Install DEX Server
The Tosca Distribution (DEX) Server is part of the Tosca Server.
To install the DEX Server, you need to install Tosca Server on the machine where you want the DEX Server.
For information on how to install Tosca Server, see chapter "Install Tosca Server".
Set up the DEX Server via Installer
If you install Tosca Server
-
Make sure to select the relevant server feature(s):
Distribution Server
The Administration Console consists of several services. You need some of these services for Tosca Distributed Execution.
-
If you change the default port for the shared settings, take note of the port number. You will need it later when you configure your services.
This is the port that you specify
-
Finish the Tosca Server installation.
-
In the Tricentis Service Configuration, go to the Tricentis Automation Object Service tab.
-
Enter the address of the DEX Server into the Distribution Server Address field.
If you changed the port for the shared settings, add the port number to the address: http://<address>:<port>
-
Optionally, you can configure different ports than the default ports for your services.
Set up the DEX Server in unattended mode
If you install Tosca Server
-
Make sure to select the relevant server feature(s):
_4DEXServer
The Administration Console consists of several services. You need some of these services for Tosca Distributed Execution.
-
If you change the default port for the shared settings, take note of the port number. You will need it later when you configure your services.
This is the port that you specify
-
Finish the Tosca Server installation.
-
In the Tricentis Service Configuration, go to the Tricentis Automation Object Service tab.
-
Enter the address of the DEX Server into the Distribution Server Address field.
If you changed the port for the shared settings, add the port number to the address: http://<address>:<port>
-
Optionally, you can configure different ports than the default ports for your services.
Install Tosca Commander
You need to install the full Tosca Commander client on
-
All machines on which you want to create TestEvents and trigger their execution.
-
The machine that holds the Tosca Distribution Server.
For information on how to install Tosca Commander, see chapter "Install Tricentis Tosca".
Install Agents
The Agent installation is part of the Tricentis Tosca installation. To install an Agent, you need to install Tricentis Tosca on every machine that should act as an Agent.
You need a separate machine for each Agent. Tosca Distributed Execution doesn't support, for instance, containers or Terminal Server setups.
To install an Agent, follow the steps below:
-
Start the installation of Tricentis Tosca.
-
On the Type screen of the Tricentis Tosca installer, select your Agent type:
-
To install an Execution Agent, select Execution Agent. Execution Agents can execute TestCases created with Engines 3.0.
-
To install the full client, select Tosca Commander. Full client Agents can execute TestCases created with Engines 3.0 and Classic Engines.
-
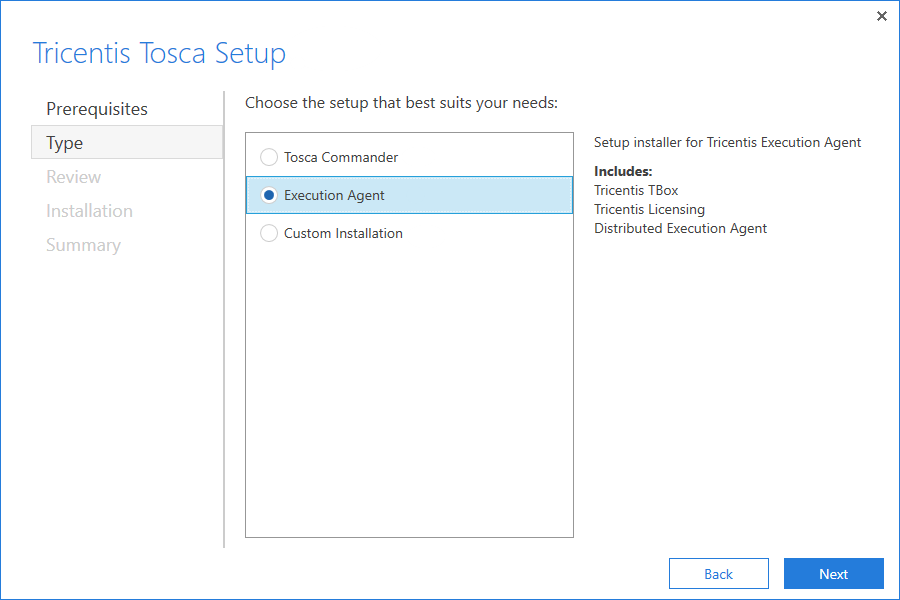
Select an Agent type in the Tricentis Tosca installer
-
Follow the instructions of the Tricentis Tosca installer to complete the installation.
Connect proxy server to Agents
You only need to perform this step if you want to use a proxy server. If not, you can skip it.
To use a proxy server, you need to connect the proxy server to your Agents. Note that you have to do this on every Agent machine.
To connect proxy server and Agent, follow the steps below:
-
On the Agent machine, open the ToscaDistributionAgent.exe.config file. By default, this file is located at %TRICENTIS_DEX_AGENT_HOME%.
<userSettings>
  <Tricentis.DistributionServer.Properties.Settings>
  ...
    <setting name="ProxyAddress" serializeAs="String">
      <value>http://11.1.11.11:1111</value>
    </setting>
    <setting name="ProxyUsername" serializeAs="String">
      <value>User1</value>
    </setting>
    <setting name="ProxyPassword" serializeAs="String">
      <value >Proxypassword</value>
    </setting>
  </Tricentis.DistributionServer.Properties.Settings>
</userSettings>-
Save and close the file.
Start and connect Agents
Next, enable communication between the DEX Server and the Agent. To do so, start your Agents and specify the DEX Server address on the Agent machine.
You need to do this on every Agent machine.
Tricentis offers the following options:
-
Start
-
Start
In this case, the Agent works in the background. You can still run GUI tests, but the Agent GUI elements are hidden.

|
You need administrator rights to edit files in an Agent default installation folder. To ensure that the Agent functions properly, you must run it as an administrator. |
Start
To start
-
On the Agent machine, right-click the file ToscaDistributionAgent.exe and select Run as administrator from the context menu.
By default, this file is located at %TRICENTIS_DEX_AGENT_HOME%.
-
If you have started the Agent successfully, you see a green Agent icon in the Windows taskbar.
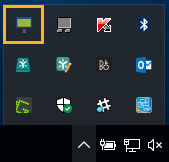
Agent icon in the Windows taskbar
-
Right-click the Agent icon in the Windows taskbar and select Configure Agent from the context menu.
This opens the ToscaDistributionAgent Configuration window.
-
In the ToscaDistributionAgent Configuration window, click the Connect to server tab.
-
In the Connect to server tab, enter the address of the DEX Server:
http://<server IP address or host name>:<port>/DistributionServerService/CommunicationService.svc
If you use an IPv6 address, the server address has to contain the IP address instead of the host name.
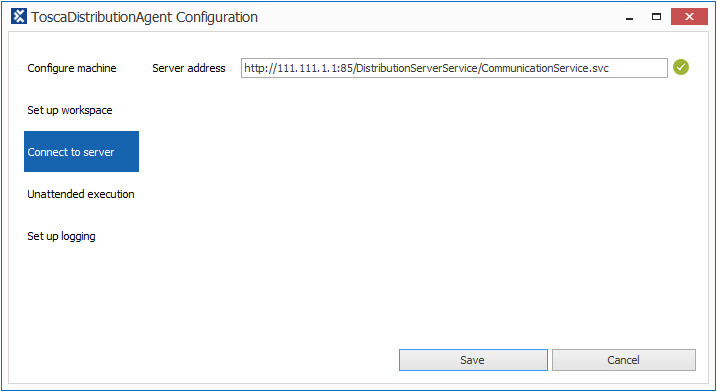
Specify the server address
-
If the connection to the DEX Server is successful, the ToscaDistributionAgent Configuration window displays a green check mark next to the Server address entry field.
If the window displays a red X, double-check the link by copying it into an internet browser.
-
Click Save.
-
Set up the Agent to allow RDP access for Unattended Execution.
To do so, go to the Unattended execution tab and perform the following actions:
-
Select Allow to open remote connections to this agent.
-
Select Use RDP connection.
-
Populate the following fields:
-
|
Field |
Optional? |
Description |
|---|---|---|
|
Username |
|
User name of the Windows user who runs the Agent.
|
|
Password |
|
Password of the Windows user who runs the Agent. |
|
Desktop Width |
yes |
Change the default width of the remote desktop in pixels. The default value is 1600. |
|
Desktop Height |
yes |
Change the default height of the remote desktop in pixels. The default value is 1200. |
|
Color Depth |
yes |
Change the default color depth of the remote desktop. The default value is 16. |
-
Click Save and close the window.
Start
To start
-
On the Agent machine, open a command prompt with administrator privileges.
-
Navigate to the folder %TRICENTIS_DEX_AGENT_HOME%.
-
Enter the following command line:
ToscaDistributionAgent.exe cmd-only http://<server IP address or host name>:<port>/DistributionServerService/CommunicationService.svc
If you use an IPv6 address, the server address has to contain the IP address instead of the host name.
-
Set up the Agent to allow RDP access for Unattended Execution. You can do so in the Agent View of the DEX Monitor (see chapter "Monitor, recover, and configure Agents in the Tosca Distributed Execution Monitor").
Activate Distributed Execution with AOS
To use Distributed Execution with AOS, you need to activate it on the Tosca Distribution Server.
To activate Distributed Execution with AOS, follow the steps below:
-
Open the file Web.config. By default, this file is located at C:\Program Files (x86)\TRICENTIS\Tosca Server\DEXServer.
-
Navigate to the section Tricentis.DistributionServer.Properties.Settings.
-
Change the value of the setting EnableWorkspacelessExecution to True.
<setting name="EnableWorkspacelessExecution" serializeAs="String">
    <value>True</value>
</setting>-
Save and close the file.
-
Restart the Tosca Server via the IIS Manager.
Administer licenses
You need to have a valid Tosca license on all machines where you install Tricentis Tosca:
-
Each Agent machine requires an ExecutionOnly license.
-
Each machine on which you create tests and trigger their execution needs an appropriate Tosca license. Which license you need depends on the kind of tests you create. For information on licensing options, contact Tricentis Sales.
-
To set up the AOS workspace on the DEX Server, you need a valid Tosca license.
You only need this license to set up the workspace. Once Tosca Distributed Execution is up and running and you don't work with the DEX Server workspace, you no longer need a license for the server machine.
For information on how to set up licensing on your machines, see chapter "License management".
Set up workspaces
To use Tosca Distributed Execution with AOS, you need to set up separate multi-user workspaces.
These workspaces must have access to one common repository.
-
One multi-user workspace on each machine on which you create and trigger your tests. These are your user workspaces.
-
One multi-user workspace for the Automation Object Service (AOS). This workspace only exists to give the AOS access to the repository.
To set up your user workspaces, follow the steps below:
-
Create them.
-
If you are already working with
-
If you have not yet set up your repository and workspaces, do so now (see chapter "Create multi-user workspaces"). You need one workspace on every machine where a user should create and execute tests.
When you create the very first workspace, make sure that the workspace name only contains alphanumeric characters and underscores _.
Don't use any other special characters.
-
-
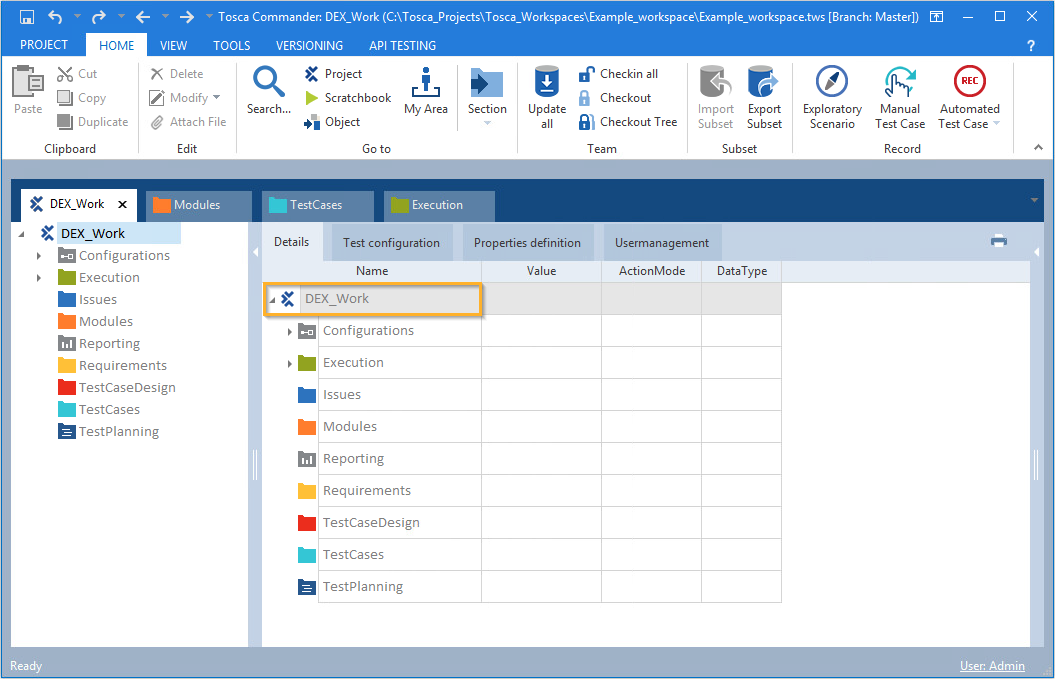
Open any workspace that is connected to the repository.
-
Go to Home->Project.
-
In the Details tab, take note of the
 project root name.
 You need this name later, when you set up the workspace for the Automation Object Service.

|
If you have skipped step 1 because you already have a repository and workspaces, check the project root name. The name must only contain alphanumeric characters and underscores _. If your project root name contains any other special characters, you have to change it: |
Check the project root name
This workspace gives the Automation Object Service (AOS) access to all objects in the common repository, such as your TestEvents and configurations.
|
|
Do not treat this workspace as a regular "working" workspace for users. It serves as a background workspace for the Automation Object Service. If you start working in this workspace, you will break the Automation Object Service. Do not use REST services with your AOS workspace; they will also break the Automation Object Service. The only exception to this rule is the AOS REST API, |
To set up your AOS workspace, follow the steps below:
-
On the Distributed Execution (DEX) Server machine, open Tosca Commander.
-
Go to Project->New. This opens the Create new workspace window.
-
In this window, perform the following actions:
-
Select your repository type from the drop-down menu.
Do not select a server repository. AOS does not work with Tricentis Server Repository workspaces.
-
Select Use existing repository and enter the connection string to your repository.
-
In the Select name for new workspace field, enter the project root name that you noted in your user workspace.
Note that this workspace name must be unique on the DEX Server. You cannot have another workspace with the same name on the DEX Server.
If you already have a workspace with the same name on the DEX Server, you must change the name of the other workspace.
-
Click OK to create the workspace.
-
Ensure that you have not selected Create slim workspace. The AOS workspace cannot be a slim workspace.
-
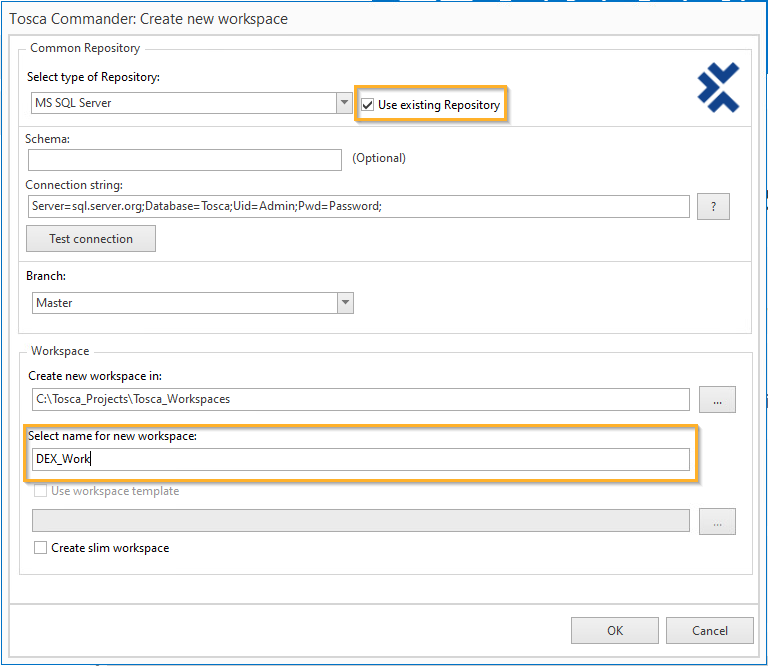
Create the AOS workspace
-
In the Automation Object Service tab of the Tricentis Service Configuration, populate the Workspace Folder, Workspace Root Name, Username and Password fields.
-
To complete the AOS setup, configure the execution environment you want to use:
-
Distributed Execution only
-
Elastic Execution Grid only
-
Distributed Execution and Elastic Execution Grid

Elastic Execution Grid was an early access feature. We're working hard on making it even better as part of our new Tricentis Test Automation platform. Unfortunately, these changes mean that we currently can't offer the integration for this version of Tosca. We apologize for the inconvenience.
Tricentis Test Automation is in the open beta phase and available for early access. If you're interested, click here to register.
-
-
Click Save and close the Tricentis Service Configuration dialog.
Connect Tosca Commander
Now you need to specify the connection between Tosca Commander and the DEX Server.
You need to do this on all machines where you want to create tests and trigger executions.
Alternatively, you can create project settings. In this case, the settings apply to all workspaces connected to the repository.
To connect Tosca Commander, follow the steps below:
-
Open Tosca Commander.
-
Go to Project->Settings->Commander->DistributedExecution->Server.
-
As the value of the setting EndpointAddress, enter the address of the DEX Server:
http://<server IP address or host name>:<port>/DistributionServerService/ManagerService.svc
If you use an IPv6 address, the server address has to contain the IP address instead of the hostname.
-
If you want to use a proxy server, populate the value of the setting Proxy with the complete network address of the proxy server:
http://<server IP address or host name>:<port>
-
Go to Project->Settings->Commander->DistributedExecution->Monitor Url.
-
As the value of the setting Url, enter the address of the machine that holds the Tosca Distributed Execution Monitor:
http://<server IP address or hostname of the machine that holds the DEX Monitor>:<port>/Monitor/
-
Go to Settings->Tricentis Services.
-
As the value of the setting ServerEndpointAddress, enter the address of Tricentis Service Discovery:
http://<server IP address or host name>:<port>
By default, Tricentis Service Discovery is installed on the same machine as the Tosca Distribution Server on port 5002.
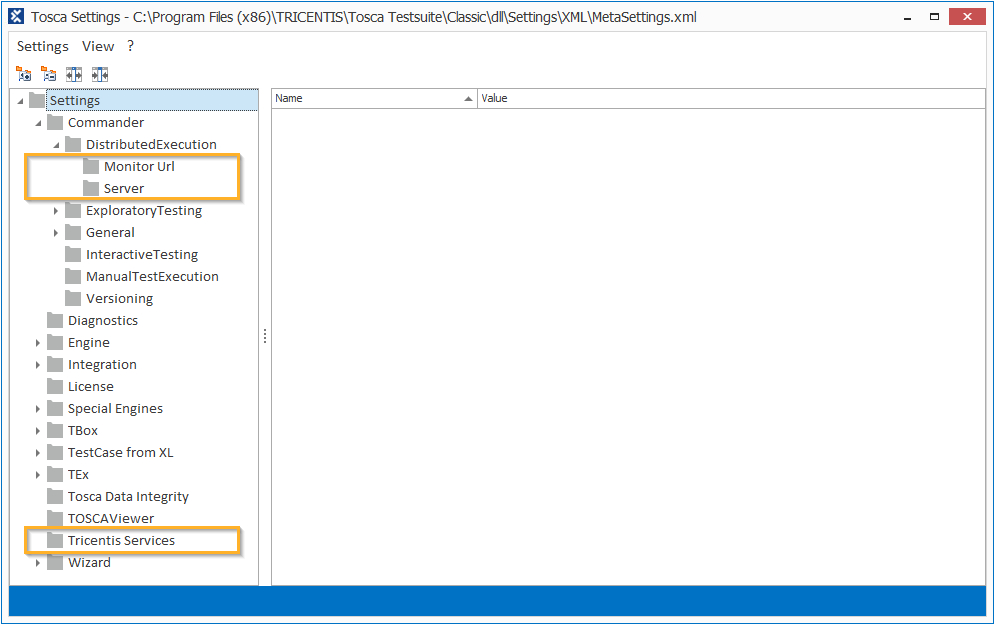
Modify the settings
Set up parallel execution
This last step of the Tosca Distributed Execution setup is optional.
In it, you create a project root setting that allows users to define how Tosca should run ExecutionLists.
If all TestCases in an ExecutionList are independent of each other, users can split an ExecutionList between Agents. The Agents then execute the TestCases simultaneously, which speeds up the test run.
To create the project root setting, follow the steps below:
-
Open a workspace which has access to the common repository and go to Home->Project.
-
Go to the Properties definition tab.
-
In the Properties definition tab, right-click ExecutionList and select
 Create Property from the mini toolbar.
 -
Rename the new property to TCDistribution.
-
Ensure that Visible is selected.
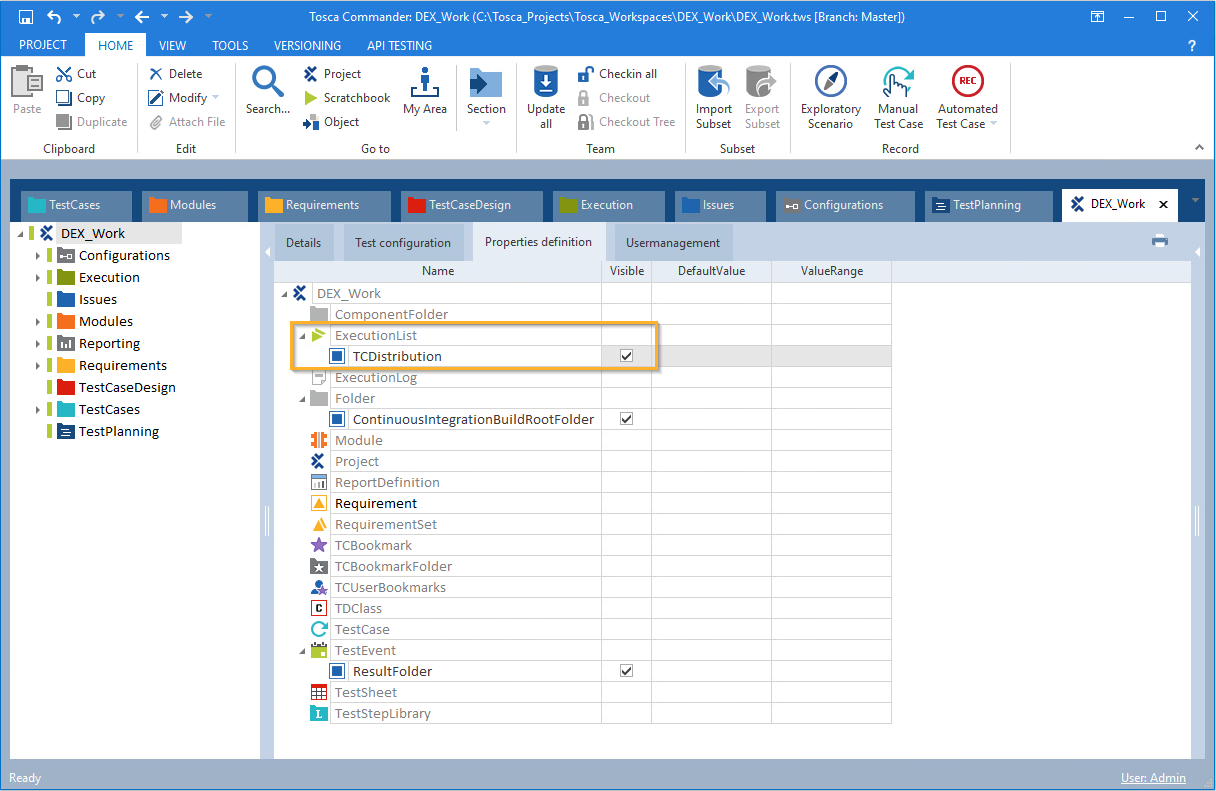
TCDistribution property for all ExecutionLists
Perform AOS workspace tasks
Tricentis offers a REST API for the Automation Object Service.
The AOS REST API allows you to perform the following tasks on your AOS workspace:
-
Check what's happening in a particular AOS workspace.
-
Compact an AOS workspace.
By default, there is no compact workspace task on the AOS workspace. As a result, retrieving and persisting data may slow down over time.
To avoid this, Tricentis recommends that you compact your AOS workspace(s) regularly.
-
Close and re-open an AOS workspace.
Tricentis Tosca treats the Automation Object Service as a separate workspace user. When you trigger an execution, AOS opens the workspace as a user. This locks the workspace; no other user can access it.
If you need to check something in this particular workspace, for instance if the workspace isn't performing as expected or you need to adapt permissions, you can manually close the workspace. Closing the workspace doesn't discard anything. AOS finishes the running tasks and queues everything else.
Once you are done, you must re-open the workspace. Then AOS can finish the queued tasks.
Access the AOS REST API
To access the AOS REST API, enter the following URL:
http://<IP address or hostname of the Tosca Distribution Server>:<AOS port>/swagger
-
If you use an IPv6 address, you must use the server IP address, not the hostname.
-
If you access the REST API from the machine that holds the Tosca Distribution Server, you can enter localhost instead of IP address/hostname.
-
Replace <AOS port> with the AOS port you have specified in the Tricentis Service Configuration.
Perform your AOS workspace tasks
For information on AOS REST API requests and responses, see the Swagger documentation in the AOS REST API.
What's next
Now that you've set up Tosca Distributed Execution, you're ready to start testing! For more information, see chapter "Create and execute TestEvents".