Create PuTTY Modules
This chapter describes how to create PuTTY Modules.
For information on how to steer PuTTY controls, see chapter "Steer PuTTY Engine 3.0 controls".
Scan PuTTY
You create
To do so, right-click a Module folder and select Scan->Remote Terminal. Alternatively, click on the dynamic menu Modules and select ![]() Scan->Remote Terminal.
Scan->Remote Terminal.

|
You must close any open Host application before scanning a PuTTY application. If you are executing a Host application, Tosca XScan doesn't detect the PuTTY application. |
The sections below describe how to create Modules with the
Scan PuTTY Label
The control Label allows you to steer messages in your
To create this control, follow the steps below:
-
In the PuTTY Scan window, select
 Label.
 -
In the Content Preview area, highlight the line where your text is located. Tricentis Tosca automatically uses the following properties to define your control:
-
Height specifies the height of the label.
-
Width specifies the width of the label.
-
Column specifies the on-screen position of the starting column of the label.
-
Row specifies the on-screen position of the starting row of the label.
-
-
Click
 Finish Screen and then
  Close.
Scan PuTTY TextBox
The control TextBox allows you to steer texts and execute keyboard commands in your
To create this control, follow the steps below:
-
In the PuTTY Scan window, select
 TextBox.
 -
-
Height specifies the overall height of the control.
-
Width specifies the overall width of the control.
-
Column specifies the on-screen position of the starting column of the control.
-
Row specifies the on-screen position of the starting row of the control.
-
-
If you want to use this control to send text or execute keyboard commands, you don't have to highlight any content. ActionMode Input always places your content in the terminal's current active position.
-
Click
Finish Screen and then  Close.
Scan PuTTY Table
To create a Module to steer tables, follow the steps below:
-
In the PuTTY Scan window, select
 Table.
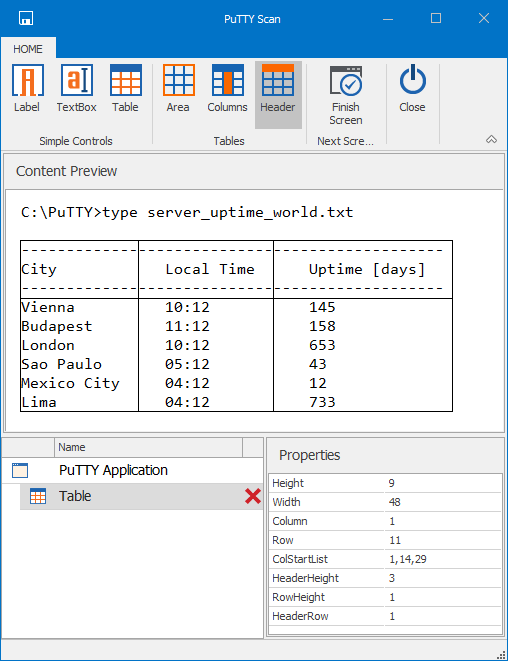
Table in a
-
By default, Tricentis Tosca counts every line as a row. If you want to choose a different height for each row of your table, use the following property:
-
RowHeight specifies the row height. The default value is 1.
-
-
Select
 Area and highlight the outer area of your table in the Content Preview area.
 Tricentis Tosca uses the following properties to define and locate your table:
-
Height specifies the overall height of the table.
-
Width specifies the overall width of the table.
-
Column specifies the on-screen position of the starting column of the table.
-
Row specifies the on-screen position of the starting row of the table.
-
-
Select
 Columns and define the columns of your table in the Content Preview area.
 Tricentis Tosca uses the following property to identify the columns of your table:
-
ColStartList is a comma-separated list for the first character of every column, relative to the control coordinates. This property always starts with 1.
-
-
By default, Tricentis Tosca uses the first row as the header of a table. If you want to use a different row as header, select
 Header and define it in the Content Preview area.
 Tricentis Tosca uses the following properties to identify the header of your table:
-
HeaderRow specifies whether the table has a header or not. The default value is -1 for a table without a header. If you define a header, this value changes to 1.
-
HeaderHeight specifies the height of the header, counted from the top of the table. The default value is 0.
-
-
Click
Finish Screen and then Close.