Mobile Modules
The folder TBox XEngines->Mobile in the Standard subset contains Modules that perform specific tasks for the Mobile Engine 3.0.
Open Mobile App
The Module Open Mobile App allows you to open native and hybrid mobile applications on your Android or iOS device.
This step is a mandatory first TestStep in Mobile Engine 3.0 TestCases. The only exception to this is if you want to set Desired Capabilities.
The Module has the following ModuleAttribute:
|
ModuleAttribute |
Description |
|---|---|
|
Application |
Specify the application name and use ActionMode Input. The application name and path depend on the device you use. For more information and examples of different ways to specify the application name, see chapter "Open mobile applications". |
If you want to open a native or hybrid app, use the Module OpenURL from the Standard subset.

|
When you upgrade Tricentis Tosca 12.3 or any earlier versions to 14.2 LTS, you have to perform an XEngines migration to ensure that the Open Mobile App Module works correctly. To do so, right-click on the project root element and select XEngines Migration->Update project to current version. |
ME3.0 Set Device Orientation
The Module ME3.0 Set Device Orientation allows you to define whether the Mobile Engine 3.0 should steer your device in portrait or landscape orientation.
It has the following ModuleAttribute:
|
ModuleAttribute |
Description |
|---|---|
|
Orientation |
Specify the orientation of your device and use ActionMode Select. The following values are available:
|

|
In the example below, you set the screen orientation to Landscape.
ME3.0 Set Device Orientation Module in a TestCase |

Click On Screen
This Module allows you to perform a tap gesture on a certain point of the mobile device screen.
It has the following ModuleAttributes:
|
ModuleAttribute |
Description |
|---|---|
|
X |
Specify the x-coordinate in percent. The leftmost value is 0 and the rightmost value is 100. |
|
Y |
Specify y-coordinate in percent. The top value is 0 and the bottom value is 100. |
|
|
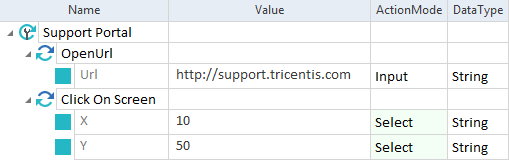
In this example, you perform a tap gesture at 10% of the x-coordinate and at 50% of the y-coordinate from the top left corner of the screen.
Click on Screen Module in a TestCase |
Set Desired Capabilities
Desired Capabilities allow you to indicate important parameters. These parameters tell the Appium Server how you want your test sessions to behave. For more information on using Desired Capabilities in your tests, see chapter "Set Desired Capabilities".
The Module Set Desired Capabilities allows you to apply Desired Capabilities to your test execution. It has to be the first TestStep of your TestCase (see chapter "Set Desired Capabilities for test execution").
The Module has the following ModuleAttributes:
|
ModuleAttribute |
Description |
|---|---|
|
Capability |
Specify which Desired Capability you want to apply:
Names and values are case-sensitive. |
|
|
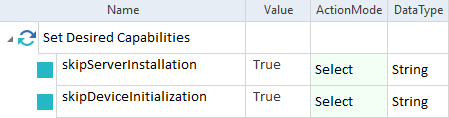
In this example, you apply the Desired Capabilities skipServerInstallation and skipDeviceInitialization to reduce the startup time of Android test execution.
Set Desired Capabilities Module in a TestCase |
Upload File to Mobile Device
The Module Upload File to Mobile Device allows you to upload a file from a computer to an Android device (see chapter "Transfer files to Android"). The file upload limit is 2 GB.
If the file already exists on the Android device, the Mobile Engine 3.0 overwrites it.
It has the following ModuleAttributes:
|
ModuleAttribute |
Description |
|---|---|
|
Desktop Path |
Specify the full path to the file that you want to upload, including the file name and extension. Example: D:\abc.pdf |
|
Mobile Device Path |
Specify the full path to the location where you want to save the file, including the file name and extension. Use forward slashes (/) in the path. Example: /sdcard/Download/abc.pdf You can specify a different name for your file. On Samsung devices, replace Internal Storage with sdcard in the file path. For example, replace /Internal storage/Download/abc.txt with /sdcard/Download/abc.txt. |
Download File from Mobile Device
The Module Download File from Mobile Device allows you to download a file from an Android device to a computer (see chapter "Transfer files to Android").
If the file already exists on the computer, the Mobile Engine 3.0 overwrites it.
It has the following ModuleAttributes:
|
ModuleAttribute |
Description |
|---|---|
|
Mobile Device Path |
Specify the full path to the file that you want to upload, including the file name and extension. Use forward slashes (/) in the path. Example: /sdcard/Download/abc.pdf On Samsung devices, replace Internal Storage with sdcard in the file path. For example, replace /Internal storage/Download/abc.txt with /sdcard/Download/abc.txt. |
|
Desktop Path |
Specify the full path to the location where you want to save the file, including the file name and extension. Example: D:\abc.pdf You can specify a different name for your file. |
|
|
In this example, you download the file example.png from your Android device to your computer.
Download File from Mobile Device Module in a TestCase |

Set Autohide Keyboard
The Module Set Autohide Keyboard allows you to disable the auto-hide mode for keyboards in native applications. This impacts the performance of steering text boxes (see chapter "Disable the keyboard auto-hide on iOS").
The Module has the following ModuleAttribute:
|
ModuleAttribute |
Description |
|---|---|
|
Autohide Keyboard |
Specify whether you want to enable the auto-hide mode of the iOS onscreen keyboard. Possible values are:
|
|
|
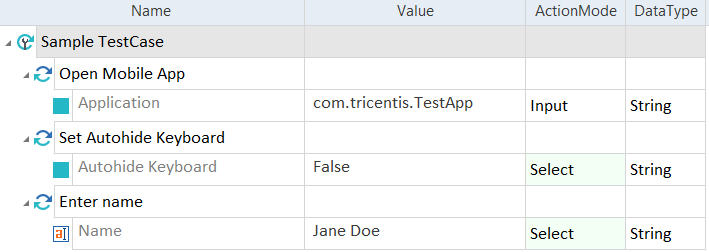
In this example, you disable the default auto-hide mode of the onscreen iOS keyboard.
Set Autohide Keyboard Module in a TestCase |
ME3.0 Hardware Button Operations
The Module ME3.0 Hardware Button Operations allows you to steer the following platform-specific hardware buttons:
-
Home button for iOS and Android
-
Back button on Android
-
App Selection button on Android
It has the following ModuleAttribute:
|
ModuleAttribute |
Description |
|---|---|
|
Button |
Specify which button you want to click. Possible values are:
|
|
|
In this example, you press the Back button on Android.
ME 3.0 Hardware Button Operations Module in a TestCase |

Swipe On Screen
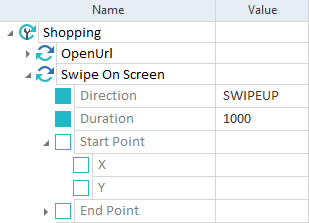
The Module Swipe On Screen allows you to perform a swipe operation directly on the screen. The length of the swipe movement is equal to one third of the mobile screen size.
The Module has the following ModuleAttributes:
|
ModuleAttribute |
Description |
|---|---|
|
Specify which type of swipe you want to perform. Possible values are:
|
|
|
Specify the duration of the swipe in milliseconds. A higher value makes the swipe slower and shorter. A lower value makes the swipe faster and longer. The default value is 300 ms. |
|
|
Define the start coordinates of the swipe. By default, the swipe starts at the center of the screen. You can specify different coordinates. If you specify one coordinate, you also have to enter a value for the other. |
|
|
Start Point->X |
Specify the start x-coordinate in percent. The leftmost value is 0 and the rightmost value is 100. |
|
Start Point->Y |
Specify the start y-coordinate in percent. The top value is 0 and the bottom value is 100. |
|
Define the end coordinates of the swipe. If you enter end coordinates, set the Direction to SWIPE. If you specify one coordinate, you also have to enter a value for the other. |
|
|
End Point->X |
Specify the end x-coordinate in percent. The leftmost value is 0 and the rightmost value is 100. |
|
End Point->Y |
Specify the end y-coordinate in percent. The top value is 0 and the bottom value is 100. |
|
|
In this example, you perform an upward swipe that lasts 1 second.
Swipe On Screen Module in a TestCase |
Send Text Input To Focused Control
The Module Send Text Input To Focused Control allows you to send text input to a focused control to simulate user action.
The Module has the following ModuleAttribute:
|
ModuleAttribute |
Description |
|---|---|
|
Text |
Specify the text input that you want to send to a focused control. |
|
|
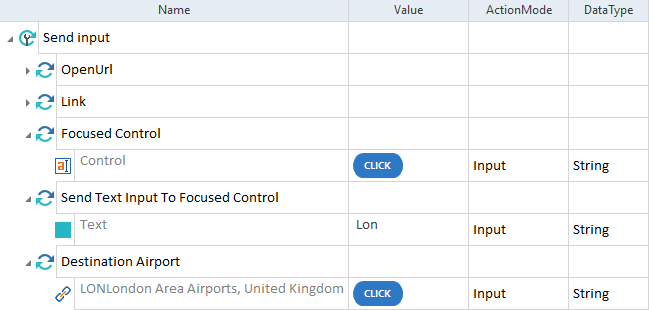
In this example, you send text input to a dynamic search field.
Send Text Input To Focused Control Module in a TestCase |
Draw On Screen
The Module Draw On Screen allows you to draw a shape directly on the screen.
The Module has the following ModuleAttributes:
|
ModuleAttribute |
Description |
|---|---|
|
Long Tap |
Specify whether you want to start the drawing with a tap or a long tap. Possible values are:
|
|
Duration |
Specify the duration of the movement in milliseconds. A higher value makes the movement slower and shorter. A lower value makes the movement faster and longer. This ModuleAttribute is optional. The default value is 300 ms. |
|
Point->X |
Specify the start x-coordinate in percent. The leftmost value is 0 and the rightmost value is 100. |
|
Point->Y |
Specify the start y-coordinate in percent. The top value is 0 and the bottom value is 100. |
|
|
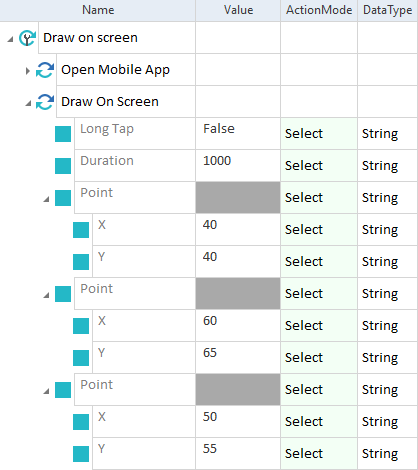
In this example, you draw a simple shape with three swipe movements. Each movement lasts one second.
Draw On Screen Module in a TestCase |
Switch Mobile App
The Module Switch Mobile App allows you to switch to a different mobile application during a single TestCase.
The Module has the following ModuleAttribute:
|
ModuleAttribute |
Description |
|---|---|
|
Application |
Specify the application to which you want to switch:
|
|
|
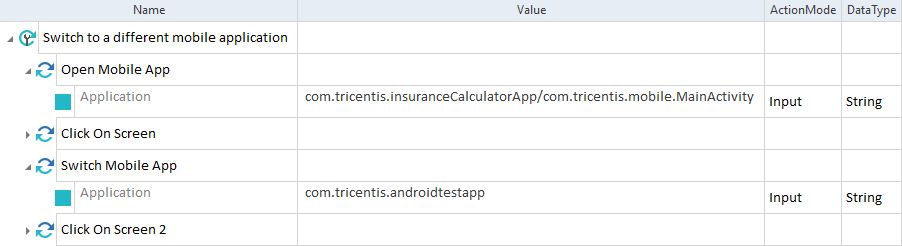
In this example, you perform the following actions:
Switch Mobile App Module in a TestCase |
Get Appium Session Id
The Module Get Appium Session Id allows you to save the Appium session ID to a buffer.
The Module has the following ModuleAttribute:
|
ModuleAttribute |
Description |
|---|---|
|
Buffer Name |
Specify the name of the buffer to which you want to save the ID of your current Appium session. |
|
|
In this example, you save the Appium session ID to a buffer named SampleBuffer.
Get Appium Session Id Module in a TestCase |

End Appium Session
The Module End Appium Session allows you to end the current Appium session.
|
|
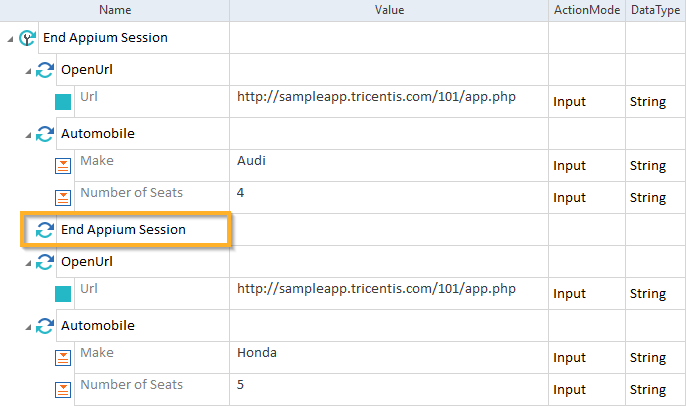
In this example, you perform the following actions:
End Appium Session Module in a TestCase |
Android Snackbar
The Module Android Snackbar allows you to steer snackbar in Android applications.
It has the following ModuleAttributes:
|
ModuleAttribute |
Description |
|---|---|
|
Text |
Specify the text that appears on the snackbar. |
|
Action |
If the snackbar contains a button, specify the action you want to perform on it. |
|
|
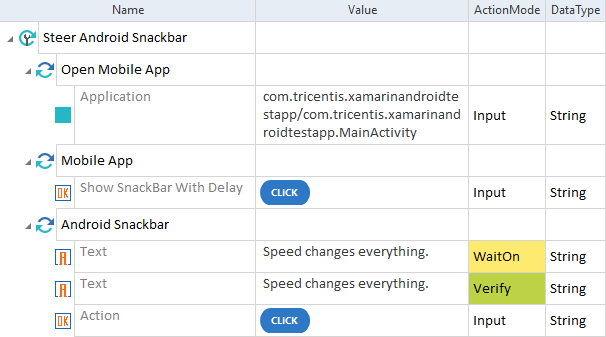
In this example, you perform the following actions:
Android Snackbar Module in a TestCase |
Set iOS biometrics enrollment
The Module Set iOS biometrics enrollment allows you to enable or disable FaceID or TouchID user authentication on your iOS simulator.
The Module has the following ModuleAttribute:
|
ModuleAttribute |
Description |
|---|---|
|
State |
Enable or disable the biometrics enrollment on your iOS simulator. Possible values are:
|
|
|
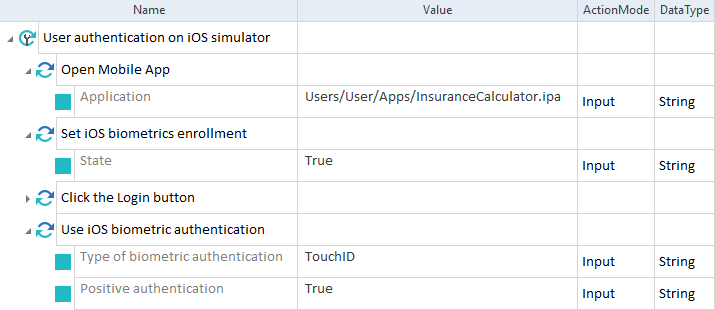
In this example, you perform the following actions:
Set iOS biometrics enrollment Module and Use iOS biometric authentication Module in a TestCase |
Use iOS biometric authentication
The Module Use iOS biometric authentication allows you to use FaceID or TouchID user authentication on your iOS simulator.

|
To use this Module, you have to enable biometrics enrollment on your iOS simulator. To do so, use the Module Set iOS biometrics enrollment. |
The Module has the following ModuleAttributes:
|
ModuleAttribute |
Description |
|---|---|
|
Type of biometric authentication |
Specify what type of biometric authentication you want to use. Possible values are:
|
|
Positive authentication |
Specify whether the authentication is positive or negative. Possible values are:
|
|
|
In this example, you perform the following actions:
Set iOS biometrics enrollment Module and Use iOS biometric authentication Module in a TestCase |
Use Android fingerprint authentication
The Module Use Android fingerprint authentication allows you to use fingerprint authentication on your Android emulator.
|
|
To use this Module in your TestCase, you have to configure fingerprint ID(s) on your Android emulator first. |
The Module has the following ModuleAttribute:
|
ModuleAttribute |
Description |
|---|---|
|
FingerprintId |
Enter the fingerprint ID that you configured on your emulator and want to use for user authentication. |
|
|
In this example, you perform the following actions:
Use Android fingerprint authentication Module in a TestCase |

Upload File To Perfecto
The Module Upload File To Perfecto allows you to upload a file to your Perfecto repository.
|
|
The Module Upload File To Perfecto is based on API Engine 3.0. When you open it in the Modules tab, you see the Technical View by default. This doesn't affect how you use the Module. You can drag and drop it onto your TestCase and fill TestStepValues as usual. |
The Module has the following ModuleAttributes:
|
ModuleAttribute |
Description |
|---|---|
|
Perfecto token |
Specify your Perfecto security token. |
|
File path |
Specify the path to the file that you want to upload. For example: .File=C:/Users/User/Desktop/SampleFile.png. |
|
Endpoint |
Specify your Perfecto repository endpoint. For example: https://<your_host>.perfectomobile.com/services/repositories/media/. |
|
Destination path |
Specify the path to the target file in your Perfecto repository. Use the correct prefix, for example PUBLIC:. |
|
Overwrite file |
Specify whether you want to overwrite an existing file with the same name:
|
|
|
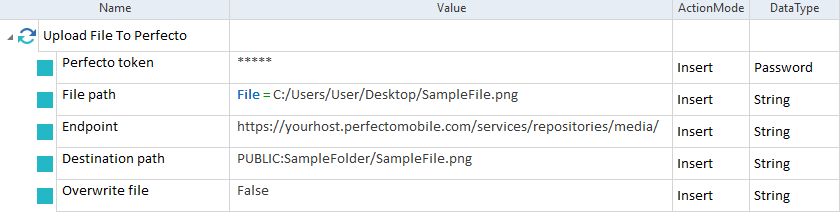
In this example, you use the Module Upload File To Perfecto to upload a file to the Perfecto repository. You specify the necessary parameters:
Upload File To Perfecto Module in a TestCase |
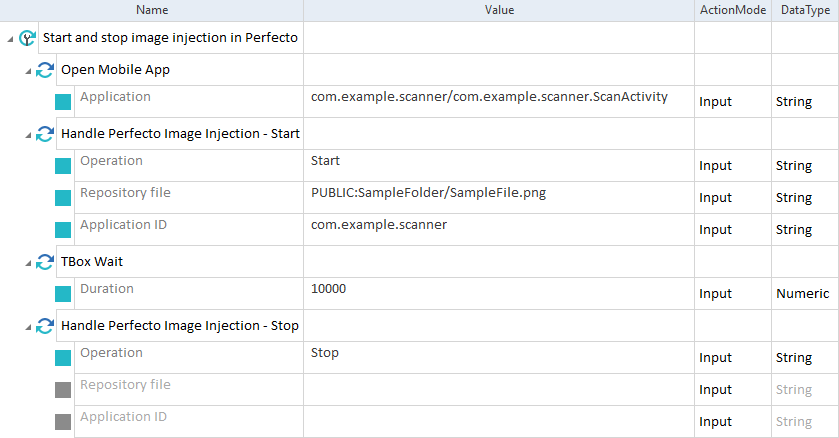
Handle Perfecto Image Injection
The Module Handle Perfecto Image Injection allows you to start or stop image injection in Perfecto.
The Module has the following ModuleAttributes:
|
ModuleAttribute |
Description |
|---|---|
|
Operation |
Specify the type of action you want to perform:
|
|
Repository file |
Specify the path to the file that you uploaded to Perfecto. Use the correct prefix, for example PUBLIC:. |
|
Application ID |
Specify the application to which you want to inject an image. For Android applications, enter the PackageName. For iOS applications, enter the BundleID. |
|
|
In this example, you perform the following actions:
Handle Perfecto Image Injection Module in a TestCase |
Use Perfecto biometrics authentication
The Module Use Perfecto biometrics authentication allows you to authenticate a user on an iOS or Android cloud device on Perfecto.
The Module has the following ModuleAttributes:
|
ModuleAttribute |
Description |
|---|---|
|
Application ID |
Specify the application where you want to trigger user authentication. For Android applications, enter the PackageName. For iOS applications, enter the BundleID. |
|
Authentication positive |
Specify whether the authentication is positive or failed. Possible values are:
|
|
Error type |
Select the type of error that you want to trigger by failed authentication. Possible values are:
For detailed error descriptions, refer to chapter "Automate user authentication on Perfecto cloud devices". |
|
|
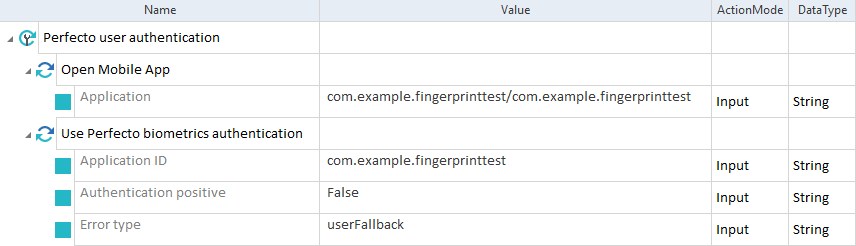
In this example, you perform the following actions:
Use Perfecto biometrics authentication Module in a TestCase |