Baseline comparison
This chapter describes the Tosca Baseline Comparison 3.0 on the Table control. The baseline comparison allows you to save a table from the test application and compare it to the current state of the table later on.
Create the baseline
If you want to perform a baseline comparison, first create a baseline. To do so, you have two options:
-
Create the baseline manually for each TestStep.
-
Create a baseline automatically for each TestStep the first time it is executed.
To create a baseline manually, follow the steps below:
-
Create a new TestStep by dragging and dropping the Module that contains the Table control onto a TestCase (see chapter "Create TestSteps from Modules").
-
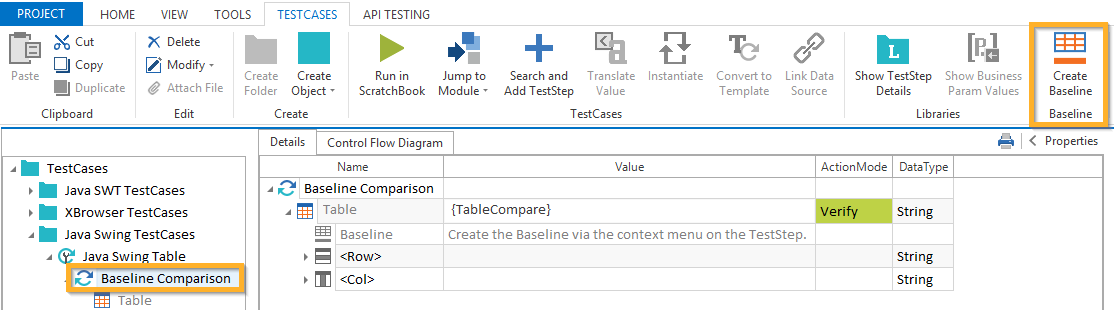
Click on the Table control and select
 Create Baseline from the dynamic menu TESTCASES.
Alternatively, right-click on the TestStep and select Create Baseline from the mini toolbar.
Create a baseline via the dynamic menu
The subsequent dialog informs you if the baseline creation was successful.
Tricentis Tosca creates the baseline element and adds it to the Table control. The Value column contains its creation date and time.
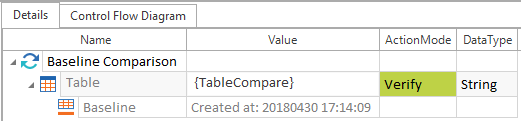
Baseline element in the TestStep
-
Execute the TestCase (see chapter "Create an ExecutionList").
Create baselines automatically
To create baselines automatically, follow the steps below:
-
Navigate to the Tricentis Tosca settings and change the value of the setting EnableAutoGenerateBaseline to True.
-
Set the Value of any TestSteps for which you wish to create a baseline to {TableCompare}.
-
Execute all TestCases containing such TestSteps. A baseline will be automatically generated for each TestStep the first time it is executed. All subsequent executions will perform a comparison against the generated baseline.
Please note: When the EnableAutoGenerateBaseline setting is enabled, a Passed status on the first execution of a TestStep with the Value {TableCompare} indicates only that the baseline was created successfully. No comparison of data is performed at this stage.
-
You can also regenerate the baseline by manually deleting it from a TestStep and executing the TestStep again. Again, a new baseline will be generated on the first run.
Exclude rows and columns
If you want to exclude specific rows or columns from the baseline comparison, select the Exclude from the dropdown menu of the ActionMode column of the Table control. You can exclude rows and columns within the same TestStep.
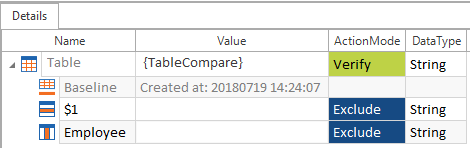
Exclude first row and column Employee of the table from baseline comparison

|
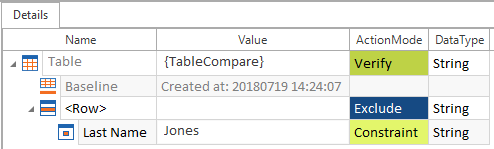
The following example shows how to search for a specific value in table and exclude the corresponding rows. The system searches for the unique customer with the attribute Last Name and the value Jones. All rows will be excluded that have the value Jones in the column Last Name.
Exclude rows using the ActionMode Constraint. For further information on the ActionMode Constraint, see chapter "ActionMode Constraint". |
Update baseline
In the Execution section, you can update your baseline to the current state of the table. To do so, follow the steps below:
-
Select the ExecutionList that contains the baseline comparison.
-
Click on the ExecutionXTestStepLog with the state of the table you want to use for upcoming baseline comparisons and select
 Update Baseline from the dynamic menu EXECUTIONLISTS.
 Alternatively, right-click on the ExecutionXTestStepLog and select Update Baseline from the context menu.
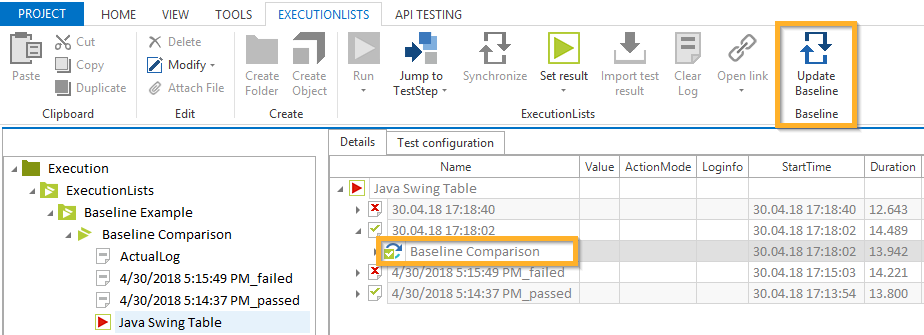
Update Baseline

|
For a successful update you need to make sure, that the TestCase is checked out (see chapter "Checkin and checkout objects"). |
The subsequent dialog informs you if the baseline update was successful.