Managing recorded TestCases
The Manual Test Case Manager serves to manage your recorded, manual TestCases. You can create TestSteps and TestStepValues manually and add files, result screenshots, design screenshots and videos. You may also add annotations to screenshots and videos.
In the Manual Test Case Manager you can perform the following actions:

Manual Test Case Manager
Navigating the Manual Test Case Manager
In the Manual Test Case Manager you can choose between a Media view and a List view.
Your created design screenshots, result screenshots, videos and attachments are stored in the TestStep. The name of the TestStep indicates the application you recorded, whereas the TestStepValue name indicates the type of the recorded interaction. You can edit these names after the recording if required.

Manual Test Case Manager
To show the name of an option in the Manual Test Case Manager, hover over an icon to display its tooltip.
The following options are available in the Manual Test Case Manager:
|
Option |
Description |
|---|---|
|
|
Saves the manual TestCase and closes the Manual Test Case Manager window (see "Save and Close"). |
|
|
This saves the manual TestCase and continues with the next manual TestCase. A new manual TestCase is opened in the Manual Test Case Manager. |
|
|
Exports the test result as PDF (see chapter "Exporting test results"). |
|
|
This shows the Media view. |
|
|
This shows the List view. |
|
|
Starts the video recording function (see chapter "Recording and editing videos"). A new TestStep is created and the video is stored in the Result column of the TestStep. |
|
|
Starts automatic recording of your interactions (see chapter "Automated recording of manual TestCases"). |
|
|
Creates a TestStep. Please assign meaningful names to your TestSteps. |
|
|
Creates a TestStepValue for the selected TestStep. |
|
|
Deletes a TestStep or TestStepValue. |
|
|
Sets the execution result of the selected TestStep to Passed. |
|
|
Sets the execution result of the selected TestStep to Failed. |
|
|
The previous action is canceled. |
|
|
The previous action is restored. |
List view in the Manual Test Case Manager
In the List View you can click on the icons ![]() or
or ![]() in the upper-left tab to collapse or expand the window view. Use the icons
in the upper-left tab to collapse or expand the window view. Use the icons ![]() or
or ![]() to hide or show the Manual Test Case Manager window.
to hide or show the Manual Test Case Manager window.
Click on the ![]() List button to switch to the List window in the Manual Test Case Manager.
List button to switch to the List window in the Manual Test Case Manager.
Manual Test Case Manager - List view
Media view in the Manual Test Case Manager
The Media view shows all TestSteps and TestStepValues of your TestCase in an expanded display. The system creates a design screenshot for each interaction which also includes annotations regarding the interaction.
Click on the ![]() Media button to switch to the Media window in the Manual Test Case Manager.
Media button to switch to the Media window in the Manual Test Case Manager.

Manual Test Case Manager - Media view
To navigate through the TestSteps of your TestCase, click on the Navigate Steps![]() icons at the bottom of the window.
icons at the bottom of the window.
Creating TestSteps and TestStepValues manually
You can manually create TestSteps and TestStepValues for a TestCase.
To create a new TestStep , click on the Create Step ![]() icon.
icon.
To create a new TestStepValue for a TestStep, click on the Create Value![]() icon.
icon.
Make sure to assign meaningful names to your TestStep and TestStepValues.
Set TestStep Results
The Manual Test Case Manager allows you to mark TestSteps and TestStepValues as Passed or Failed. When a TestStep contains at least one TestStepValue, you have to set the result on the level of the TestStepValue.
To set the results of a TestStep or TestStepValue, follow the steps below:
-
Select the TestStep or TestStepValue for which you want to set a result.
-
Click on the Set Passed
 icon or the Set Failed
 icon in the Test Case ribbon to set the result to Passed or Failed.
Alternatively, you can select the results by clicking the icons next to the TestSteps or TestStepValues in the sidebar of the Media view, or in the Result column of the List view.
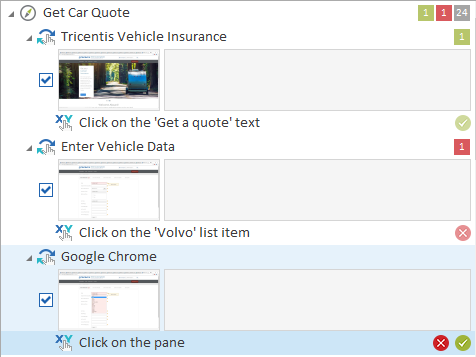
TestStep results in the Media View
The colored square indicates the result and the number of TestStepValues with that result.
Attaching Files
You can attach any number of files for each TestStep of a TestCase.
To attach files to a TestStep or TestStepValue of a TestCase, click on the Add Attachment![]() icon. The option is available in the Results column of the List view and at the upper right-hand side in the Screenshot tab of the Media view.
icon. The option is available in the Results column of the List view and at the upper right-hand side in the Screenshot tab of the Media view.
Merging TestSteps
Tosca allows several TestSteps to be combined to one TestStep.
-
Select the TestStep you would like to merge with another TestStep.
-
Use drag and drop to move the TestStep to the Merge Box field of the TestStep to be merged.
The TestSteps are merged. All annotations of the merged design screenshots are inserted into the design screenshot of the target TestStep.

Merging TestSteps

|
Please note that screenshots in TestSteps to be merged must be of the same size. |
Save and Close
Click on the ![]() Save and Close button to save your recorded manual TestCase and to exit the Manual Test Case Manager.
Save and Close button to save your recorded manual TestCase and to exit the Manual Test Case Manager.
The recorded manual TestCase is created in the TestCases section, and the TestCase workstate is set to Completed.
Tosca creates an ExecutionList with ExecutionEntries in the Execution section for manual TestCases which include at least one TestStep with at least one result, result screenshot or attachment.
Design screenshots are stored in the Managed Files Area, whereas result screenshots are stored in the screenshots folder, and attachments are referenced (see chapter "Create file reference with central storage location").