Work with TestCase-Design Classes
You can minimize redundancy in your TestSheet by using TestCase-Design Classes for Attributes that are repeatedly used. Instead of creating the same Attribute multiple times, you can create a Class, which you can centrally manage and use throughout your TestSheets.
Create a Class
You can create a Class manually, from an existing Module, or from an Attribute. After you have created your Class, use Class references to work with your Class within your TestSheet.
Create a Class manually
To create a TestCase-Design Class manually, follow the steps below:
-
Right-click the TestCase-Design folder for which you want to create a Class.
-
Select
 Create Class from the mini toolbar.
 Alternatively, press Ctrl N + Ctrl C to create a new Class.
-
Rename the Class as desired. TestCase-Design Classes must have unique names.
-
Create Attributes and Instances within your Class as required by your project.
Create a Class from a Module
You can create a Class from an existing Module or XModule avoid redoing your work manually. To do so, follow the steps below:
-
Select the Module(s) you want to use for your TestCase-Design Class. You can select multiple Modules at once by holding the Ctrl key.
-
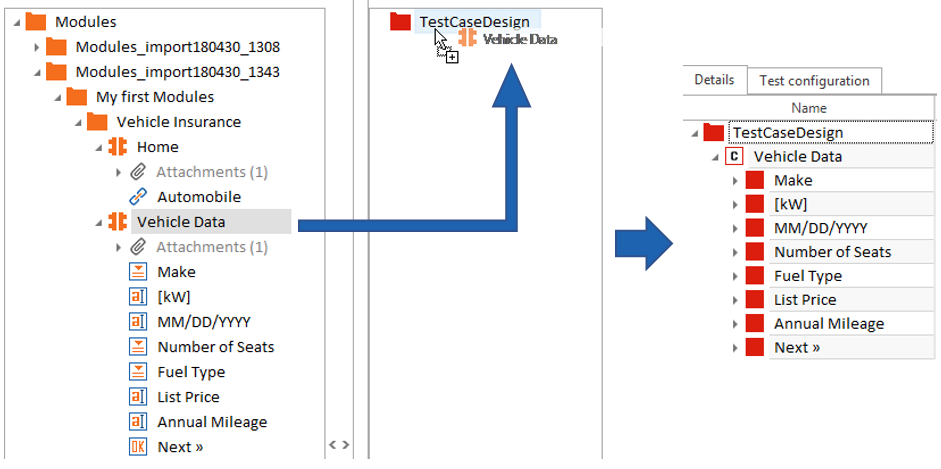
Drag and drop the Module(s) onto the TestCase-Design folder for which you want to create the new Class.
Tosca Commander creates a Class for each Module including all relevant Attributes and Instances.

Create Vehicle Data Class from Module
Create a Class from Attributes
You can create a Class from existing Attributes. To do so, follow the steps below:
-
Select the Attribute(s) you want to save as a Class. You can select multiple Attributes at once by holding the Ctrl key.
-
Drag and drop the selected Attribute(s) onto the TestCase-Design folder for which you want to create the new Class.
-
If the selected Attributes do not have any child elements, Tosca Commander will prompt you to select one of the following:
-
Create Class from Attribute: This creates a Class and Instance collection for each selected Attribute.
-
Create Structure from Attribute: This creates a Class without any Instance collection for each selected Attribute.
-
Any Attributes you used to create a new Class will automatically become class references.
Customize a Class icon
You can change the default Class icon to an icon of your choice. To do so, follow the steps below:
-
Right-click the Class for which you want a custom icon, and select Attach File from the context menu.
-
Select the image file you want to use for your icon and click Open.
-
In the subsequent Choose file type dialog, select Embedded from the dropdown menu and click OK.
-
Tosca Commander adds the image as an attachment to the Class. Right-click the image file and select Use as Class Icon from the context menu.
To remove a custom icon, simply delete the attached file. The icon will revert to the default Class icon.
In the example below, the Class Vehicle Data class has a custom icon.
![]()
Customized Vehicle Data class icon