Use image injection in Perfecto
Perfecto allows you to upload an image and inject it to a specified application so that it can be used by the camera. This enables you, for example, to test QR code recognition.
To use this feature via Tricentis Tosca, you need two Modules that are provided in the Standard subset under Standard modules->TBox XEngines->Mobile:
Prerequisites
To use image injection in Perfecto, you need to enable Sensor instrumentation when you install your application on a cloud device.
To do so, open your device in Perfecto, go to Applications and click on +Install New. In the CONFIGURE APP tab, enable the toggle Sensor instrumentation.
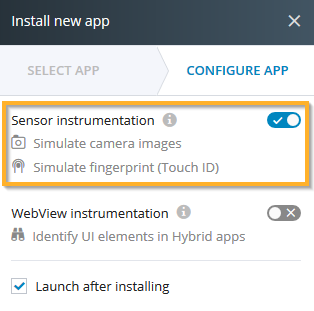
Enable Sensor instrumentation in Perfecto
Upload file to Perfecto
To upload a file to the Perfecto repository, follow the steps below:
-
Create a TestCase out of the Module Upload File To Perfecto.
-
Specify the TestStepValues. Note that you must specify all parameters.
-
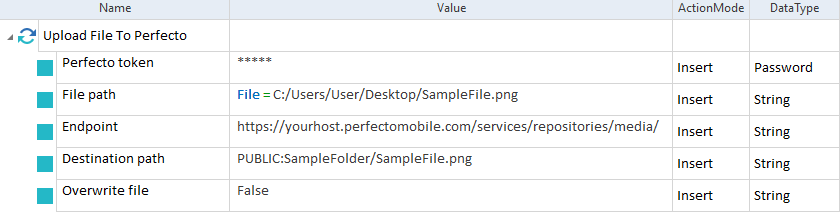
For Perfecto token, enter your Perfecto security token.
-
For File path, enter the path to the file that you want to upload. For example: .File=C:/Users/User/Desktop/SampleFile.png.
-
For Endpoint, enter your Perfecto repository endpoint. For example: https://<your_host>.perfectomobile.com/services/repositories/media/.
-
For Destination path, enter the path to the target file in your Perfecto repository. Use the correct prefix, for example PUBLIC:.
-
For Overwrite file, enter True if you want to overwrite a file with the same name. Enter False if you don't want to overwrite an existing file.
For detailed information on all parameters that you can use to upload a file to Perfecto repository, refer to the Perfecto documentation.
-
-
Run the TestCase.
Tricentis Tosca uploads the file that you specified in the TestStepValue File path to the Perfecto repositiory path that you specified in the Destination path.
To access your Perfecto repository, you have to switch to the old lab in Perfecto. To do so, click on Go to the old lab in the upper right corner of your Perfecto Manual Testing panel.

|
The Module Upload File To Perfecto is based on API Engine 3.0. When you open it in the Modules tab, you see the Technical View by default. This doesn't affect how you use the Module. You can drag and drop it onto your TestCase and fill TestStepValues as usual. |

|
In this example, you use the Module Upload File To Perfecto to upload a file to the Perfecto repository. You specify the necessary parameters:
Upload File To Perfecto Module in a TestCase |
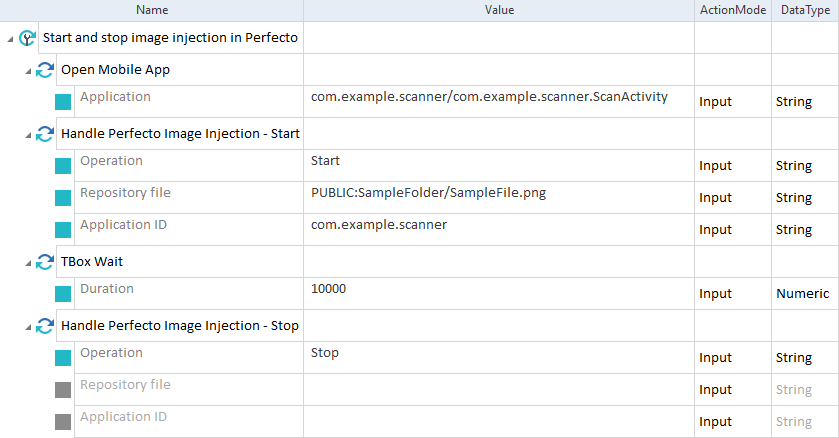
Start or stop image injection in Perfecto
To start and stop injecting an image to the camera of a cloud device, follow the steps below:
-
Specify the test configuration parameters to establish a connection with the Perfecto device.
-
Add the Open Mobile App TestStep as a first TestStep in the execution.
-
Drag and drop the Handle Perfecto Image Injection Module onto your TestCase.
-
Specify the TestStepValues:
-
For Operation, select Start from the drop-down list to start image injection.
-
For Repository file, enter the path to the file that you uploaded to Perfecto. This file is injected to your application and displayed for the camera of your cloud device.
-
For Application ID, enter the ID of an application that you opened with the Open Mobile App TestStep. For Android applications, enter the PackageName. For iOS applications, enter the BundleID.
-
-
To display the image for a specified period of time, you can use the Tbox Wait Module.
-
To stop the image injection use the Handle Perfecto Image Injection Module once again. Set the TestStepValue Operation to Stop. You don't need to specify any other TestStepValues here.
|
|
In this example, you perform the following actions:
Handle Perfecto Image Injection Module in a TestCase |