|
|
Map out your process
This chapter describes step 1 in the RPA Studio First Steps tutorial.
What will you do here?
You will outline your process in the Flowchart tab.
Why is that important?
Before you even think about automation, take the time to map out your business process. This helps you to figure out the following things:
-
What exactly do you need the Bot to do - and when?
-
Which elements are involved? Which user interfaces, files, etc.?
Create a new Bot
First, you need to create a new Bot. To do so, follow the steps below:
-
In RPA Studio, create a new folder for your Bots. To do so, right-click RPA folder and select
 Create Folder from the mini toolbar.

Create a new folder
-
Rename the folder to Tutorial.
-
Right-click the folder and select
 Create Bot from the mini toolbar, or press CTRL+N, CTRL+B.
 -
Name the Bot Tutorial Bot.

New Bot, pristine Flowchart
Map out your basic process
The Flowchart tab is where you define which actions you want your Bot to perform. These actions are called Steps.
For now, you'll use so-called Empty Steps. Empty Steps are placeholders that help you to map out your process before you start designing your Bot.
The following video takes you through the mapping process. A step-by-step description is below.
-
In the Flowchart tab, click on
 Add. This opens the Add dialog.
 -
In the Add dialog, click on Empty Step.
![]()
Create an Empty Step via the Add dialog
This adds an Empty Step to your Flowchart:
![]()
New Empty Step in the Flowchart
Consider the goal of this tutorial:
You want the Bot to register someone for the event, remember the resulting registration code, and save the code to a file.
So a logical first Step for the Bot would be to open the registration page in the browser.
-
Give the Empty Step you just created a descriptive name: Open the registration page
-
Next, create four Empty Steps that chart the basic process:
- Empty Step Enter registration data: The Bot should enter the registration data for a particular visitor. For this, the Bot has to interact with the registration form, i.e. the demo application.
- Empty Step Get code: The Bot should get the registration code for this visitor. For this, the Bot has to interact with the registration form, i.e. the demo application.
-
Empty Step Write code to Notepad: The Bot should write the code to a new Notepad file.
-
Empty Step Save file: The Bot should save the file.
You can create these Steps from scratch via the Add dialog. Alternatively, you can copy existing Steps: either press CTRL + C, CTRL + V, or drag an existing Step while holding CTRL.
This is your basic process:

Initial process outline
Figure out additional requirements
Now it's time to figure out any extra Steps or checks you might need in between.
Steps in a Flowchart aren't set in stone. You can always add new Steps or rearrange Steps via drag and drop.
For instance, you might want to make sure that the browser window is front and center. This should happen between the Steps Open the registration page and Enter registration data.
-
To add an Empty Step at this position, hover your mouse over the gray arrow between the two Steps.
-
The gray arrow then turns into the
Add icon. Use it to add another Empty Step. Alternatively, you can add an Empty Step at the bottom of the Flowchart and drag it to the desired position.
-
Name the Empty Step Manipulate browser window.

Add a new Step between two existing Steps
Next, you need to think about how the Bot should interact with Notepad: It has to open Notepad, write the code to a new file, and then save and close the file.
But first, you need another check.
Since the Bot has to open Notepad, you need to ensure that the program isn't already open. If it were, the Bot wouldn't know which window to steer - and throw an error.
To avoid this, you can use an IF Statement to check whether Notepad is open. IF Statements check whether a given statement is TRUE or FALSE. Depending on the outcome, the Bot performs different actions (see "Create an IF Statement").
-
Open the Add dialog by clicking on
Add. You can position the Step in one of the following ways: -
Directly between the Steps Get code and Write code to Notepad
-
At the bottom of the Flowchart, in which case you need to drag and drop it to the right position
-
-
In the Logic tab of the Add dialog, click on IF Statement. This adds an IF Statement to your Bot:

Newly created IF Statement in the Flowchart
The blue element with the question mark is a so-called Control Expression. That's the statement the Bot checks to see whether it's TRUE or FALSE.
You'll learn how to design Control Expressions in a later chapter of the tutorial. For now, use placeholders.
-
Enter the placeholder text Check if Notepad is open into the Control Expression.
-
If the statement is FALSE, i.e. Notepad isn't open, the Bot should open it.
So add an Empty Step to the No path of the IF Statement.
-
Name the Empty Step Open Notepad.
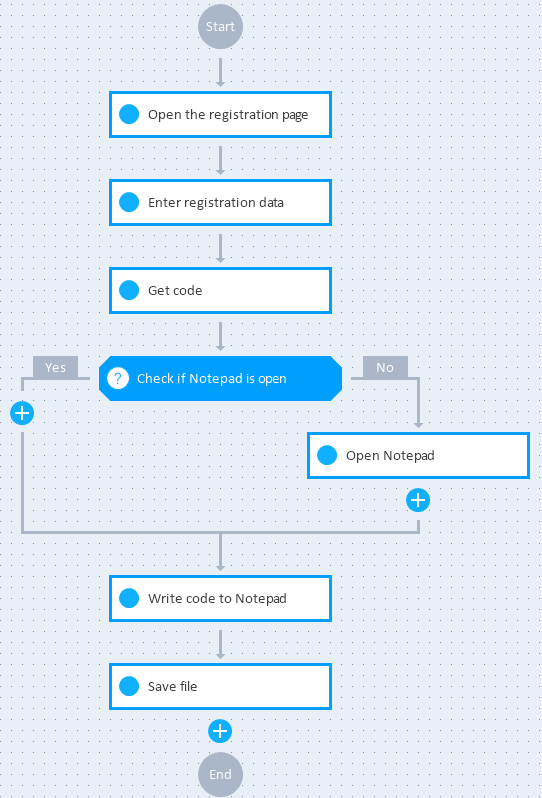
IF Statement in the Flowchart
As you did with the browser window, you also want the Bot to bring the Notepad front and center. The Bot should do this even if Notepad is already open. In other words, this action is no longer part of the IF Statement.
-
Add an Empty Step after the IF Statement and name it Bring Notepad front and center.
Finally, the Bot should close the file and then close the browser window. To do so, add two more Empty Steps at the bottom of the Flowchart:
-
Add an Empty Step named Close file.
-
Add an Empty Step named Close browser.
This gives you the final process outline:

Final outline
What's next
Now you know what you want the Tutorial Bot to do.
Before you design the Tutorial Bot, i.e. determine how to automate the process that you have just mapped out, you need to scan your application.