Execute test runs
You execute test runs within the Test Pad, a core component of Tricentis Test Management for Jira. It helps you navigate through your selected test runs and supports you in entering all relevant details.
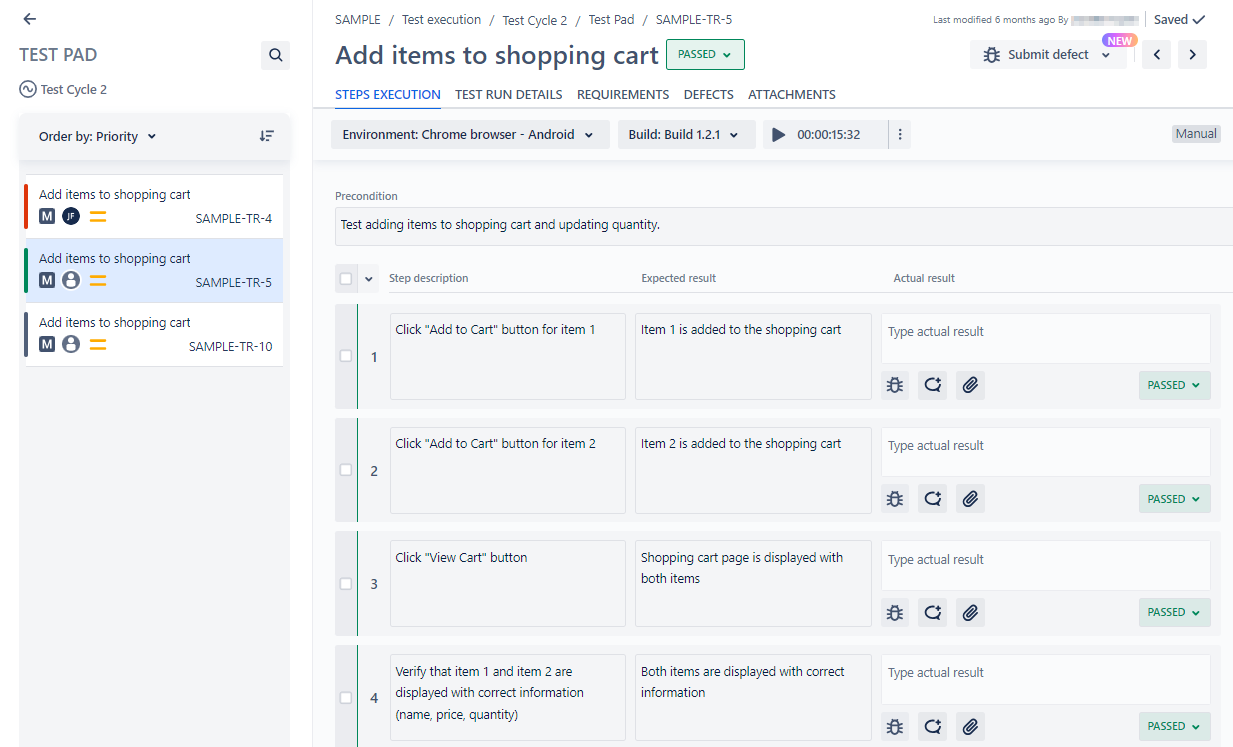
Execution logging with a test run
During the execution with the Test Pad, you enter the actual result of your tests. For each test run you can perform the following:
-
Specify the execution status: Passed, Failed, Blocked, In Progress, or Unexecuted.
-
Submit a defect (bug) to let your team know you encountered a problem during the execution.
-
Attach a file to support any findings you have during the execution.
-
Include a comment to add any other simple text information.
-
See an overview of the associated requirements, defects, and attachments.
-
Record the amount of time it takes to run each test with the Timer. If it isn't activated yet, turn on this functionality in the execution settings.
This topic takes you through the steps to work with the Test Pad to execute a test run and report defects.
Open the Test Pad
To open the Test Pad to execute a selection of test runs, follow these steps:
-
In the Apps section of your Jira project, select Test Management to open the Tricentis Test Management for Jira.
-
Go to the Test Execution tab.
-
On the left pane, select the test cycle which contains the test runs that you want to execute.
-
Select the check boxes next to the test runs you want to execute.
-
Select Run to open the Test Pad.
-
Work with the Test Pad to document the validation of the selected test runs.
Note that you can select multiple test cycles and use the floating actions bar to quickly run multiple test runs.
Work with the Test Pad
Once the Test Pad is open, you can start executing the selected test runs. For each test run, you can enter and view additional information in one of these tabs: Steps Execution, Test Run Details, Requirements, Defects, and Attachments.
Use the left pane to sort and navigate between the test runs you've selected to execute in the Test Pad. Alternatively, use buttons Previous and Next at any time.
Steps Execution
In the Steps Execution tab, you can perform the following for each test step of a test run:
-
Enter the Actual result. Use this field to describe the observed behavior in contrast to the specified Expected result.
-
Submit a Defect. Use this button to create a defect (bug) issue type where you can describe a problem you encountered during the execution.
-
Add a Comment. Use this button to add simple text information about the execution of that test step, such as additional findings or remarks.
-
Add an Attachment. Use this button to upload a file, such as a test evidence or artifacts that are relevant to the test step.
-
Choose a Status: In Progress, Failed, Blocked, and Unexecuted.
Test Run Details
In the Test Run Details tab, you can see and modify the Jira issue fields Description and Details of the Linked test case.
Requirements
In the Requirements tab, you can see Linked requirements. These are all requirements that you have linked to the associated test case.
Defects
In the Defects tab, you can see the following information:
-
Test run linked defects: Defects that you submitted to the whole test run.
-
Steps linked defects: Defects that you submitted to specific test steps.
Attachments
In the Attachments tab, you can perform the following tasks:
-
Attach files which correspond to the whole test run. These are listed under Test run attachments.
-
See files that you attached to individual test steps in the Steps Execution tab. These are listed under Test run steps attachments.
What's next
Now that you have executed your test runs, check how you can analyze your test results.