Integrate .NET UnitTest with Universal Agent
In this article we will walk you through an example to integrate, execute and schedule Test Execution for your Unit Test test project (.NET.Framework) with Universal Agent
Notes
The test project used in this article is stored on github at https://github.com/QASymphony/dotnet-samples containing:
-
Dotnet project that targets .NET.4.5 (Windows only): UnitTestSample
This article will integrate UnitTestSample project with Universal Agent
Prerequisites
-
You machine needs to have .NET.4.5 or higher version and MSBuild installed
-
This article uses Selenium that opens Chrome browser, so make sure you also install Google Chrome to the machine where Automation Host is running
Step 1: Create a new Universal Agentfor your UnitTest test project
Access to your Automation Host UI. Click on Add button to create a new agent. The New Agent dialog will be shown.
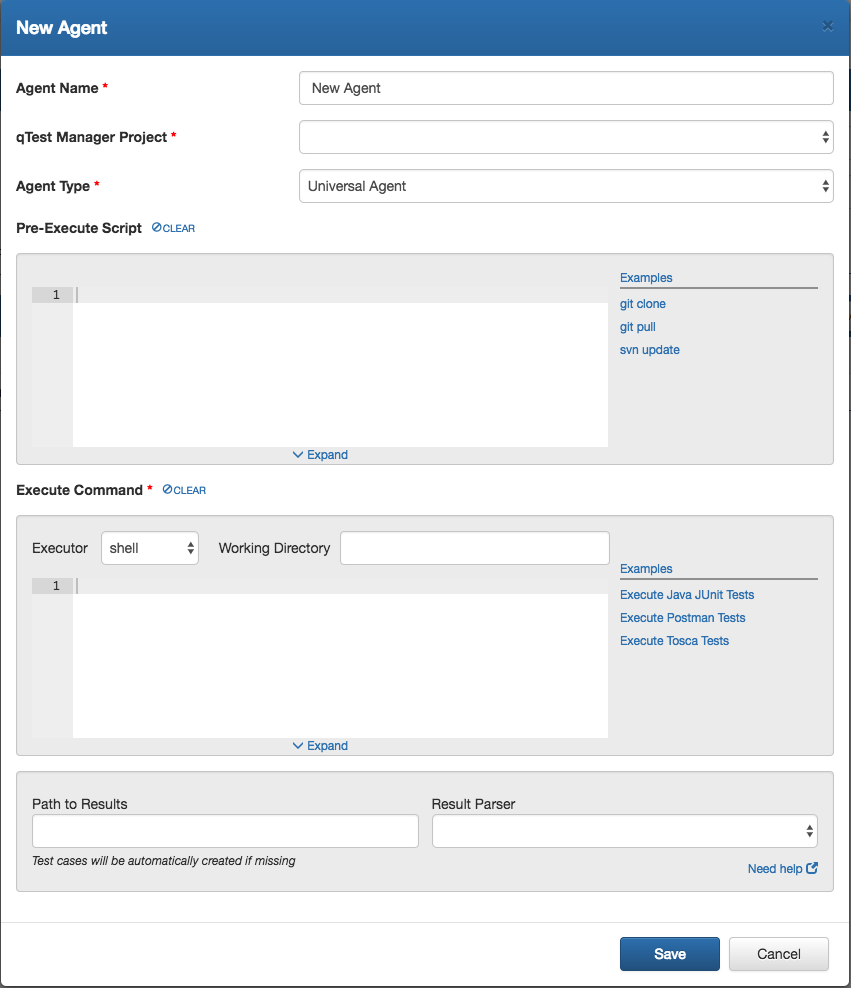
Next, enter the following to the New Agent dialog:
General Information
-
Agent Name: enter name of the agent, e.g UnitTest .NET.Agent
-
qTest Manager Project: select a qTest Manager project from which the agent is going to execute scheduled tests, e.g. qConnect Sample Project
-
Agent Type: select Universal Agent/strong>
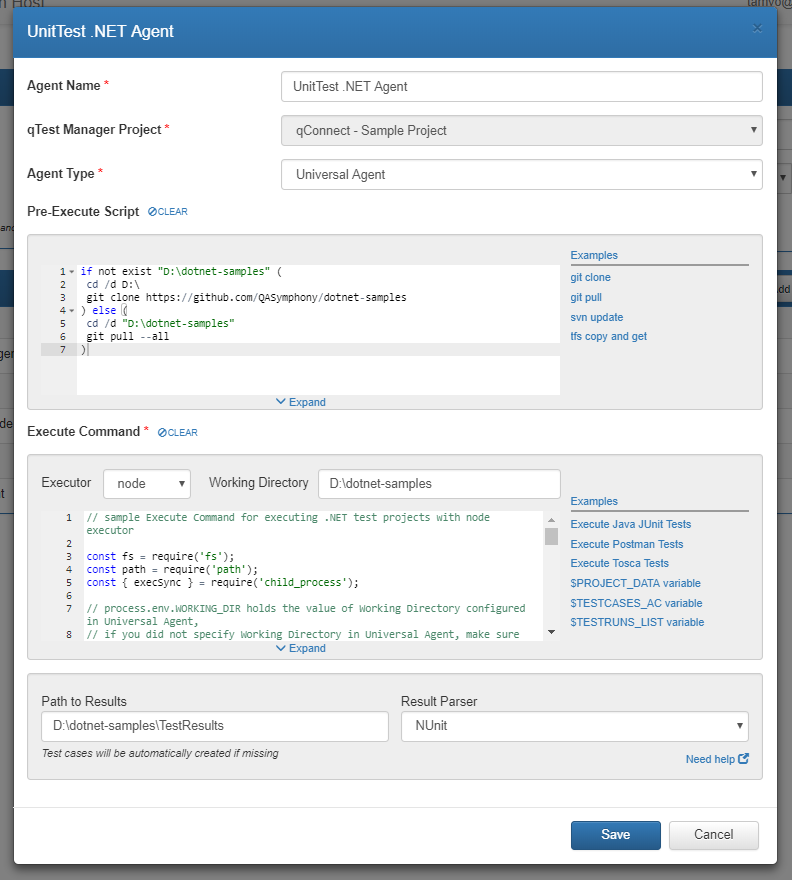
Pre-Execute Script
We are going to configure a pre-execute script to either clone the sample code from github or pull the latest updates of that repo if it already exists to the host machine.
Enter the script below to the Pre-Execute Script editor, which is specific to the Operating System that the Automation Host is running:
if not exist "D:\dotnet-samples" (
 cd /d D:\
 git clone https://github.com/QASymphony/dotnet-samples
) else (
 cd /d "D:\dotnet-samples"
 git pull --all
)
Execute Command
Executor: select node as the script executor
Working Directory: enter D:\dotnet-samples
Execute Command
We are going to create a script written in NodeJS to:
-
obtain the automation content(s) of scheduled test runs by resolving the value of magic variable TESTCASES_AC. Refer to this article to learn more about MAGIC VARIABLES in Universal Agent
-
if the value of TESTCASES_AC variable is empty, which means there is no test runs being scheduled to be executed (e.g. when this Universal Agentis executed in the first time), we will let the agent execute the whole tests in our UnitTestSample project then create test run logs to qTest Manager as the execution result
-
if TESTCASES_AC variable has value, which are the automation contents of scheduled test runs, we will instruct Universal Agentto only execute tests that match those automation contents
Enter the code snippet below to the Execute Command editor.
// sample Execute Command for executing .NET UnitTest projects with node executor
const fs = require('fs');
const path = require('path');
const { execSync } = require('child_process');
// process.env.WORKING_DIR holds the value of Working Directory configured in Universal Agent,
// if you did not specify Working Directory in Universal Agent, make sure you enter it here
let SOLUTION_DIR = process.env.WORKING_DIR || ``;
// change project name that you want to run
let TEST_PROJECT_NAME = 'UnitTestSample';
// path to test project, change it to reflect yours
let TEST_PROJECT_DIR = path.resolve (SOLUTION_DIR, 'Dotnet', TEST_PROJECT_NAME);
// validate the existence of SOLUTION_DIR, it it does not exist, print error and stop execution
if (!fs.existsSync(SOLUTION_DIR)) {
console.error('No working directory found.');
return;
}
// solution file path contains test project
let SOLUTION_FILE = path.resolve (SOLUTION_DIR, 'Dotnet-Samples.sln');
// possible value for configuration: Debug or Release
let CONFIGURATION = 'Debug';
// we are going to execute published test
let EXECUTION_DIR = path.resolve(TEST_PROJECT_DIR, 'bin', CONFIGURATION);
// path to the test project output
let TEST_PROJECT_DLL_FILE = path.resolve(EXECUTION_DIR, `${TEST_PROJECT_NAME}.dll`);
// this is the full path to MSBuild to build project
// make sure you change it to reflect your environment
let MS_BUID_EXECUTABLE_PATH = 'C:/Program Files (x86)/MSBuild/12.0/Bin/MSBuild.exe';
// this is the full path to vstest.console.exe command
// make sure you change it to reflect your environment
let VSTEST_CONSOLE_EXECUTABLE_PATH = 'C:/Program Files (x86)/Microsoft Visual Studio/2017/Community/Common7/IDE/CommonExtensions/Microsoft/TestWindow/vstest.console.exe';
// by default, the result folder will be created at ${SOLUTION_DIR}/TestResults
let RESULT_DIR = path.resolve(`${SOLUTION_DIR}`, 'TestResults');
// this is the path to XML test result
let PATH_TO_XML_RESULT = path.resolve(`${RESULT_DIR}`, 'Results.xml');
// delete result dir if it exists
if (fs.existsSync(RESULT_DIR)) {
execSync(`rmdir /s /q "${RESULT_DIR}"`);
}
// resolve TESTCASES_AC magic var to get the scheduled test runs
let testcases_AC = $TESTCASES_AC;
testcases_AC = testcases_AC ? testcases_AC.split(',') : [];
/**
* Kicks off the test. What it does is to resolve the value of `testcases_AC` variable and validate:
* Case 1: if that variable has value, meaning there is/are test run(s) being scheduled in qTest Manager
* -- for each scheduled test run, finds and executes the the test method whose name matches that test run's automation content
* Case 2: the value of testcases_AC is empty, meaning no test runs being scheduled when the Universal Agent is executed in the first time
* -- executes all the tests within the project output DLL
*/
var testMethods = '';
if (testcases_AC && testcases_AC.length > 0) {
testMethods = '/Tests:';
for (let testcase_AC of testcases_AC) {
testMethods += `${testcase_AC},`;
}
testMethods = testMethods.slice(0, -1);// remove the last ','
}
// the command line builder
let commandBuilder = [];
// build command line to build test project. If you don't want to build project or the project build already exists, you can remove this line
commandBuilder.push(`"${MS_BUID_EXECUTABLE_PATH}" "${SOLUTION_FILE}" /p:Configuration=${CONFIGURATION} /p:Platform="Any CPU"`);
// build command line to run tests
if (testMethods != '') {
// run specific test methods, change the log file path if desired
commandBuilder.push(`"${VSTEST_CONSOLE_EXECUTABLE_PATH}" "${TEST_PROJECT_DLL_FILE}" ${testMethods} --logger:"nunit;LogFilePath=${PATH_TO_XML_RESULT}"`);
} else {
// run all tests, change the log file path if desired
commandBuilder.push(`"${VSTEST_CONSOLE_EXECUTABLE_PATH}" "${TEST_PROJECT_DLL_FILE}" --logger:"nunit;LogFilePath=${PATH_TO_XML_RESULT}"`);
}
// the dotnet test runner will throw exception when there is an assertion failed and causes the
// test exited with code 1. So we wrap the command execution in a try catch block to ensure the
// execute command is fully executed and not exited with code 1 when there is exception thrown from the test
try {
let commandLine = commandBuilder.join(' && ');
// execute the shell command
execSync(commandLine, { stdio:"inherit" });
} catch (err) {
console.error(`*** Test execution error ***`);
console.error(err.message || err);
console.error(`*** End test execution error ***`);
}
Path to Results
Enter the value below to specify the path to the test results generated when the execution completes e.g: D:\dotnet-samples\TestResults
Result Parser
Select NUnit as the Result Parser. Note: if you do not find the NUnit parser in the Result Parser list, follow below steps to make it available to Universal Agent
-
Temporarily save the NUnitTest .NET.Agent. You'll be return back to Automation Host dashboard
-
Download NUnit parser HERE
-
Access qTest Launch and follow this article to upload the Parser to qTest Launch
-
Go back to Automation Host UI, refresh the page for it to load the new parsers
-
Select to edit NUnitTest .NET.Agent and you'll find the NUnit parser from the Result Parser list
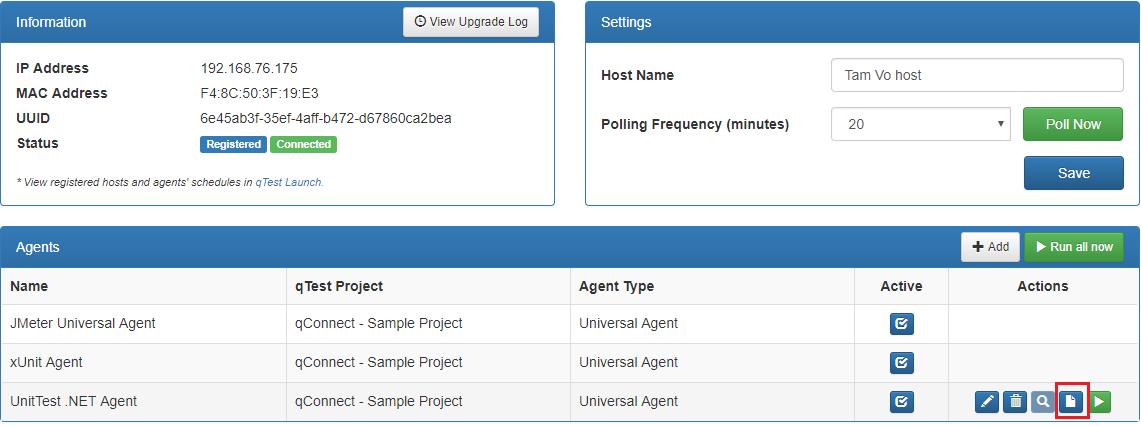
Select SAVE to finish creating the agent. Below is how UnitTest Agent looks like.
Step 2: Execute the Agent
From Agents list, locate the UnitTest .NET.Agent and click on Run Now button.

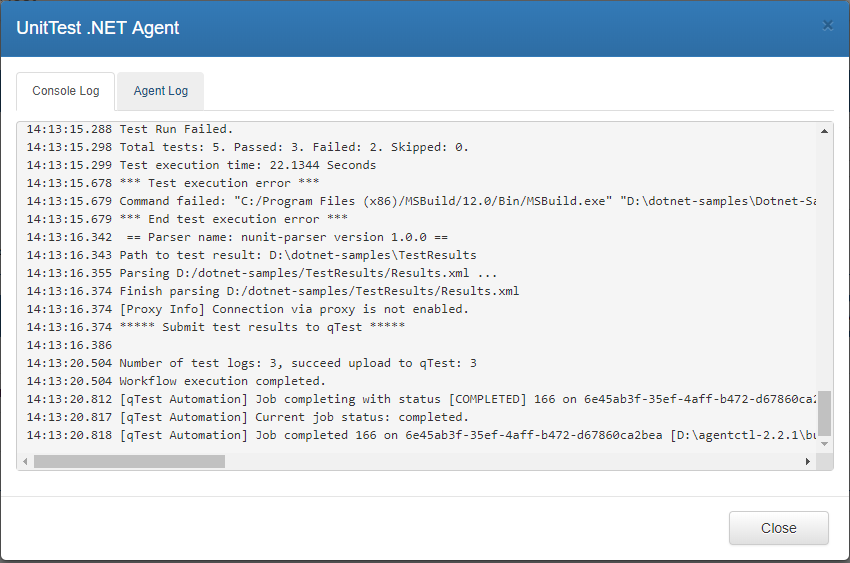
The agent execution dialog will display.
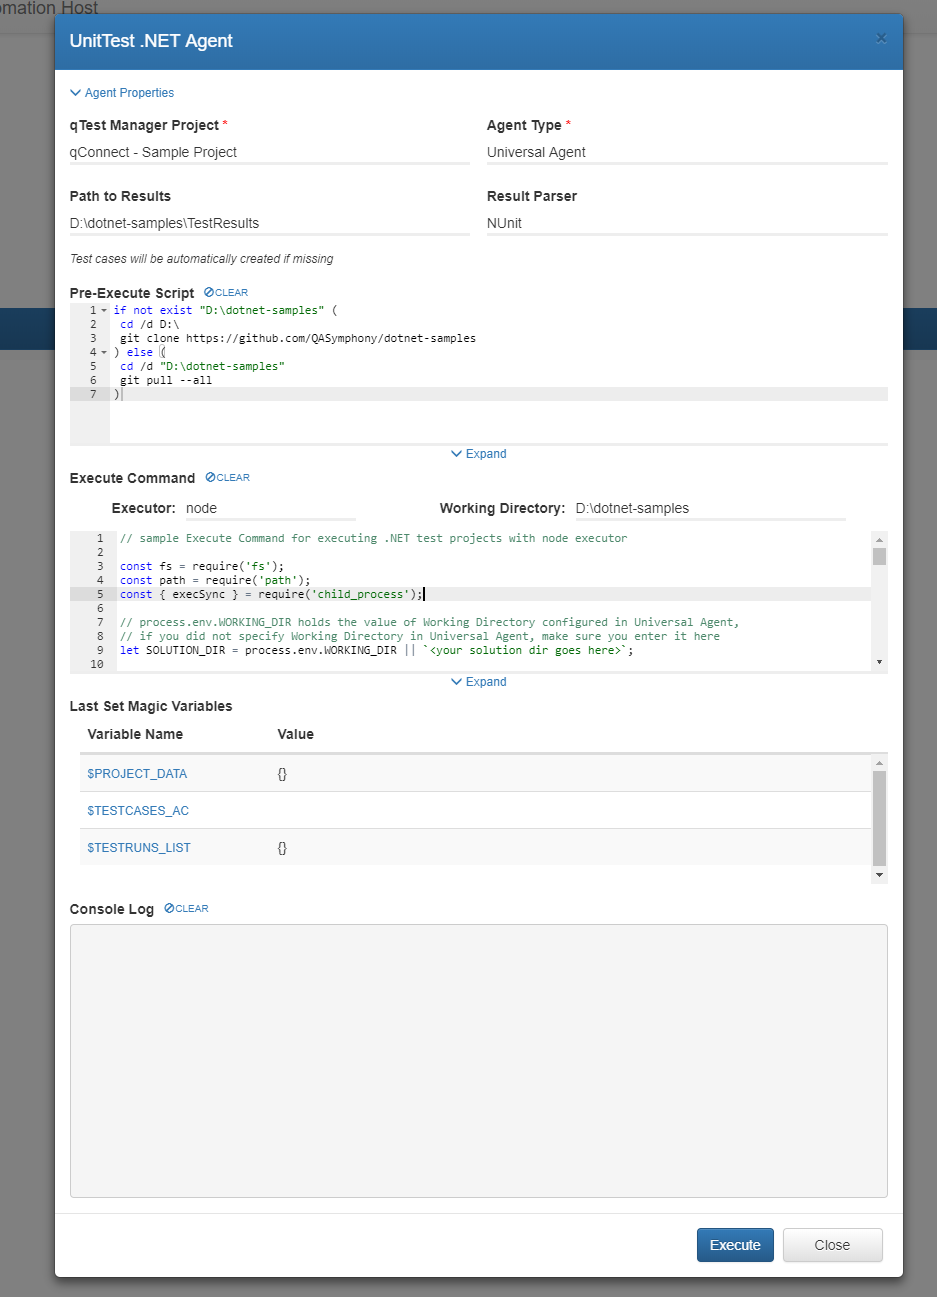
Click on the Execute button to execute the agent. Once the execution completes, the Console Log shows all the test results have been submitted to qTest Manager, as below screenshot.
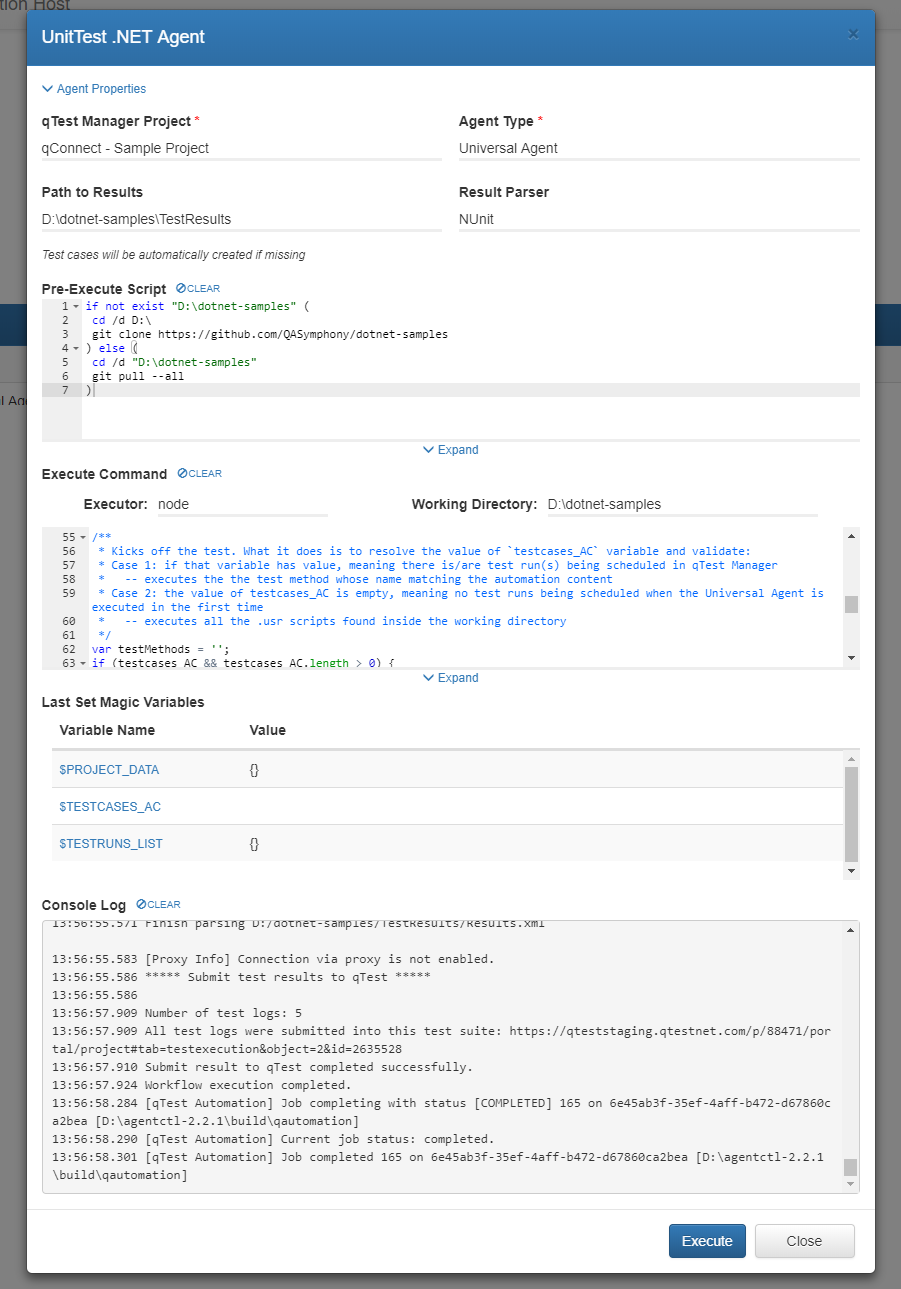
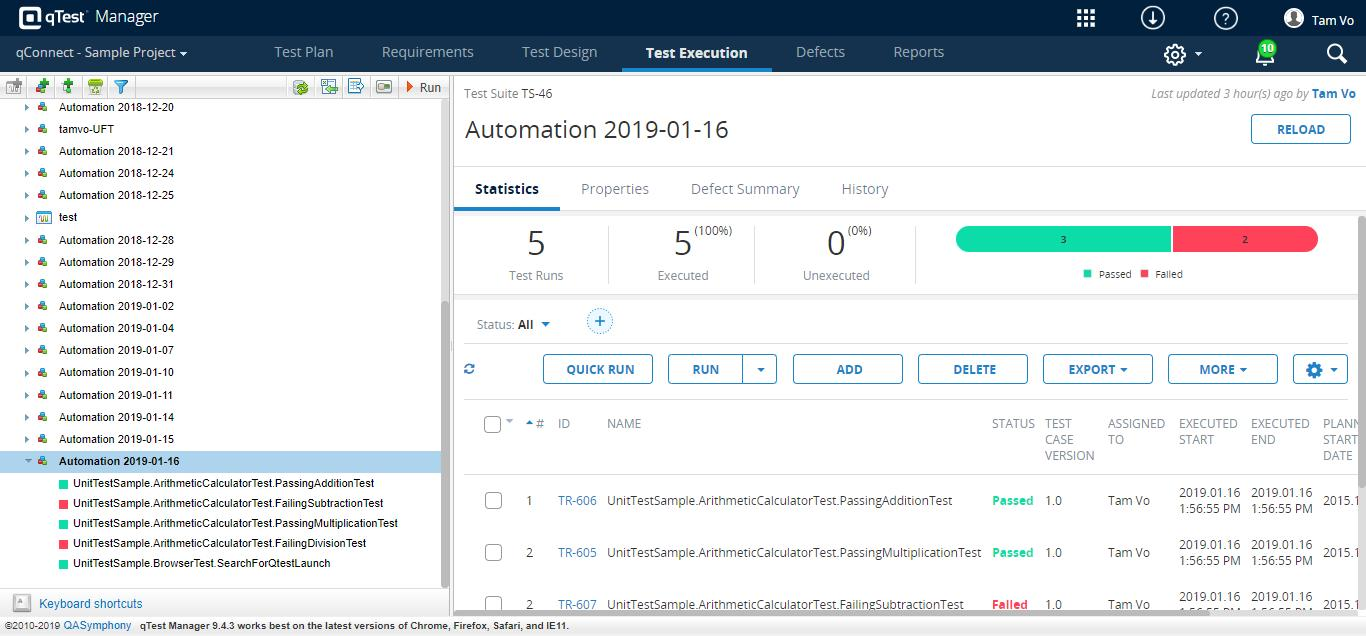
Next, access to qTest Manager. Select qConnect Sample Project then go to Test Execution module. You'll see the test results submitted to qTest Manager as Test Runs under a Test Suite naming Automation YYYY-MM-DD, where YYYY-MM-DD is the date the agent is executed, as below.
Now we are going to schedule Test Execution for some selected test runs with the UnitTest .NET.Agent and verify it only executes tests that match the scheduled test runs as well submits results to those test runs.
Step 3: Schedule Test Execution for specific Test Runs
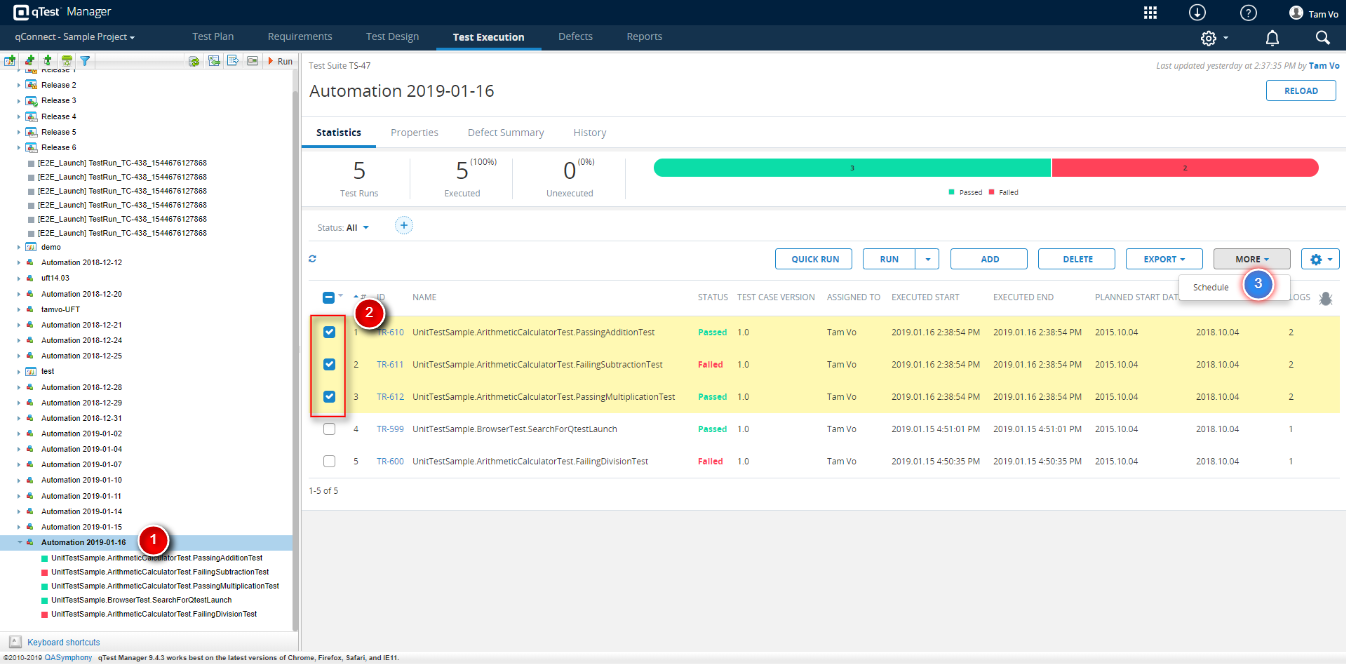
From qTest Manager, select the project qConnect Sample Project, then click on Test Execution tab and do the followings:
-
Select the newly created test suite, in our example, it is Automation 2019-01-16.
-
From the test run list on the right, select the first three (3) test runs
-
Click on MORE button, then select Schedule
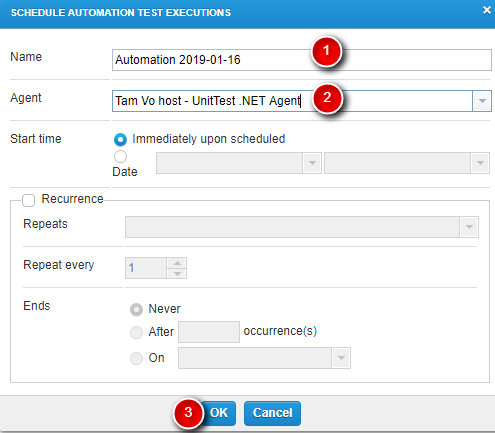
On the opening SCHEDULE AUTOMATION TEST EXECUTION dialog, enter the followings:
-
Name: name of the schedule, e.g. Execute UnitTest with Universal Agent/strong>
-
Agent: select the UnitTest .NET.Agent
-
Click OK button to complete Test Execution scheduling for the selected three test runs
Now go back to Automation Host UI. Click Poll Now button.
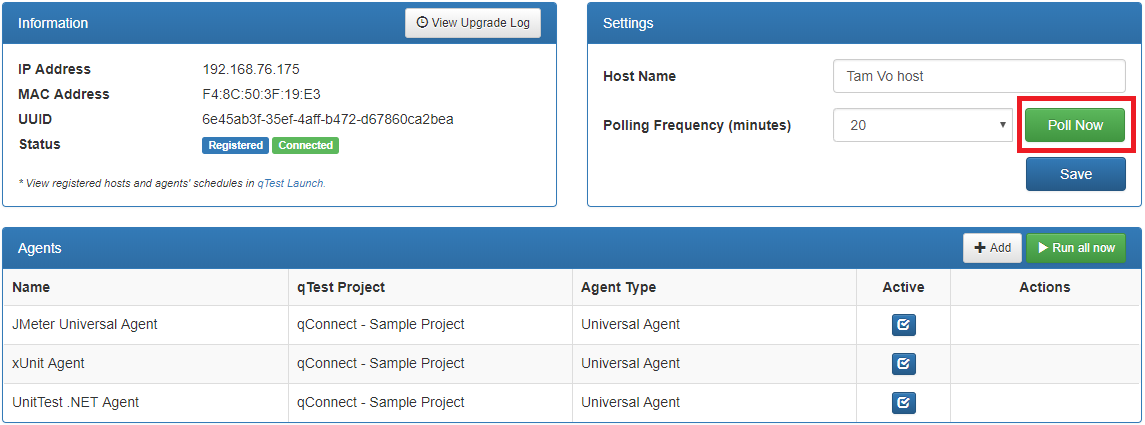
At this stage, the Automation Host does the followings:
-
immediately polls to qTest Manager to load schedule jobs and
-
executes the job execution for the test methods in UnitTestSample project that match the automation content of the three scheduled test runs
Wait for a while for the execution completes, then click on View Log icon to view execution log.
A log screen will display that shows the laTest Execution logs. Verify that the log reported only three (3) tests being executed.
Now get back to Test Execution module of qConnect Sample Project project in qTest Manager. Click on each test run that was scheduled to be executed, you'll see the Execution History of each test run was updated with 2 test run logs: one test log created when the agent was first executed, and one test log from the scheduled execution.
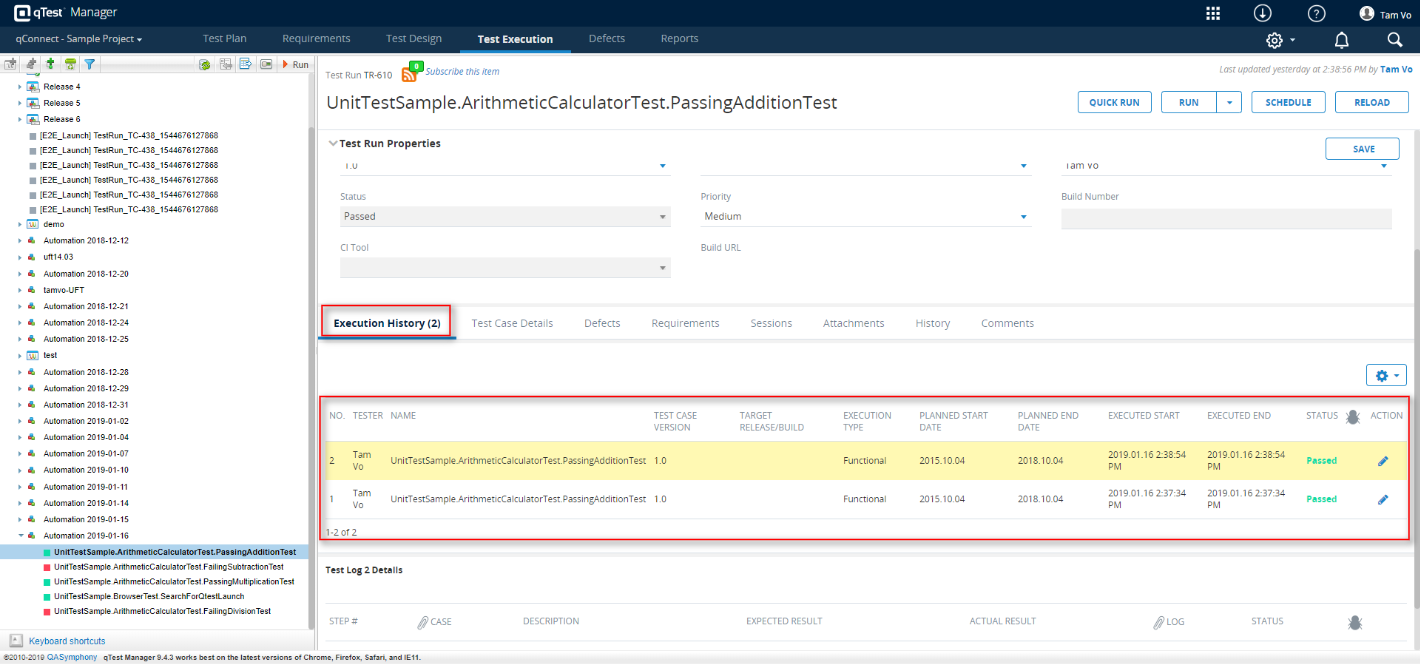
You have successfully scheduled Test Execution for specific tests in your UnitTest test project using Universal Agent and have it reported the Test Execution to qTest Manager.