Get pre-execution approval in Vera for test cases linked in qTest and Tosca
qTest lets you integrate your linked Tosca tests with Vera, which is an e-signature tool used for validation testing within a LifeSciences FDA regulated environment. This integration allows you to route an automated test case from Tosca to Vera for e-signature approval, before you can begin the test case execution process.
Route test cases to Vera for approval
After you've set up integration for Tosca and Vera and have some linked test cases, you can route your Tosca test cases to Vera for approval.
Prerequisites
Before you can start the approval process in qTest, you need to complete the following items:
-
Get user permissions to edit test cases in qTest.
-
Request Approval from Tosca to update the Tosca State to IN_WORK.
Route Tosca test case to Vera for approval
To route your test case to Vera, follow these steps:
-
In your Tosca-Vera integrated project in qTest, select the Route for Approval button on your test case.
Note that you can only see the Route for Approval button after you request approval for the test case from Tosca.
 The Route for Approval button displays if the Tosca State updates from PLANNED to IN_WORK.
 -
Select Proceed to verify you want to lock the test case and send it for approval.
Once you send the test case to Vera for approval, qTest updates the Vera fields with the following information:
- Vera Approval Status: Routing
-
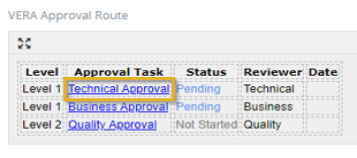
Vera Approval Route: Displays details about the Approval Task, Status, Reviewer, Date, and Level for completed or pending test case approval.
-
Vera Pending Tasks: Lists the reviewers who still have a Pending status.
-
Vera ID: ID of the approval record
-
After you've sent the test case for pre-execution approval, you can no longer edit the test case, unless the reviewer rejects your request.
You can also unlock test cases and return edit rights to testers with the following methods, but you need to get the test case approved again:
-
Use Cancel Approval to cancel a routed approval.
-
Select Revise to revise an approved test case.
In both cases, you need to send the test case for approval again.
Note that the test case unlocks if any API errors occur in Tosca.
-
Approve or reject a routed test case
Once you've routed your test case to Vera for approval, reviewers need to take a look at the contents in Vera before they can Approve or Reject the test case.
Test cases are approved if every reviewer listed in the Vera Approval Route field gives their okay. If a single reviewer rejects, the test case reverts to PLANNED in Tosca, and you need to start the full review process again.
Approve a test case
Reviewed that test case and everything looks great? Then it's time to approve it from Vera.
As a reviewer, follow these steps to approve a test case in Vera:
-
In qTest, open the test case that is routed for approval.
-
In the Vera Approval Route field, select the link associated with your reviewer title to open Vera.
 Use the link associated with your Approval Task to navigate to Vera.
 -
Sign in to Vera to continue.
-
If the test case is in compliance, select Approve.
-
In the Approve Selected Entity dialog, enter your username and password, and select Submit to apply your electronic signature.
Under Title 21 CFR Part 11 of the Code of Federal Regulations, entering your credentials is considered your "electronic signature" and validates your approval. -
In qTest, select Reload to refresh the Vera fields on your test case.
Once all reviewers submit approvals, qTest updates the Vera fields with the following information:
-
Vera Approval Status: Approved
-
Vera Approval Route: Details on the Approval Task, Status, Reviewer, Date, and Level for completed test case approvals
-
Vera ID: ID of the approval record
-
Reject a test case
Not everything is perfect the first time around.
If you review a test and find an element that's not in compliance, you need to reject the test case from Vera to restart the review process. This returns the test case back to the PLANNED state in Tosca.
To reject a test case, follow these steps:
-
In qTest, open the test case that is routed for approval .
-
In the Vera Approval Route field, select the link associated with your reviewer title to navigate to Vera.
- Sign in to Vera to continue.
-
If the test case is not in compliance, select Reject.
-
Enter the reason for rejection in the Reject Selected Entity dialog, and then Submit.
-
In qTest, select the Reload icon on the test case to refresh the browser.
After a test case is rejected by any of the reviewers, qTest updates the Vera fields with the following information:
-
Vera Approval Status: Rejected
-
Vera Approval Route: Displays details on the Approval Task, Status, Reviewer, Date, and Level for completed, rejected , or pending test case approval
-
Vera ID: ID of the approval record
-
Cancel a routed approval
Sometimes you notice an error right after you hit send. Or, maybe you didn't mean to hit send at all. Don't worry, it happens to all of us.
To retract a submitted test case before it's approved, use the Cancel Approval button to cancel the approval route. This allows you to update and revise any issues before you receive approval or rejection.
To perform this action, you need permissions to edit test cases.
To cancel an approval, follow these steps:
- Wait until the Vera Approval Route field populates. You may need to Reloadthe test case to see this.
-
Select Cancel Approval. The test case updates to reflect the cancellation, and the Route for Approval button enables. The test case returns to the PLANNED state in Tosca.
You may need to select Update All in Tosca, and then select Reload in qTest for the test case to correctly reflect the status.
Revise an approved test case
If you receive new information that changes how you need to test, or you notice an issue that a previous approver missed, you can restart the approval process with the same test case.
To revise an approval, follow these steps:
-
Select Revise to return the test case back to the beginning of the approval state.
-
The Tosca State updates to PLANNED.
You may need to select Update All in Tosca, and then select Reload in qTest for the test case to correctly reflect the status.