
As an admin, you can manage the following access rights for users and user groups:
Limit the visibility of folders and objects
You can determine that object(s) should be visible only to a specific user group. You have three different options to determine the viewing group for an object.
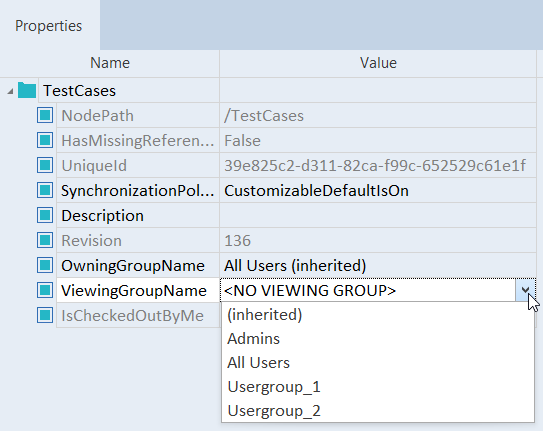
Option 1: Use the object property ViewingGroupName
-
Select the object whose visibility you want to restrict.
-
In the Value column of the property ViewingGroupName, select the user group from the drop-down menu.
The drop-down list includes all existing user groups and Inherited which means that the parent object takes over the assigned user group..
Option 2: Drag and drop the user group
-
In the Usermanagement tab, select the user group that you want to assign to an object.
-
Hold SHIFT and drag the user group onto the object.
-
In the subsequent context menu, select Assign Viewer. This changes the value of the property ViewingGroupName to the name of the group.
Option 3: Assign the user group via menu
-
Select multiple objects or folders and right-click on them.
-
Select Modify->ViewingGroupName from the context menu or the Home menu.
-
In the subsequent dialog, enter the name of the user group.
-
Click Modify All or press ENTER.
Limit write permissions for folders and objects
You can determine that only a specific user group should have write access to a specific object. You have three different options to determine the write permission for an object:
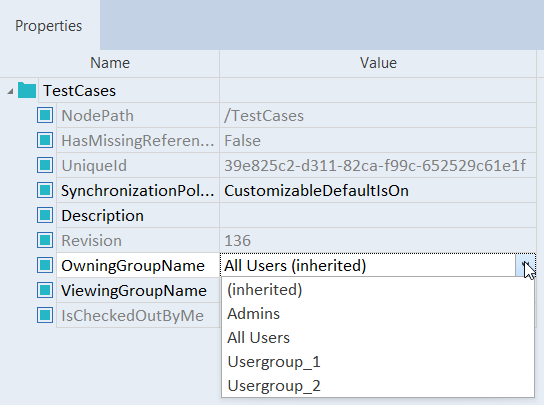
Option 1: Use the object property OwningGroupName
The property OwningGroupName overrides the property ViewingGroupName. For exampe, if the OwningGroupName is All Users, all users are able to see the project regardless of the value of ViewingGroupName.
To specify the OwningGroupName property, follow the steps below:
-
Select the object whose write access you want to restrict.
-
In the Value column of the property OwningGroupName, select the user group from the drop-down menu.
The drop-down list includes all existing user groups and Inherited which means that the parent object takes over the assigned user group.
Option 2: Drag and drop the user group
-
In the Usermanagement tab, select the user group that you want to assign to an object.
-
Hold SHIFT and drag the user group onto the object.
-
In the subsequent context menu, select Assign Owner. This changes the value of the property OwningGroupName to the name of the group.
Option 3: Assign the user group via menu
-
Select multiple objects or folders and right-click on them.
-
Select Modify->OwningGroupName from the context menu or the Home menu.
-
In the subsequent dialog, enter the name of the user group.
-
Click Modify All or press ENTER.
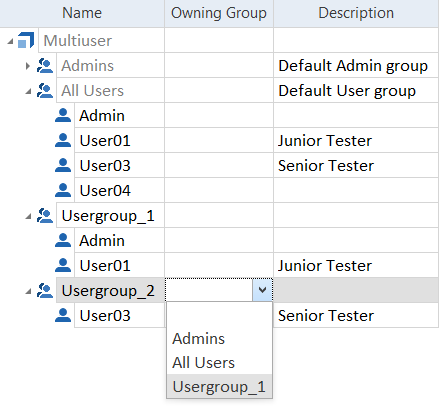
Limit write permissions of a user group
If user group contains at least one admin user, you can assign it as owning group of other user groups. This means that only admins of the owning group can make changes to subordinated user groups.
You have two different options to determine the owning group for another user group:
Option 1: Use the group property OwningGroupName
-
In the Usermanagement tab, select the user group that you want to define as the subordinate group.
-
In the Owning Group drop-down menu, select the user group that you want as the owning group.
Option 2: Drag and drop the user group
-
In the Usermanagement tab, select the user group that you want as the owning group of another user group.
-
If you work with hierarchical user groups, drag and drop the user group onto another user group.
If you don't work with hierarchical user groups, hold SHIFT while you drag and drop.
Define access rights for specific operations
You can limit which operations users are allowed to perform. To do so, select one of the following levels from the Level column of the Usermanagement tab:
|
Level |
Description |
|
Expert |
Users have access to all functions and operations. This is the default level for each user. |
|
Advanced |
Same as Expert: users have access to all functions and operations. |
|
Basic |
Users can't replace Modules with other Modules. |