Tricentis Analytics Upgrade Guide
Overview
As well as performing a fresh install, you can also upgrade your version of Tricentis Analytics. To do so, you will need the Tricentis Analytics Upgrade App.
The Upgrade App is responsible for the following:
- Installing the SyncApp (includes launching the new reporting DB)
- Stopping and starting the service of the SyncApp
- Upgrading applications in Tricentis Analytics
Prerequisites
- For Tosca users: upgrade Tosca from 12.2 to 12.3
- For qTest users: upgrade to qTest 9.7.1
Use the Upgrade App
Follow these steps to download and use the Tricentis Analytics Upgrade App.
-
Download the Tricentis Analytics upgrade file.
-
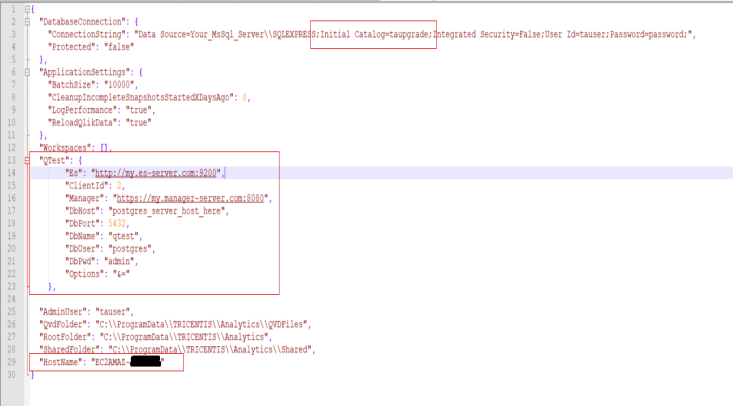
Modify the json file Tricentis.Analytics.Snapshotting.Snapshotter.json under the folder C:\Program Files (x86)\TRICENTIS\Tosca Testsuite:
-
Modify DB Name : Initial Catalog=<new DB name>
-
If you don’t need Tricentis Analytics to work with qTest, skip this step. Otherwise, add the qTest section as seen in the following image. Provide Elasticsearch instance and qTest DB info (provide DB ReadReplica if you have one, otherwise provide the master DB info).
-
Add Hostname (the hostname you use to access your Tricentis Analytics)
-
This is how your qTest API Endpoint should appear:
"QTest": {
"Manager": "http://localhost:8080",
"Es": "http://localhost:9200",
"ClientId": 2,
"DbHost": "localhost",
"DbPort": 5432,
"DbName": "qtest97",
"DbUser": "postgres",
"DbPwd": "password",
"Options": "&="
},
-
- Run TricentisAnalyticsModifier.exe
- In the "Tricentis Analytics Modifier Setup" dialog, select Install
- Once you are done, select Close.