Datasets
Once you have created Parameters, you can create Datasets from combinations of Parameters. Datasets are useful when you need to test large amounts of data that pull information from pairings or groups of Parameters.
For example, suppose you are a QA tester who needs to test ordering a variety of phone case models in each available color. If you have created a Parameter for phone case models and another Parameter for colors, you can create a Dataset that automatically generates combinations of these models and colors, rather than needing to create Test Runs for each model and color combination manually. The Datasets feature can save you time when testing a large variety of data and options.
View, sort, and filter Datasets
-
View Datasets. The Datasets tab is where you can view and manage your existing Datasets.
To access the Datasets tab, access qTest Parameters, and then click the Datasets tab at the top of the screen.
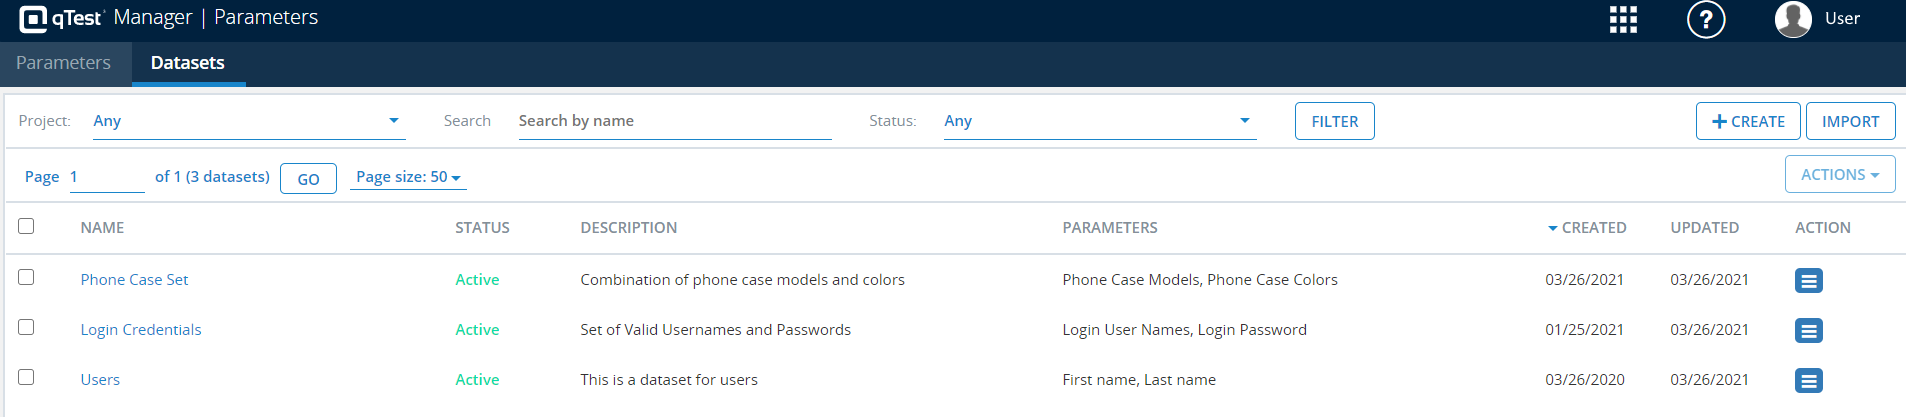
By default, the most recently created Datasets appear at the top of the Datasets tab. Basic information is listed for each Dataset, including whether the Dataset is active and the Parameters that are included in the Dataset.
-
Sort Datasets. To sort Datasets, click a column heading. Datasets will arrange in descending order. Click the column heading again to arrange the Datasets in ascending order. For example, click the Name column heading twice to arrange Datasets alphabetically from A to Z.

-
Filter Datasets. You can filter Datasets to display only Datasets that match specified criteria. To filter Datasets, select or make entries in the filter fields, and then click Filter. For example, select Project A in the Project filter and Active in the Status filter to display only Datasets that are active and are associated with Project A.

The following filter fields are available.
Filter Description Project Click the Project filter to search for and select qTest projects. If a Project is selected, only Datasets associated with that Project will display on the Datasets tab. Search Enter a Dataset name to search for that specific Dataset. Status Select Active to display only active Datasets. Select Inactive to display only inactive Datasets. Select All to display both active and inactive Datasets.
Create a Dataset
To add Datasets to qTest, you can either manually create Datasets or you can import Datasets. The following procedure can be used to manually create Datasets. For a procedure on importing Datasets, refer to Import Datasets.
Once you have created a Dataset, refer to Use Parameters and Datasets for information on using the Dataset in a Test Case.
To manually create a Dataset:
-
There are two ways to start creating a Dataset. You can create a Dataset and then select Parameters, or you can select your Parameters ahead of time if you already know which Parameters you want to use.
 Create a Dataset from scratch on the Datasets tab
-
On the Datasets tab, click the Create button.

Create a Dataset by selecting Parameters on the Parameters tab
-
On the Parameters tab, select the check boxes for the Parameters that you want to use in a Dataset.
-
Click the Actions button. On the menu that appears, select Create Dataset.

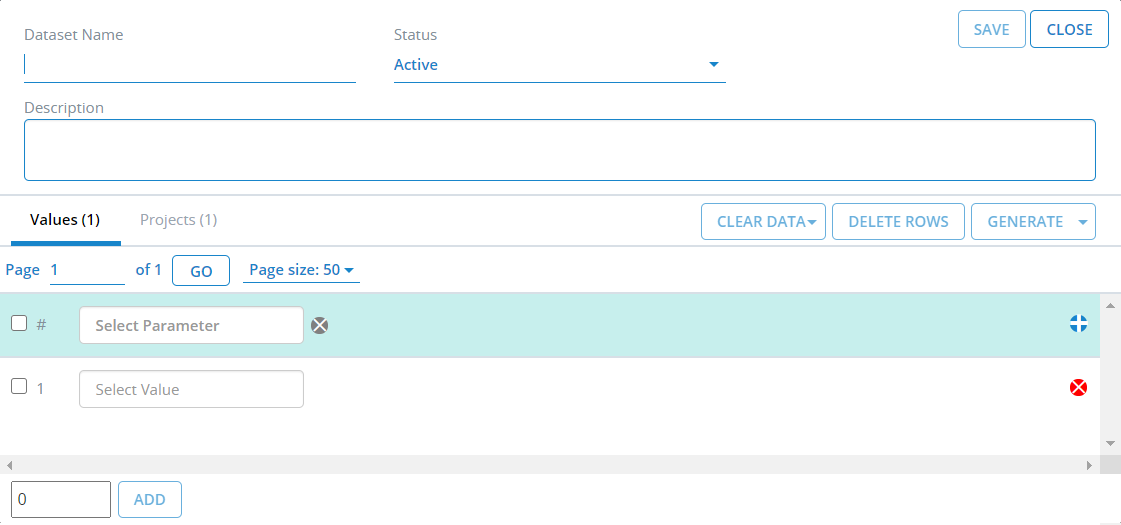
A dialog appears, where you can add information for a new Dataset.
-
-
On the dialog, enter the following information for the Dataset.
Field Description Dataset Name Enter a name for the Dataset. Status Select whether the Dataset should be active or inactive. If you are planning on using the Dataset right away, leave the status as Active.
For more information about setting the status of a Dataset, refer to Delete, activate, or deactivate Datasets.
Description (Optional) Enter a description for the Dataset. -
Next, select the Parameters to use for the Dataset. If you have already selected Parameters, proceed to step 5.
To select a Parameter, click the Select Parameter field. A list appears, where you can select from available Parameters. You can also search for a Parameter in the list by typing the Parameter name.
You can only select Parameters that have been associated with qTest Manager Projects. For information on creating Parameters and associating them with qTest Projects, refer to Parameters.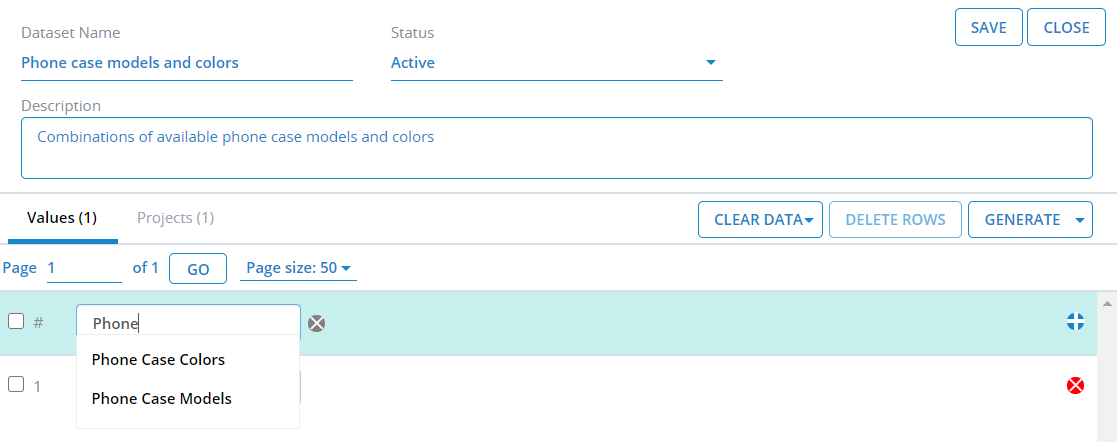
-
Add additional Parameters as needed by clicking the Click to add new column icon
 . A new column will appear, where you can repeat step 4 to select an additional Parameter.You can add up to 25 Parameter columns to a Dataset.
 -
Next, select the values to use for each Parameter in the Dataset. There are multiple ways to add values.
Manually add individual values
If you know the specific combinations of values you want to create, you can manually add individual values to each Parameter.
To manually add a value to a Parameter:
-
Click the Select Value field. A list appears, where you can select from available values associated with the Parameter. You can also search for a value in the list by typing the value name.
-
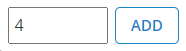
Add values as needed by entering the number of additional rows you want to create in the unlabeled Add Rows field at the bottom of the dialog. Then click Add.
 To remove a value row, click the Click to remove this row icon
 . You can also remove multiple rows at a time by selecting the check box for each row, and then clicking Delete Rows.
Automatically generate unique values
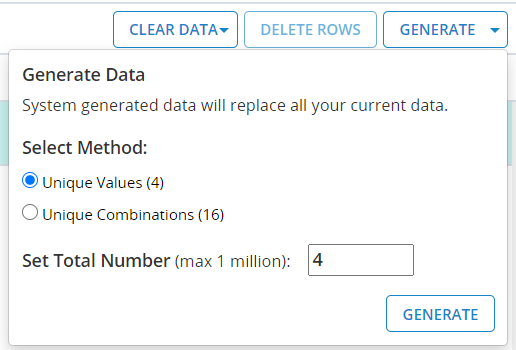
If your data can be randomized, you can automatically generate values. Using the Unique Values option, Parameter values will not repeat and no two rows will have the same Parameter value. This option is useful when you want to test every value in a Parameter set but don't necessarily need to test them with each value in another Parameter set.
To automatically generate unique values:
-
Click the Generate button to display the Generate Data modal.
-
Select the Unique Values option button. The possible number of unique values that can be generated appears in parentheses to the right of the button.
-
(Optional) In the Set Total Number field, you can enter the number of values that you want to generate. For example, if the possible number of unique values that can be generated is 10 but you only want to test 8 values, you can enter 8 in the Set Total Number field to limit the number of values created to eight.
-
Click the Generate button. The unique values generate and appear on the dialog.
Automatically generate unique combinations
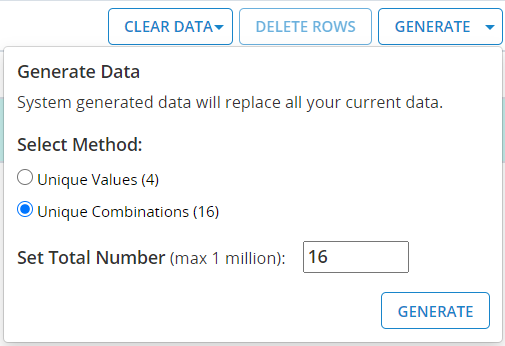
If your data can be randomized, you can automatically generate unique combinations of values. Using the Unique Combinations option, each row in the data grid will be a unique combination of values. Parameter values can repeat; however, no two rows will have the same combination of values. This option is useful when you want to test every value in one Parameter set with every value in another Parameter set.
-
Click the Generate button to display the Generate Data modal.
-
Select the Unique Combinations option button. The possible number of unique combinations that can be generated appears in parentheses to the right of the button.
-
(Optional) In the Set Total Number field, you can enter the number of combinations that you want to generate. For example, if the possible number of unique combinations that can be generated is 16 but you only want to test 10 values, you can enter 10 in the Set Total Number field to limit the number of values created to ten.
-
Click the Generate button. The unique combinations generate and appear on the dialog.
-
-
Once you have added values, you will need to associate the Dataset to a qTest Project. Associating a Dataset to specific Projects is helpful if you are working on multiple Projects in qTest or if you will have several Projects in the future. If Datasets are not assigned to any Project, they can be difficult to trace for later use.
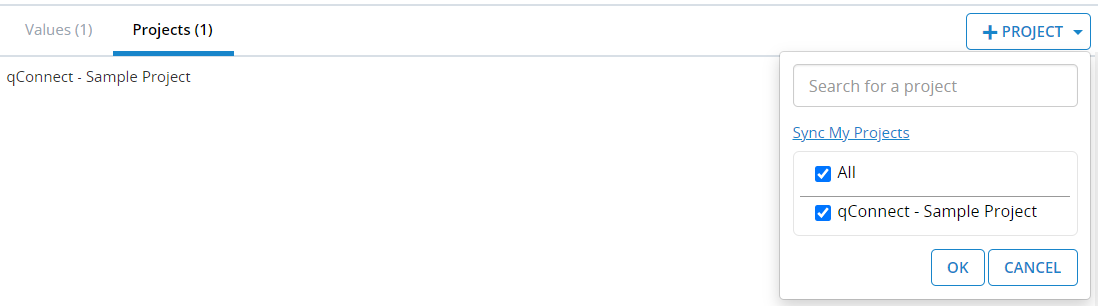
By default, the Dataset will be associated with all of your qTest Projects. To change the Project associated with the Dataset, click the Projects tab. Then click the Project button, which will display a list where you can select the Projects that the Dataset should be associated with. Click OK to save your selections.
-
On the dialog, click Save to save the new Dataset.
Edit a Dataset
You can modify an existing Dataset, if needed, including the Dataset name, status, description, Parameters, and values.
To edit an existing Dataset:
-
In the Name column on the Datasets tab, click the name of the Dataset that you want to edit.

A dialog appears, where you can edit the Dataset information.
-
Edit the existing information, as needed.
Option Action Delete an individual row of values Click the Remove icon
for that row.Delete all values Click the Clear Data button, and then select the Clear Values option button to clear all of the values from the Dataset. Delete all values and all Parameters Click the Clear Data button, and then select the Reset Table option button to clear all Parameters and values from the Dataset. For information about the remaining fields and options on this dialog, refer to Create a Dataset.
-
On the dialog, click Save to save your changes.
Delete, activate, or deactivate Datasets
It may be the case that some Datasets may not be useful for the time being but may be useful at some later point for an upcoming Project. You can change the status of a Dataset to activate or deactivate the Dataset, as needed. You can also delete a Dataset if it is no longer needed.
You can delete, activate, or deactivate an individual Dataset multiple Datasets at once.
-
To delete, activate, or deactivate an individual Dataset, click the Action icon
 for the Dataset. On the menu that appears, select the appropriate option.
-
To delete activate, or deactivate multiple Datasets, select the check boxes for the Datasets that you want to modify. Then click the Actions button. On the menu that appears, select the appropriate option.

Related Topics
| Parameters Quick Start Guide |
| Use Parameters and Datasets |
| Import Datasets |
| Parameters |