Edit values
In an OSV Scenario, Module Attributes represent relevant message elements that you use for testing, such as a date or customer ID. To steer these Module Attributes during your test activities, you use values and ActionModes.
Tricentis Tosca helps you add default values and ActionModes when you generate the XTestStepValues for your OSV Scenario. However, you can modify these values if needed.
Which values can you use?
There are two types of values that you can work with:
-
Static values that are known before run-time.
-
Dynamic values that are determined at run-time.
For more general information on values, see chapter "Specify values".
How can you use values?
The chapters below provide practical examples for using different values in your OSV Scenarios. The examples also indicate which ActionModes you can use with the described values.
Enter date and time
You can use a dynamic expression to specify date and time values in OSV. This allows you, for instance, to use the current date as an identifier for a message.
OSV uses UTC (Coordinated Universal Time). Tosca Commander uses your local time settings.
|
Syntax: |
{<EXPRESSION>[<Base date>][<Offset>][<Format>]} |
ActionMode: Insert, Input, Verify, WaitOn
Expression
You can use the expressions DATE and TIME:
-
Use DATE when the base date only contains a date.
-
Use TIME when the base date also contains a time.
You can specify expressions without any parameters. The following example uses the current date and time.

|
Current date=3.Nov.2018, at 13:37:11 UTC: {DATE} gives 2018-11-03 {TIME} gives 2018-11-03T13:37:11Z |
If you specify expressions with parameters, you have to indicate the parameter's base date, offset, and format.
To apply standard behavior to one of the parameters, leave the parameter value empty [].
For instance, {DATE} and {DATE[][][]} have the same meaning. The system uses the current date without deviations and in the target format that you specified in the Settings dialog.
|
|
In the following example, Tosca identifies the first day of the current month (monthfirst) using the standard format settings. 01.{DATE[][][MM.yyyy]} |
Base date
Base dates are date values according to the Tricentis Tosca date format.
If you leave the value empty, Tosca uses the current date as the base date. You can also use Buffer values as the base date.
|
|
Buffer date=2010-11-10: {DATE[{B[Variable]}][+1M+1d][]} gives 2010-12-11 Buffer date=20.12.2013: {DATE[{B[Variable]}][-1M][01.MM.yyyy]} gives 01.11.2013 Buffer date=2012-12-24T12:34:56Z: {TIME[{B[Variable]}][+2d+1h][]} gives 2012-12-26T13:34:56Z |
Offset
Offset specifies an offset from the base date. You can either add or deduct offsets. They consist of a signed integer and a unit.
|
Unit |
Description |
|---|---|
|
d |
days |
|
M |
months |
|
y |
years |
|
h |
hours |
|
m |
minutes |
|
s |
seconds |
|
|
With the expression +3M-1d you add three months to the base date and deduct one day. |
Format
Format lets you determine the date expression format for the test object (see chapter "Tosca date formats").
If you specify a base date and a format, it must match the base date.
If you don't specify a base date, the system uses the format defined in the file <Tosca OSV program files>\Tricentis.OSV.Environment.exe.config.
Escape special characters
Use quotation marks to avoid syntax errors when using special characters such as }]{[.
|
Syntax: |
"<special characters>" |
|
|
The string "{{{Hi]]]" does not cause a syntax error. The string {{{Hi]]] causes a syntax error due to incorrect brackets. |
Generate random numbers
Use the random number function to generate random integers.
|
Syntax: |
{RND[number of digits]} |
Number of digits indicates the length of the random number.
|
|
{RND[7]} creates a 7-digit number. |
|
Syntax: |
{RND[start value][end value]} |
Start value and end value indicate the upper and lower limit of the random number range.
|
|
For example, {RND[-789[123]]} creates an integer number between -789 and 123. |
ActionMode: Insert
Use buffer and green buffer
Buffers store values of message elements.
If the name of the buffer begins with a dollar sign $, it is a green buffer (see chapter "Green algorithm" and chapter "ActionMode Verify").
Define buffer
Buffer
|
Syntax: |
buffer name |
Green buffer
|
Syntax: |
$green buffer name |
ActionMode: Buffer
Use buffer
Buffer
|
Syntax: |
{B[buffer name]} |
Green buffer
|
Syntax: |
{B[$green buffer name]} |
ActionMode: Insert, Input, Verify
Use split buffer
To split a payload in an OSV Scenario based on a separator, you can define a split buffer.
Define buffer
|
Syntax: |
{Splitbuffer[_Separator_][_Base for buffer names_]} |
ActionMode: Buffer
Use buffer
|
Syntax: |
{B[MyBuffer1]} |
ActionMode: Insert, Input, Verify
|
|
For example, if your input is 123;456;789;ABC and you use {Splitbuffer[;][MyBuffer]} the result is: MyBuffer1 = 123, MyBuffer2 = 456, MyBuffer3 = 789, MyBuffer4 = ABC |
Use XBuffer
An XBuffer allows you to partially buffer values using the ActionMode Buffer.
You can use XBuffer for payloads, headers, resources, and query parameters. However, you can't use XBuffer for path parameters or attachments.
Use the following syntax within strings:
|
Syntax: |
{XB[<Buffername>]} |
|
|
In this example, you want to buffer only the OrderID that is located between Transfer order and has been created. To do so, you create an XBuffer with the buffer name OrderID.
Use an XBuffer |

Generate random text
You can use the random text functionality to generate a random text of capital letters, where n is the number of letters.
|
Syntax: |
{RANDOMTEXT[n]} |
ActionMode: Insert, Input
Generate unique IDs
The unique ID functionality generates unique IDs at run-time.
|
Syntax: |
{UNIQUEID[n]} |
ActionMode: Insert, Input, WaitOn
The generated unique ID is n digits long.
|
|
Example: For n=1 the range of generated unique IDs is between 0 and 9. For n=2 the range of generated unique IDs is between 10 and 99. |
Therefore, the number of unique IDs available for a specific n is 10n.

|
If there are not enough IDs available and the system cannot generate any new IDs, an error occurs. Restart the environment to reset the unique IDs, or use a larger n. |
Use a buffer to use a unique ID more than once.
Use regular expressions (Regex)
Use the Regex functionality to verify strings.
|
Syntax: |
{REGEX[regular expression]} or {REGEX["regular expression"]} |
ActionMode: Verify, WaitOn
You can use any .NET compatible regular expression as described in chapter "Use .NET compatible regular expressions".
Generate random strings with regular expressions
You can generate random character strings that are limited by regular expressions. You must specify the regular expressions within double quotation marks.
|
Syntax: |
{RANDOMREGEX["Regular expression"]} |
ActionMode: Insert, Input
|
|
{RANDOMREGEX["^[A-Z][a-z]+[0-9]{4}$"]} creates a value that starts with a capital letter between A and Z, followed by any number of lower case letters, and exactly four ciphers between 0 and 9. The ^ character marks the beginning of the line, and $ marks the end of the line. This expression creates, for instance, Ecqwp1989. |
Perform calculations
In Tricentis Tosca, you can perform calculations via the expression MATH.
|
Syntax: |
{MATH[<Operand 1><Operator><Operand 2>..<Operator><Operand n>]} |
ActionModes: Insert, Input, Verify
You can use numerical values and scientific notations as operands.
|
|
You have to separate decimal places with a decimal point. |
|
|
This example illustrates how the value of the buffer A is increased by 1: {MATH[{B[A]}+1]}
MATH example |

The following operators are supported:
|
Operator |
Description |
|---|---|
|
+, -, *, / |
basic arithmetic operations |
|
% |
Modulo operation |
|
^ |
potentiation |
|
== |
equals |
|
!= |
not equal |
|
< |
less than |
|
> |
greater than |
|
<= |
less or equal |
|
>= |
greater than or equal to |
Operators are processed according to the PEMDAS rule. However, you can modify this behavior by using brackets.
Specify a time stamp
The time stamp returns the number of milliseconds that have elapsed since 00:00:00 Coordinated Universal Time (UTC), Thursday, 1 January 1970.
|
Syntax: |
{TIMESTAMP} |
ActionMode: Insert, Input
Use a counter
Use the configuration parameter Counter to show the current counter.
|
Syntax: |
{COUNTER} |
ActionMode: Insert, Input
For the configuration parameter n, {COUNTER} is equal to 1, 2, 3,…, n in the first, second, third,..., nth message.
Buffer sub-strings with left and right
The expressions LEFT and RIGHT allow you to buffer sub-strings.
|
Syntax: |
{LEFT[start][end][buffername]},{RIGHT[start][end][buffername]} |
ActionMode: Buffer
Expression LEFT: reads the buffer value from left to right.
Expression RIGHT: reads the buffer value from right to left.
The following applies for the parameters start and end (both type Int32):

For detailed information about Int32, refer to http://msdn.microsoft.com/en-us/library/system.int32.aspx.
|
|
Test string = ToscaOrchestrate {LEFT[1][5][BufferA]} : writes Tosca in the buffer BufferA. {LEFT[6][9][BufferB]} : writes Orch in the buffer BufferB. {LEFT[15][20][BufferZ]} : writes te in the buffer BufferZ. {RIGHT[1][3][BufferC]} : writes ate in the buffer BufferC. {RIGHT[14][19][BufferY]}: writes Tos in the buffer BufferY. {RIGHT[30][35][BufferX]}: writes an empty string in the buffer BufferX. {LEFT[5][5][BufferD]}{LEFT[10][12][BufferE]}{RIGHT[2][6][BufferF]}: writes a in BufferD, est in BufferE and strat in BufferF. |
Increase response time
You can increase the value of your Response Time to delay a response message by milliseconds.
The value you specify determines the minimum delay time for your response message. However, factors like network latency or processing time of the OSV Host may delay the response further.
Once you have set the Module Attribute for a response time delay, add a numeric value between 0 and 10.000.
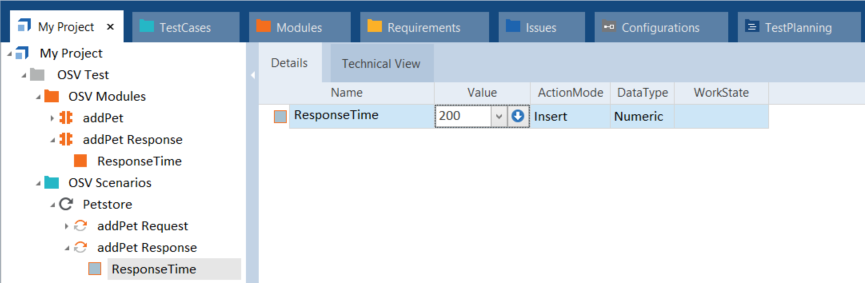
Specify Response Time value
If you want to specify a delay of more than 10.000 milliseconds, Tricentis recommends to schedule your outbound messages.
Use the green Selector
You can use the green selector as a selector in the green message detection algorithm (see chapter "Green algorithm").
|
Syntax: |
{optional} |
ActionMode: WaitOn
Work with XExcel
Use the XExcel functionality to read values from an external Microsoft Excel sheet. You can use this functionality along with the blue message detection algorithm.
|
Syntax: |
{XExcel[“Path to excel file";Sheetname][IdentifierColumn;ScenarioNameColumn;UserNameColumn]} |
|
|
For example: {XExcel["C:\Users\admin\Desktop\ISINListExample.xlsx";BICFI][Identifiers;ScenarioName;User]} |
ActionMode: WaitOn
Save the identifiers that trigger Scenarios to the Excel sheet. Define a user (tester) for all possible combinations of identifier and Scenario.
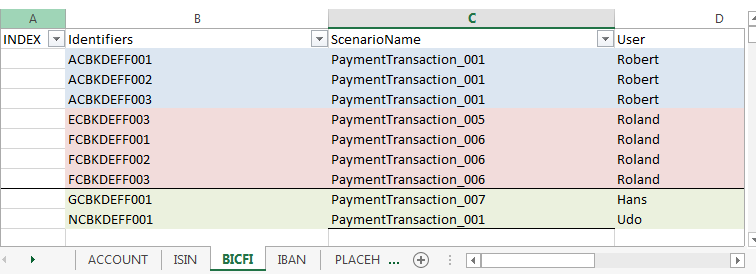
Example: Excel sheet
If you run the Scenario in an OSV Environment, OSV fills the message elements that reference an Excel sheet with the corresponding identifiers from the Excel sheet. It specifies the user as tester for that specific Scenario execution.
|
|
In this example, the following identifiers are taken into account for the Scenario PaymentTransaction_001: ACBKDEFF001, ACBKDEFF002, ACBKDEFF003, NCBKDEFF001 If an inbound message has the identifier NCBKDEFF001, the system uses the user Udo. If the identifier is ACBKDEFF002, it uses the user Robert. |