TestCases can only be used if they contain TestSteps with TestStepValues. The controls of an object to be tested can be steered with these TestSteps. The elements or even subordinate elements must be checked out for the current user to be able to edit TestCases, TestCase folders and TestSteps in multi-user mode.
The chapters below will describe all the options and properties that are possible for TestCases.
Properties
Any text can be specified for this property. The entered information is also displayed as a tooltip.
The information that is stored here does not have any effect on automated steering.
Revision number automatically generated by Tosca. Each Checkin or Checkout process increments this number.
Describes the state of the TestCase. Newly created TestCases have the state PLANNED.
|
Status |
Description |
|
COMPLETED |
The TestCase is completed. |
|
PLANNED |
This TestCase is planned. |
|
IN_WORK |
The TestCase is currently in progress. |
ExecutionEntries inherit the TestCaseWorkState of the linked TestCases (see chapter "Create an ExecutionList").
Pausable
Specifies whether manual TestSteps can be paused (see chapter "Execute manual tests"). The value of this property can be overwritten by the values of subordinated TestStep folders or TestSteps.
Options
Creates a TestCase folder. This folder allows a tree view to be structured and TestCases to be grouped accordingly.
This option creates a TestCase at the end of the hierarchy.
-
Select the folder, where the new TestCase should be created.
-
Select the option Create TestCase from the context menu. You can also left-click on the folder and select
 Create Object->TestCase from the dynamic menu TestCases.
-
Tosca Commander™ creates a new TestCase at the desired position and automatically offers to rename it. You can either assign a new name to the TestCase or you can use the default name <New TestCase> by pressing Enter.
Create TestCase (after this)
Creates a new TestCase directly after the selected TestCase.
-
Select the TestCase after which a new TestCase should be created.
-
From the context menu of the TestCase, select the option Create TestCase (after this). You can also left-click on the TestCase and select
 Create Object->TestCase (after this) from the dynamic menu TestCases.
-
Tosca Commander™ creates a new TestCase at the required position and automatically offers to rename it. You can either assign a new name to the TestCase or you can use the default name <New TestCase> by pressing Enter.
Creates a duplicate of the selected TestCase beneath this TestCase.
-
Select the TestCase to be duplicated.
-
From the context menu of the TestCase, select the option Create Duplicate (after this). You can also left-click on the TestCase and select
 Create Object->Duplicate (after this) from the dynamic menu TestCases.
 -
Tosca Commander™ duplicates the TestCase and all the objects beneath and automatically offers to rename them. You can either assign a new name to the TestCase or you can use the default name <TestCase name>_1 by pressing Enter.
Creates a manual TestStep (see chapter "Working with manual TestCases").
Create Test configuration parameter
Creates a test configuration parameter for the selected TestCase (see chapter "Create test configuration parameters ").
Add file attachments (see chapter "Add attachments").
Convert to Template
Converts a TestCase into a TestCaseTemplate (see chapter "Working with TestCase templates").
Run in ScratchBook
Executes the selected TestCase(s) in ScratchBook (see chapter "Run tests in the ScratchBook").
Reinstantiate TestCase
This option generates the TestCase again from the template and is available to TestCases which are located in a TemplateInstance (see chapter "Creating TemplateInstances").
Multiple, already instantiated TestCases can be selected and reinstantiated via Shift + Click or Ctrl + Click.
Reset test configuration parameter
This menu entry is available as soon as one or more parameters have been specified for the selected object. This option allows any test configuration parameters to be deleted (see chapter "Create test configuration parameters ").
Deleting TestCases
-
Select the TestCase(s) to be deleted.
-
Click on Delete in the context menu or the dynamic menu TestCases, or press the Del key.
-
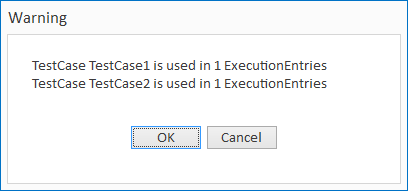
If the TestCase or the TestCases are used in one or more ExecutionLists, the following warning message will appear:
-
To delete the TestCase(s), click on OK.
-
Press Cancel if you do not want to delete the TestCase(s).

|
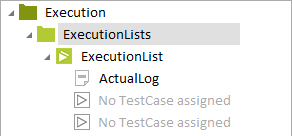
If TestCases that are used in ExecutionLists are deleted, the ExecutionEntries remain without any TestCase references. |
Converting TestSteps into TestCases
If one or more TestSteps are dragged and dropped onto TestCase folders, they are converted into concrete TestCases. The new TestCases are named according to the corresponding TestStep. If a TestStep folder with one or more subordinate TestSteps is dragged and dropped onto a TestCase folder, the TestStep folder is converted into a TestCase.
-
Select one or more TestSteps (TestStep folders) to be converted.
-
Drag them onto the required TestCase folder and drop them there.