Create and organize test cases
A test case defines the scope of your testing activities towards a new feature or specification: what do you need to do to make sure that your application works as expected?
Test cases consist of the following core components:
-
One or more test steps, which are the test actions that you need to take. If you need to take multiple actions, create test steps in a given sequence to break down your tasks.
-
The expected reaction of the system under test. These are the metrics that define whether your test case passes or fails. For instance, if your application doesn't meet one of the specified conditions, does that mean that the whole test case fails?

An example of a test case in Tricentis Test Management for Jira
In Tricentis Test Management for Jira, the My test cases folder works as a central location for all of your test cases, even if you distributed test cases in different folders. Consequently, when you move test cases from the My test cases folder to a new location, these test cases remain indexed in the All test cases folder.
Note that you can select multiple test cases and use the floating actions bar to quickly create a test run.
This topic takes you through the steps to create and organize test cases in Tricentis Test Management for Jira.
Create a test case
You can create test cases in one of the following ways:
To create a test case in Jira, follow these steps:
-
In Jira, select the Create button.
-
In the subsequent dialog, perform these steps:
-
Choose the Project that uses Tricentis Test Management for Jira.
-
Choose Test Case as the Issue type.
-
Fill out all relevant fields. For instance Fix versions, if you organize your tests in releases.
-
-
Select Create.
-
Optionally, add test steps to your test case.
Create a test case in Tricentis Test Management for Jira
To create a test case in Tricentis Test Management for Jira, follow these steps:
-
In the Apps section of your Jira project, select Test Management to open Tricentis Test Management for Jira.
-
Go to the Test Design tab.
-
On the left pane, choose or create a folder where you want to save your test case.
-
In the top right corner of the screen, select Add new test case.
-
Fill out all relevant fields. For instance Fix versions, if you organize your tests in releases.
-
Select Create.
-
Optionally, add test steps to your test case.
Generate test cases from requirements with AI
Once you've created a requirement, you can use AI to automatically create a set of test cases to cover your requirement.
Watch as AI generates your test cases with a single button.
To create test cases using a requirement, follow these steps:
-
From the Requirements tab, select the requirement you want to create test cases for.
-
Select Write test cases with AI.
-
If this is the first time you use this feature, the Welcome to Test Case Creation with AI window displays. To generate your test cases with even more accuracy, you can optionally use the field on this window to describe the general overview and user flow of the software you're testing. When you're done, select Continue to proceed with test case generation.
You can add or edit this description at any point in the future. Just select the
 icon in the top-right corner of Tricentis Test Management for Jira and go to Provide AI with product context.
 -
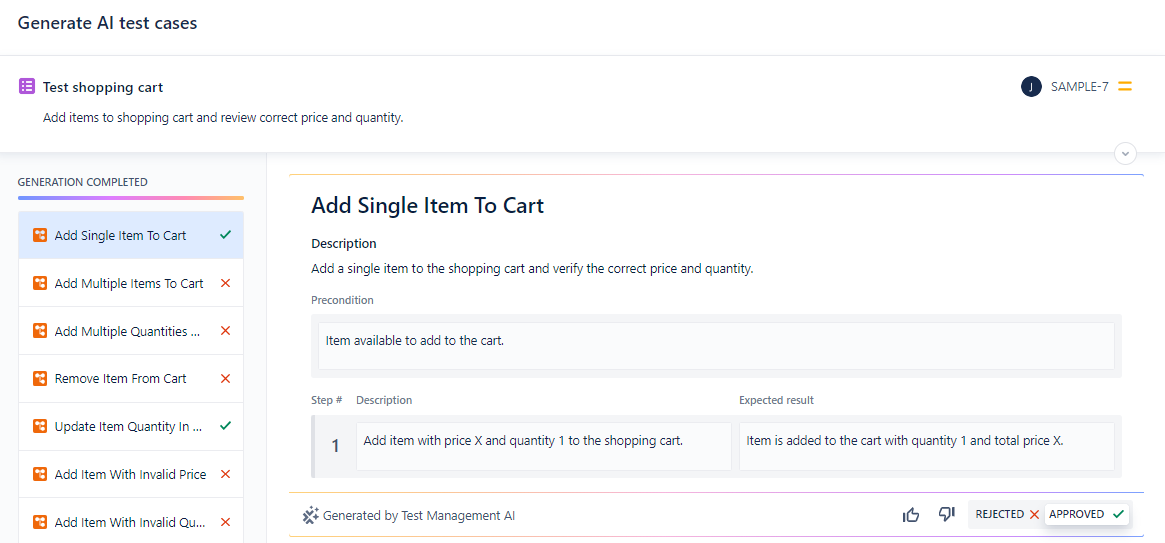
The Generate test cases with AI window displays and begins creating test cases using AI. Note that you can toggle on Auto follow AI writing to follow along as the AI creates test cases. To interrupt the AI at any point while it generates cases, click Stop.
-
For each test case that AI generates, choose whether the case is Rejected or Approved.
Generated test cases default to Approved if you do not make a selection.
-
When you've reviewed and decided the fate of each test case, select Create test cases to add the approved test cases to the requirement.
Clone test cases
You don't need to create test cases from scratch every time. To speed up your test creation process, you can clone existing test cases and adapt them.
To clone a test case, follow these steps:
-
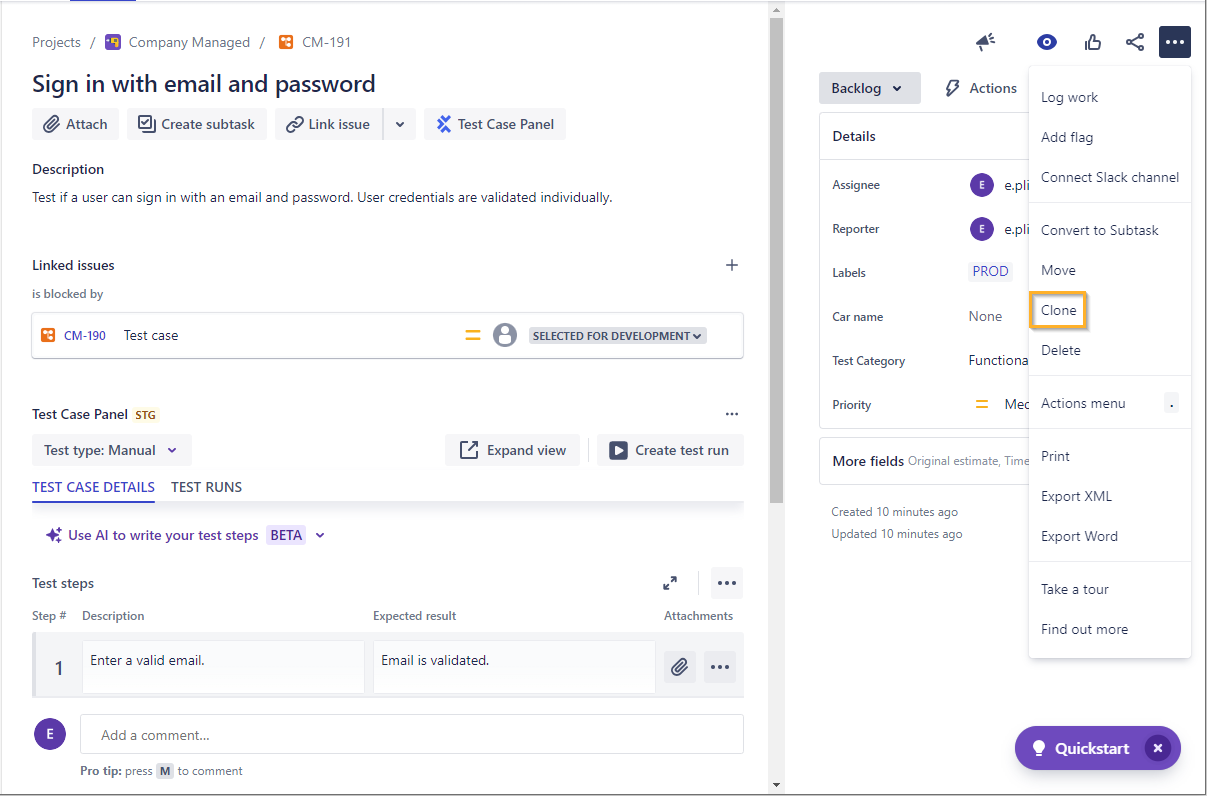
Open the test case you want to clone and select
 Actions > Clone in the test case status bar.
Clone your test case
-
In the next dialog, define what you want to carry over. By default, Tricentis Test Management for Jira clones all test steps and preconditions. If you also want to clone attachments or linked issues and requirements, select the respective checkboxes.
Bulk update test cases
If you need to make edits to one or more test cases, you can update test cases in bulk using one of two methods:
-
Quick bulk edit, which lets you make changes to the Priority, Assignee, or Reporter fields across multiple test cases in just a few seconds.
-
Bulk edit with Jira, which lets you make changes to any field across your test cases. We recommend you use this option if you have an extensive or complex set of test cases to edit.
To use Quick bulk edit, follow these steps:
-
Go to the Test Design tab.
-
Mark the checkbox to the left of each test case you want to update a field in.
-
Select the
 on the floating actions bar and navigate to Quick bulk edit.
 -
Choose the Attribute to update from the dropdown.
Note that you can only update Priority, Assignee, or Reporter from this window. If you need to bulk update other fields, you can navigate to Bulk edit with Jira from this window.
-
Select what you want to update the test case field to from the Replace current value with dropdown.
-
If you want to update another attribute, select Add another attribute.
To open your test cases in Bulk edit with Jira, mark the checkbox to the left of each test case you want to update. Then, select the on the floating actions bar and navigate to Bulk edit with Jira. Note that this option takes more time and navigates you outside of Tricentis Test Management for Jira.
For more information on how to use Jira's bulk edit features, you can take a look at the documentation on Atlassian.
Delete a test case
If you discover unnecessary test cases while you are organizing the My test cases folder in the Test Design tab, you can delete these test cases.
When you delete a test case, you also delete all associated steps, attachments, and data. Make sure that the test cases you want to delete don't contain any information you will need later. Once you delete a test case, you can't get it back.
To delete a test case, follow these steps:
-
On the right pane of the Test Design tab, select the test cases you want to delete.
-
Select Delete.
-
Select Delete to confirm you want to delete the test case.
Organize test cases
By default, all new test cases are in the My test cases folder in the Test Design tab in Tricentis Test Management for Jira. You can create additional folders to better organize your test cases. For instance, you might want to separate test cases into releases or features.
To do so, follow these steps:
-
Go to the Test Design tab.
-
In the left pane, select New folder.
-
Rename the folder.
-
Move test cases to this new folder:
-
Go to the folder in which your test cases are. This can be, for instance, the My test cases folder.
-
Select the check-boxes of all test cases that you want to move.
-
Select Move to folder and choose a destination folder.
-
Search your test cases
Sometimes, you need to focus on a small part of the bigger picture. In this case, use Filters & JQL to investigate specific test cases.
Select Filters & JQL to display these available search options:
-
Select Add filter to filter by specific parameters. For example, you could filter test cases by Priority.
-
Enter any keywords you want to search for in the Search field.
-
Toggle to JQL to perform an advanced search of your test cases with JQL. For more information on JQL, see the Atlassian help (opens in new tab).
If you find yourself applying the same group of filters over and over, save yourself some work in the future. Just apply your filter(s), select Save filter, and follow the prompts on the screen. You can access all saved filters any time via the  button. You can also save JQL features this way.
To get the information you're looking for at a glance, you can also customize your field and folder views in the Test Design tab.
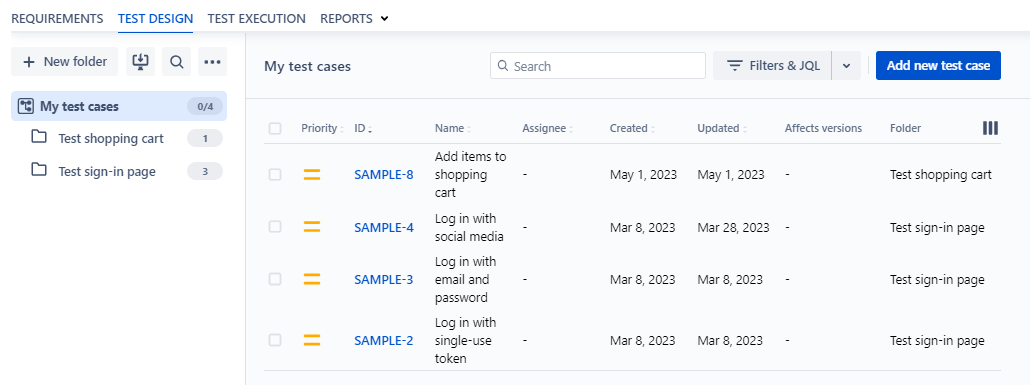
This table displays test cases from subfolders, as well as a custom set of fields.
To customize how your folders display, select the above the file tree on the left. Use the available radio buttons to choose whether to show or hide folders in the table. If you choose to show folders, sub folders display alongside any test cases that belong to the same parent folder.
If you choose to hide the folders in your table, you can view test cases from a parent folder alongside test cases from its sub folders in a single window. Select Show test cases of sub folders to display any test cases from sub folders alongside test cases located in the parent folder. You can still see which folder each test case belongs to in the Folder column, so you'll always know where the test case is stored.
You can also customize fields. Whether you're viewing all of the test cases in a folder, or you've filtered down to a specific set of test cases, just select  and choose the fields you want to display for each test case in the list. You can even view Jira fields that you've created.
What's next
Now that you have created and organized your test cases, you may want to add test steps or assign a Test type.
Or, you can use this opportunity to create and link requirements.