Configure HTTP/HTTPS
You can use an HTTP service port to simulate virtual HTTP and HTTPS services.
When you configure your service port, you have to specify whether you want it to act as a Client or Server. A client sends a request and a server sends a response.
Configure general settings
Once you have created your service port, you can configure the general service port details:
|
Attribute |
Description |
|---|---|
|
General - Name |
Enter the name of the service port. |
|
General - Type |
Select your service port technology. |
|
Server / Client |
Select what you want to configure:
|
|
Real Service |
Select if you want to connect to a real service. |
|
Allow OSV to forward requests to the real service. To use this option, you need to select Real Service. |
|
|
Allow OSV to store forwarded messages in the Recorder tab. To use this option, you need to enable Forwarding. |
|
|
Active |
Select if you want your service port to be active, deselect to set it to inactive. |
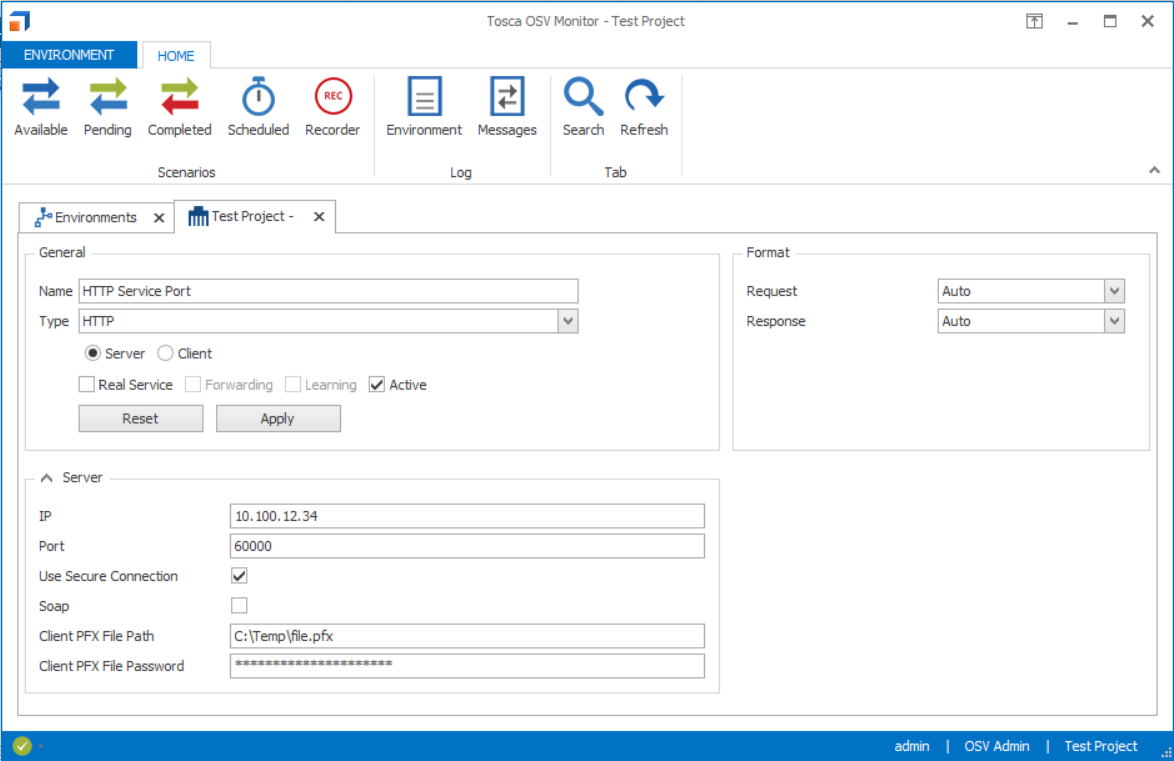
Configure the server
Use the following attributes for the server:
|
Attribute |
Description |
|---|---|
|
IP |
Specify the IP address that the service port listens to. If you don't enter an IP address, the service port uses the default network interface (local host). |
|
Port |
Enter the server port. |
|
Soap |
Select this option to use SOAP protocol with HTTP. |
|
Select this option to use Secure Sockets Layer (SSL) protocol. |
|
|
Client pfx File Path |
Enter the Windows file path to the PFX file that identifies the user. A PFX file contains your certificates and corresponding private keys. |
|
Client pfx File Password |
Enter the password for the PFX file. |
HTTP Server
To save your changes, click Apply. To discard your changes, click Reset.
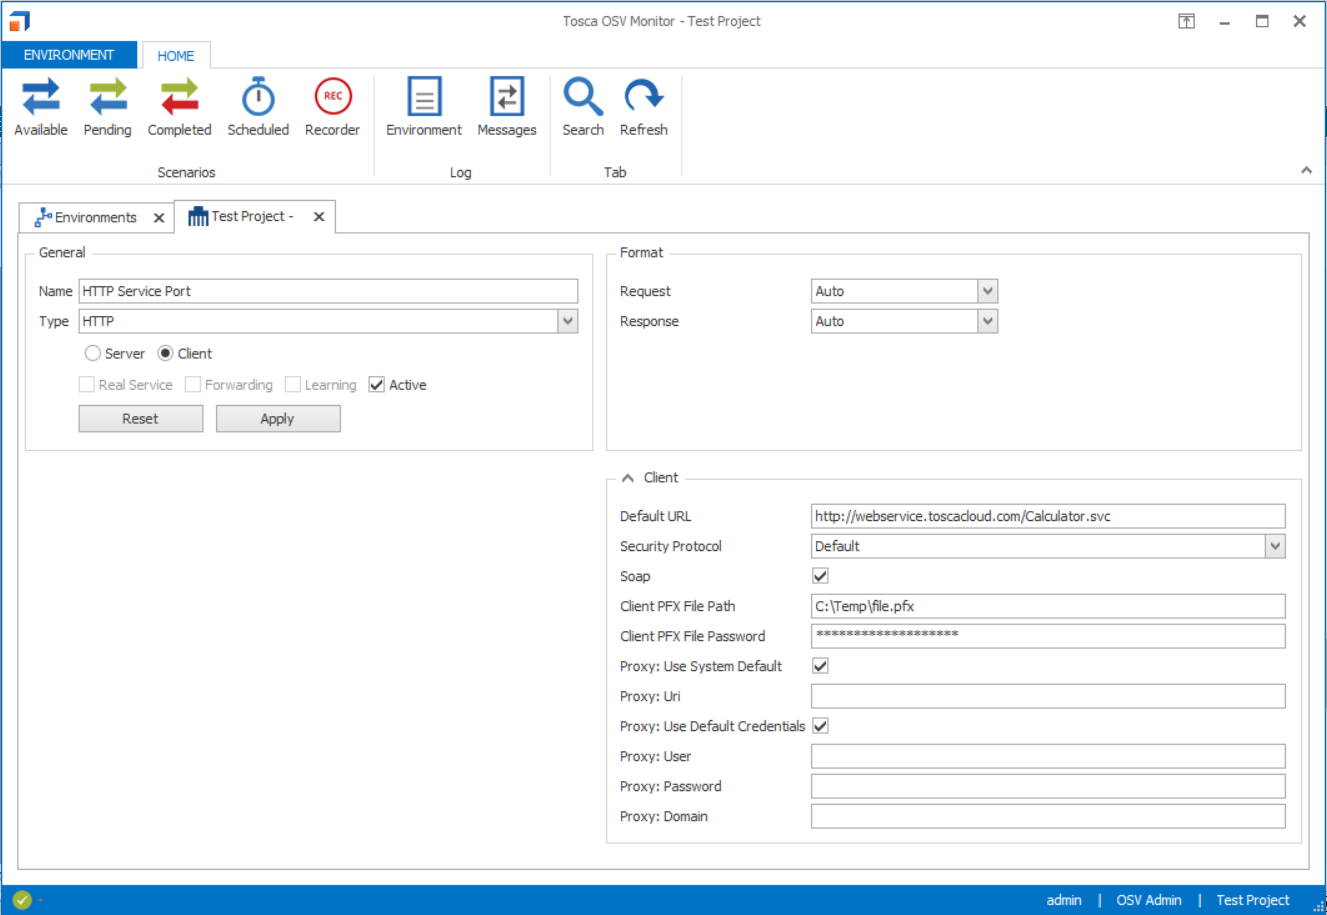
Configure the client
Use the following attributes for the client:
|
Attribute |
Description |
|---|---|
|
Default URL |
Enter the default URL. If you define a URL endpoint in your Scenarios, OSV uses that endpoint to run your Scenarios. If you don't specify a URL endpoint in your Scenarios, OSV uses the default URL from the service port. |
|
Security Protocol |
Select a security protocol for authentication. By default, OSV uses the most recently used protocol. The following protocols are also available: Ssl3, Tls, Tls11, Tls12. |
|
Soap |
Select this option to use SOAP protocol with HTTP. The system sets the content type header for inbound and outbound messages to XML and verifies whether the SOAPAction header exists. |
|
Client pfx File Path |
Specify the Windows file path to the PFX file that identifies the user. A PFX file contains your certificates and corresponding private keys. For example: C:\Temp\file.pfx |
|
Client pfx File Password |
Enter the password for the PFX file. |
|
Proxy: Use System Default |
Select this option to use your system default proxy. If you want to define a different proxy, specify its address, user, password, and domain in the fields below. |
|
Proxy: Uri |
Enter the proxy address, if you don't want to use your system default proxy. For example: http://52.174.157.85:1111 |
|
Proxy: Use Default Credentials |
Select this option to use the logged-in Windows user. |
|
Proxy: User |
Specify the proxy user, if you don't want to use your system default proxy. |
|
Proxy: Password |
Specify the proxy password, if you don't want to use your system default proxy. |
|
Proxy: Domain |
Specify the proxy domain, if you don't want to use your system default proxy. |
HTTP Client
To save your changes, click Apply. To discard your changes, click Reset.
Use REST
OSV supports RESTful services. These are services that implement the REST architecture.
OSV detects the message format automatically, so you don't need to make any additional configurations. For more information on supported message formats, see chapter "Set message formats".
Use HTTPS
If you want to test locally on your own system via proxies, you must use the fully qualified name (FQN) of your machine.
When the OSV Environment forwards messages, it acts as a client and must authenticate itself to a web service or another endpoint.

|
To start HTTPS mode, you have to select Use Secure Connection when you configure the service port. |
Additionally, you have to adjust the following settings for HTTPS mode:
-
Bind the fingerprint of the PFX file certificate (=certhash) to the port you defined for the service port. Use netsh in the command line.
For example:
-
Add binding:
netsh http add sslcert ipport=0.0.0.0:1234 certhash=7eb35dff000ea90b72d46952e3016c8fad3213e1 appid={86476d42-f4f3-48f5-9367-ff60f2ed2cdd} clientcertnegotiation=disable -
Delete binding:
netsh http delete sslcert ipport=0.0.0.0:1234 -
Show binding:
netsh http show sslcert ipport=0.0.0.0:1234
-
-
Install the PFX file in the Windows certificate store (LocalMachine/My).
-
Make sure that the PFX file is trusted in one of the following ways:
-
Ensure that there is a certificate in LocalMachine/TrustedRootStore that is identical to the one you installed.
-
Ensure that there is a certificate in LocalMachine/TrustedRootStore for which there is a certificate chain. That means the PFX file was signed by someone who is already in LocalMachine/TrustedRootStore.
-