Schedules and Test Automation
Using the Automation Integration V2 feature, you can create schedules, which are used to automatically execute tests on a recurring basis. The Automation Integration V2 feature also allows you to immediately execute tests, as needed.
Automation Agents poll qTest for new schedules frequently based on a configured interval. The Agents then run the schedules on the corresponding Automation Hosts. After schedules are run, test results are posted in qTest. If there are any errors, any failed Test Steps, or if a schedule could otherwise not be completed, the schedule status changes, and error details are updated to the appropriate Agent Test Log.
The following image displays the status life cycle of a schedule.
![]()
Prerequisites
The following steps must be completed before schedules can be run.
-
Activate Automation Integration settings in your qTest project.
-
Install and register the Automation Host. Verify that the Automation Host is currently online.
-
When prompted, enter the appropriate configurations. For details about configurations, refer to Create Universal Agent in qTest Launch.
-
Create your automated Test Cases. You can either manually create the Test Cases using the Add Test Runs dialog or automatically create Test Cases using the Automation Agent. Depending on your framework, Test Cases should be created based on certain properties.
-
For Cucumber or JBehave, create Test Cases based on feature or scenario.
-
For TestNG or JUnit, create Test Cases based on test class or method.
Test Step descriptions need to match the method name in the associated test class or the scenario of the associated feature. If a description does not match, the Test Step will not be executed. -
Create a schedule in qTest Launch
If you have access to qTest Launch, you can select Test Runs in qTest Manager and then create a schedule in qTest Launch.
-
Access qTest Manager. Then click the Test Execution tab.
-
In the tree panel, select the object containing the Test Run that you want to schedule, such as a Release, a Test Cycle, or a Test Suite.
The corresponding object screen appears.
-
On the object screen, click the Statistics tab.
-
To create a schedule for a single Test Run:
-
Click the link in the ID column for the Test Run that you want to create a schedule for.
The Test Run screen appears.
-
On the Test Run screen, click Schedule.
To create a schedule for multiple Test Runs:
-
Select the check boxes for the Test Runs in the Test Run grid.
-
In the Test Run grid, click More. Then select Schedule.
At least one automated Test Run must be selected to create a schedule. In addition, manual Test Runs are excluded from schedules.If the most recent version of a selected Test Run has not been approved, the Execute Approved Test Case modal appears. Proceed to step 5.
If the most recent version of a selected Test Run has been approved, you are navigated to qTest Launch, and the Schedule Test Run: Select Cases dialog appears. For a procedure detailing the remaining steps to create a schedule in qTest Launch, refer to Schedule and Distribute Test Automation in qTest Launch.
-
-
On the Execute Approved Test Case modal, select the option button for the most recent version of each Test Case listed.
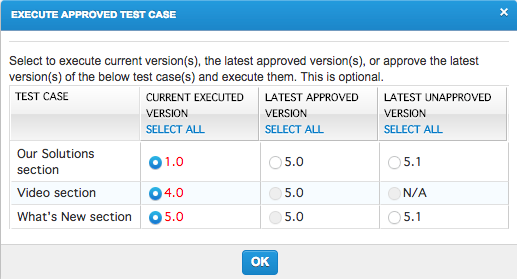 You must have the appropriate permissions to approve Test Cases. If you do not have the correct permissions, you can only schedule and execute the most recently approved version, which may be outdated.
 -
Click OK.
You are navigated to qTest Launch, and the Schedule Test Run: Select Cases dialog appears. For a procedure detailing the remaining steps to create a schedule in qTest Launch, refer to Schedule and Distribute Test Automation in qTest Launch.
Create a schedule in qTest Manager
If you do not have access to qTest Launch, you can create a schedule directly in qTest Manager.
-
Access qTest Manager. Then click the Test Execution tab.
-
In the tree panel, select the object containing the Test Run that you want to schedule, such as a Release, a Test Cycle, or a Test Suite.
The corresponding object screen appears.
-
On the object screen, click the Statistics tab.
-
To create a schedule for a single Test Run:
-
Click the link in the ID column for the Test Run that you want to create a schedule for.
The Test Run screen appears.
-
On the Test Run screen, click Schedule.
To create a schedule for multiple Test Runs:
-
Select the check boxes for the Test Runs in the Test Run grid.
-
In the Test Run grid, click More. Then select Schedule.
At least one automated Test Run must be selected to create a schedule. In addition, manual Test Runs are excluded from schedules.If the most recent version of a selected Test Run has not been approved, the Execute Approved Test Case modal appears. Proceed to step 5.
If the most recent versions of all selected Test Runs have been approved, the Schedule Automation Test Executions dialog appears. Proceed to step 7.
-
-
On the Execute Approved Test Case modal, select the option button for the most recent version of each Test Case listed.
You must have the appropriate permissions to approve Test Cases. If you do not have the correct permissions, you can only schedule and execute the most recently approved version, which may be outdated. -
Click OK.
The Schedule Automation Test Executions dialog appears.
-
Enter the following information on the Schedule Automation Test Executions dialog.
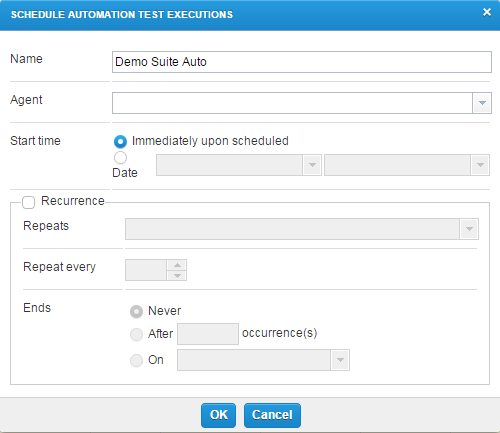
Name Enter a name for the schedule. Agent Select the Agent that will execute the automation scripts. Only Agents that are online and active are available. Start time Select the Immediately upon scheduled option button to indicate that the schedule should begin running as soon as it is created. Test Runs that are scheduled to run immediately will be triggered after the Agent polls the schedule.
You can manually trigger polling, as needed. For more information about manually triggering an Agent to poll, refer to Manually trigger an agent to poll.or
Select the Date option button to select a date and time that the schedule should run.
Recurrence Select this check box to indicate that the schedule should run on a recurring basis. Repeats Select whether the schedule should run on a daily, weekly, or monthly basis. Repeat every Select the interval that the schedule should run, based on the entry in the Repeats field. For example, if you selected Daily in the Repeats field and 3 in the Repeat every field, the schedule will run every three days. Ends Select one of the following option buttons to indicate when the schedule should end.
-
Never. The schedule should run with no end date.
-
After ... occurrence(s). Enter a number to indicate the schedule should run for that number of occurrences. For example, enter 3 to indicate that the schedule should only run three times.
-
On. Select a date that the schedule should end on.
-
-
Click OK to create the schedule.
View existing schedules for an Agent
-
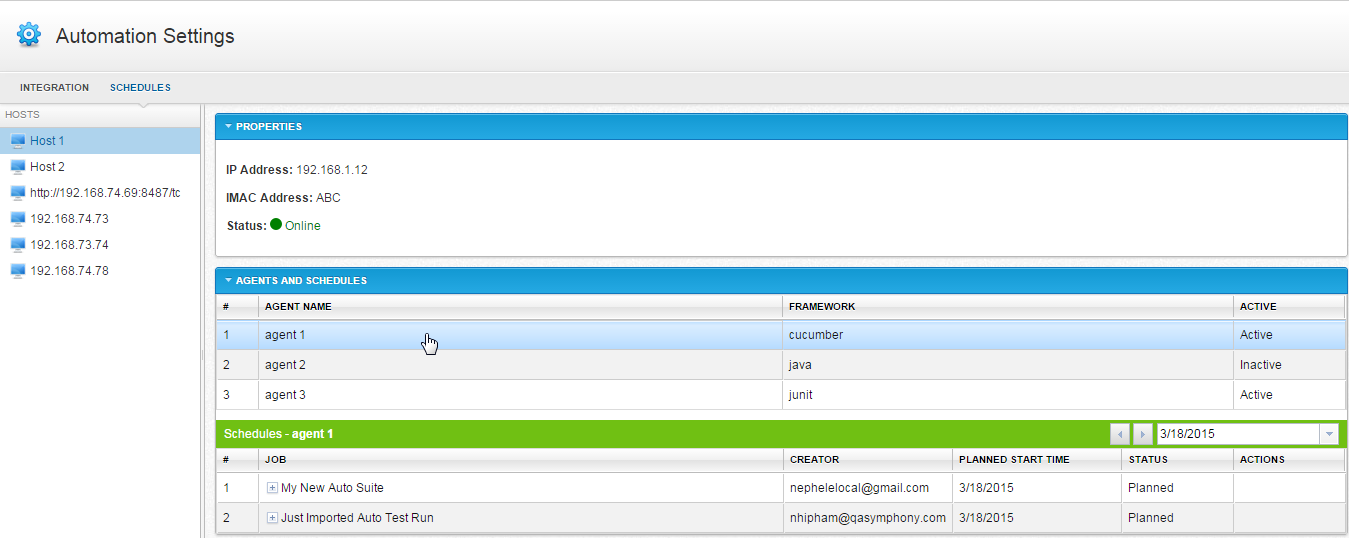
In qTest Manager, click the Gear icon
 . Then select Automation Settings.
 -
On the Automation Settings screen, click the Schedules tab.
-
In the Hosts panel, select the Automation Host associated with the Agent.
-
In the Agents and Schedules section, select the Agent to view schedules for.
Schedules associated for the Agent display in the Schedule section. By default, schedules that were run or are scheduled to run on the current date are displayed. You can select a different date to display schedules for other dates.
Delete a schedule
If a schedule is in Planned status, the schedule can be deleted.

-
In qTest Manager, click the Gear icon
. Then select Automation Settings. -
On the Automation Settings screen, click the Schedules tab.
-
In the Hosts panel, select the Automation Host associated with the schedule.
-
In the Agents and Schedules section, select the Agent associated with the schedule.
By default, schedules that were run or are scheduled to run on the current date appear in the Schedules section. You can select a different date to display schedules for other dates.
-
Hover your cursor in the Action column for the schedule that you want to delete.
-
Click the Delete icon
 . Then select one of the following options:
-
Delete occurrence. Delete only the selected occurrence of the schedule.
-
Delete series. Delete the selected occurrence of the schedule and all future occurrences. Details for past occurrences are retained.
-
Manually trigger an agent to poll
To immediately run a schedule, you can force an Agent to poll for schedules from qTest Launch.
Follow the steps below to manually trigger an agent:
-
From qTest Launch, go to host you want to execute an agent for and select View from the Action dropdown.
-
Find the agent you want to execute on this host and select Execute from the Action dropdown.
-
A confirmation message displays and the agent executes on the Automation Host during the next polling cycle.