Edit scenario
You can edit scenarios in the Scenario Manager.
In the Scenario Manager you can perform the following actions:

|
Attachments, design screenshots, results screenshots and videos are saved in the ExploratoryTesting Assets folder. The default directory is C:\Tosca_Projects\ToscaCommander\ExploratoryTestingAssets. You can change the directory via the AssetsPath setting (Settings->Commander->ExploratoryTesting: |
Create TestSteps and TestStepValues manually
You can manually create TestSteps and TestStepValues for a scenario.
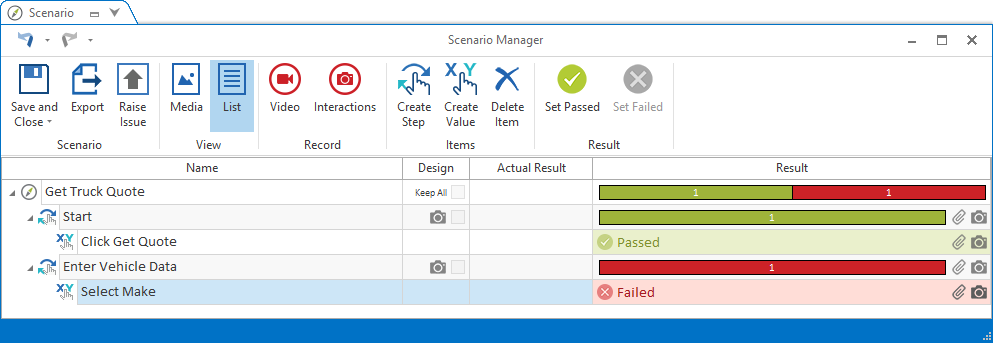
To create a new TestStep , click on the Create Step ![]() icon.
icon.
To create a new TestStepValue for a TestStep, click on the Create Value![]() icon.
icon.
Make sure to assign meaningful names to your TestStep and TestStepValues.
Create new TestStep or TestStepValue
Set TestStep Results
The Scenario Manager allows you to mark TestSteps and TestStepValues as Passed or Failed. When a TestStep contains at least one TestStepValue, you have to set the result on the level of the TestStepValue.
To set the results of a TestStep or TestStepValue, follow the steps below:
-
Select the TestStep or TestStepValue for which you want to set a result.
-
Click on the Set Passed
 icon or the Set Failed
 icon in the Scenario ribbon to set the result to Passed or Failed.
Alternatively, you can select the results by clicking the icons next to the TestSteps or TestStepValues in the sidebar of the Media view, or in the Result column of the List view.

TestStep results in the Media View
The colored square indicates the result and the number of TestStepValues with that result.
Attach Files
You can attach any number of files for each TestStep of a scenario.
To attach files to a TestStep or TestStepValue of a scenario, click on the Add Attachment![]() icon. The option is available in the Results column of the List view and at the upper right-hand side in the Screenshot tab of the Media view.
icon. The option is available in the Results column of the List view and at the upper right-hand side in the Screenshot tab of the Media view.
Merge TestSteps
You can merge one or more TestStep with another TestStep.
To merge them, follow the steps below:
-
Switch to the Media view.
-
Select the TestStep you would like to merge with another TestStep.
-
Use drag and drop to move the TestStep to the Merge Box field of the TestStep with which you want to merge it.
The TestStep are merged along with the corresponding design screenshots. Annotations of merged design screenshots are inserted into the design screenshot of the target step.

Merging Steps
|
|
Please note that screenshots included in TestSteps to be merged need to be of the same size. |