Install Tricentis Analytics
Tricentis Analytics is an Enterprise Reporting Dashboard available for unified reporting across the Tricentis Continuous Testing Platform. Tricentis Analytics allows you to leverage data for both qTest and Tosca.
This version allows you to leverage your qTest and Tosca Objects and their associated properties for custom reporting. The following list provides a brief description of the components you will be working with:
- Reporting DB: the MSSQL database used to store data for Tricentis Analytics
-
Snapshotter: syncs your data from Tosca into your MSSQL reporting database
Note: The Snapshotter only syncs data from Tosca. qTest data is synced by the SyncApp.
-
SyncApp: Syncs data from qTest into your MSSQL reporting DB
Note: The SyncApp only syncs data from qTest. Tosca data is synced by the Snapshotter.
- Tricentis Analytics Reload: After data is in your reporting database, the Tricentis Analytics Reload syncs that data with Tricentis Analytics. The frequency at which the Tricentis Analytics Reload occurs is dependent upon how you configure the Scheduler.
-
Scheduler: dictates the frequency of the data load from your reporting DB and Tricentis Analytics Applications (the qTest Enterprise Analytics Application and the Tosca Enterprise Analytics Application). You will configure the Scheduler and its frequency during install.
qTest Sync App
The qTest SyncApp includes two main components:
-
Historical Data: The Historical Data sync pulls all existing historical qTest data into your Tricentis Analytics database. Historical data consists of the client's existing data before the SyncApp is launched. This occurs right after installation is complete, and it will only occur once. You must wait until this Historical Data Sync is completed before you start Tricentis Analytics.
For example: In July 2019, a qTest user installs Tricentis Analytics. The qTest SyncApp will sync month by month data from July 2019 back to January 2010 (January 2010 is a configurable time line, and the user can change this if they have data from before January 2010).
-
Sync Deltas: After the Historical Data sync is completed, the Sync Deltas process is responsible for pulling new and updated data from qTest into your Tricentis Analytics database. The SyncApp constantly watches ElasticSearch for changes within qTest and then updates any changes within your Tricentis Analytics database. This will keep the information within your Tricentis Analytics database current with the information that you have in qTest.
Scheduler Data Load Recommendations
Before beginning the installation wizard, please consider how often you want the Scheduler to reload new data from the reporting database into Tricentis Analytics. We recommend that you establish a frequency between 30 and 60 minutes.
Note: The Scheduler only dictates how often fresh data loads in Tricentis Analytics from your Tricentis Analytics database. As a result, data will not reload immediately upon the Scheduler's set frequency. Instead, the data will reload after the Tricentis Analytics Reload has finished the data reload process. This applies to both qTest and Tosca data.
Prerequisites
IMPORTANT: Before you can install Tricentis Analytics, you must first complete all prerequisite items and make sure that you are aware of the proper system requirements. For this information, refer to the Tricentis Analytics Install Preparation Checklist.
Install Tricentis Analytics
Remember, you should have qTest Manager 9.7.1 installed (for qTest customers) or Tosca 12.3 (for Tosca customers). qTest users should have Elasticsearch 6.3-6.8 installed and enabled in qTest Manager.
IMPORTANT: To install and configure Tricentis Analytics, you need to use an account with local administrator rights.
-
Download and unzip the Tricentis Analytics installation file.
Do not use the TricentisAnalytics-Upgrade.zip file. -
Double-click the file name to open the Tricentis AnalyticsSetup dialog.
-
In the Tricentis AnalyticsSetup dialog, select Install.
-
Accept the license agreement.
- Now, you are ready to configure the installation parameters.
Configure your Installation Parameters
There are seven installation parameters that you will need to configure. Additional details for each parameter are provided below:
-
Folders: specify the installation root folder
-
Ports: specify the User management port and the Internal database port
-
Database connection: the connection string to the reporting database
-
Tosca Data: define your Tosca Data repositories
-
qTest Data: define qTest Data parameters
-
Scheduler: specify the frequency at which updated data in the reporting database loads into your Tricentis Analytics Applications
-
Admin user: the username and the password of the admin user for Tricentis Analytics. This needs to be a Windows user, so it will be helpful to have a Windows user pre-configured to be used as the admin for Tricentis Analytics.
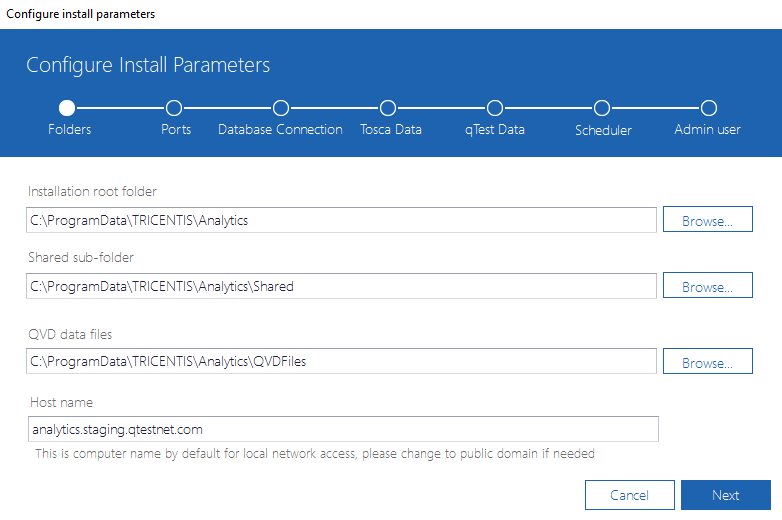
Folders
By default, the folder name is Analytics, and it contains the Shared folder and QVDFiles subfolders. You can specify a different path to each in the respective entry fields.
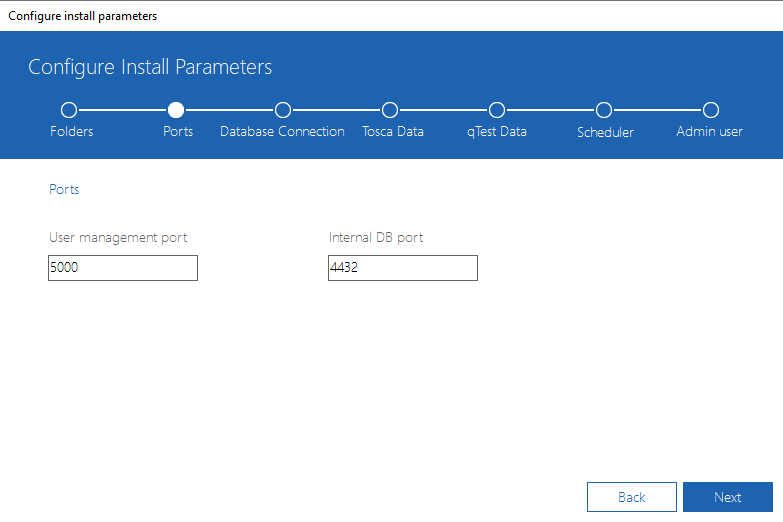
Ports
By default, the User Management port is 5000 and the Internal Database port is 4432. If other applications use these ports, you can specify different ports through the text fields.
Database Connection
Enter the database connection string for your chosen MSSQL login mode.
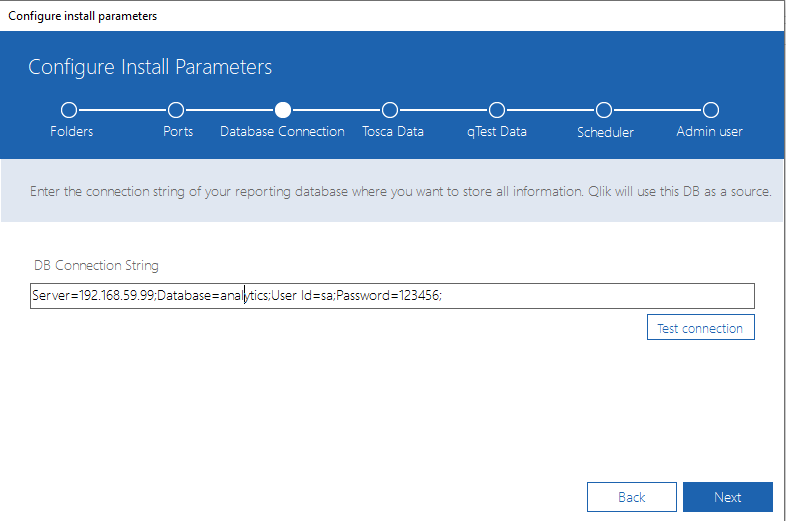
Important:
If your MSSQL is on the same server with Tricentis Analytics and MSSQL, and it has the default named instance SQLEXPRESS, then the connection string should be:
For Windows login mode:
Server=localhost;Database=<database name>;Integrated Security=True;User Id=;Password=;
For SQL login mode:
Server=localhost;Database=<database name>;User Id=<user id>;Password=<password>;
For the default named instance, we should use localhost for both types.
Tosca Data
If you want to report on Tosca data, define which repositories are included in Tosca Data.
To do so, select the respective repository, and select Add.
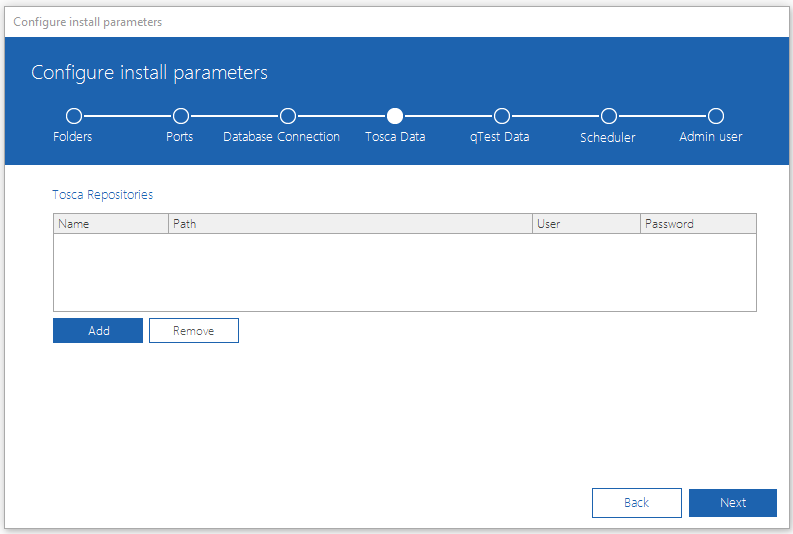
Tricentis Analytics can only take snapshots of multi-user workspaces.
Tricentis recommends that you create a new local multi-user workspace for the common repository that you want to snapshot. After adding the new multi-user workspace to Tosca Data, do not make any changes to this workspace.
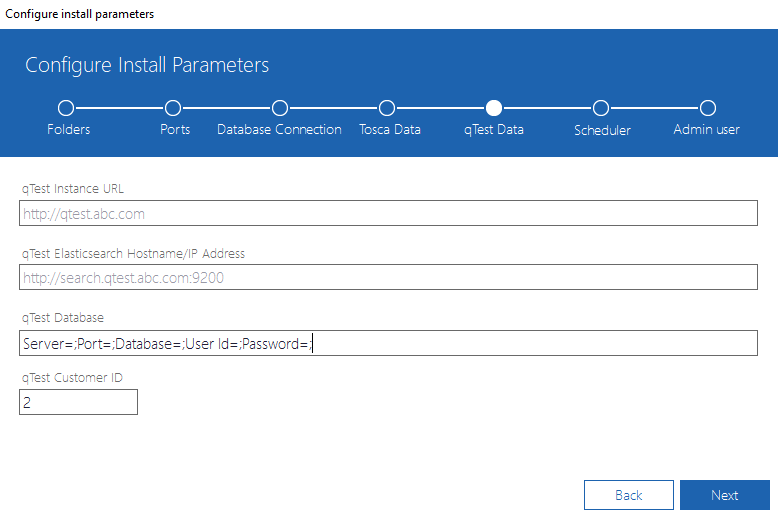
qTest Data
If you want to report on qTest data, enter the following information to connect your qTest ElasticSearch DB to Tricentis Analytics:
- qTest API Endpoint: the qTest URL for your environment.
Example: https://qas.qtestnet.com - qTest Search Endpoint: the ElasticSearch server's IP address. The default port value is 9200.
Example: http://10.101.17.48:9200 - qTest Database: the configuration for your qTest Manager Postgres. The format for this field is as follows:
- Server=;Port=;Database=;User Id=;Password=;
For example: Server=192.168.59.135;Port=5432;Database=qtestdb;User Id=postgres;Password=123456;
- Server=;Port=;Database=;User Id=;Password=;
- qTest Customer Id: for OnPremise customers, the default value is "2."
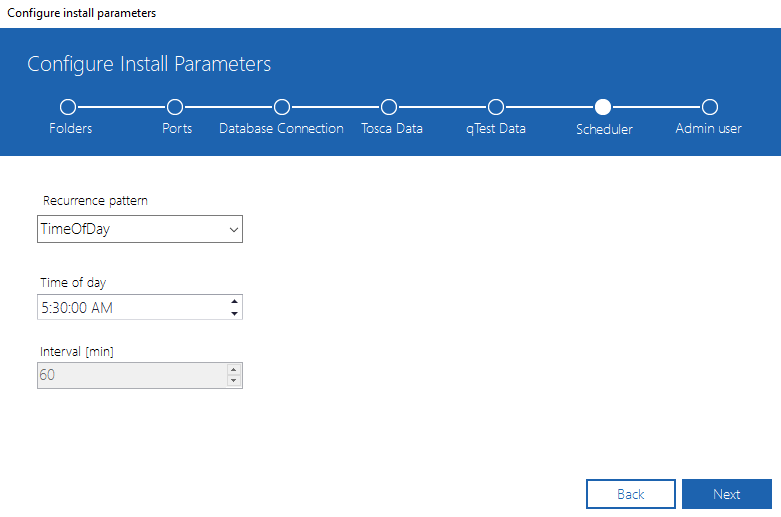
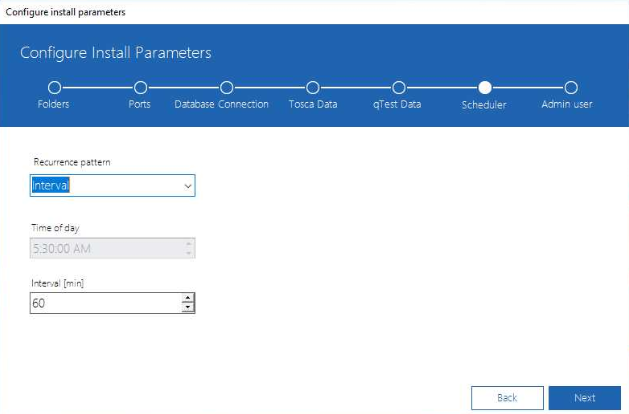
Scheduler
The Scheduler will dictate how often the Tricentis Analytics Data Reload syncs data between your reporting database and Tricentis Analytics.
Choose your preferred option in the Schedule type drop down menu:
-
TimeOfDay syncs data at a specific time of day. Specify which time in the Time of day entry field.
-
Interval syncs data at specific time intervals. Specify the interval in the Minutes entry field.
The recommended scheduled interval is between 30 and 60 minutes.
Admin
Define a local Windows user for using Tricentis Analytics. This user then has the future Administrator rights in Tricentis Analytics to access the QMC site to manage Users and Licenses.
This Admin User is able to manipulate user roles and add new users to Tricentis Analytics.
During installation, you are asked to specify/create a Qlik Admin account. This user can use the QMC site: <host>/qmc/ (Example: https://ta.staging.qtestnet.com/qmc/)
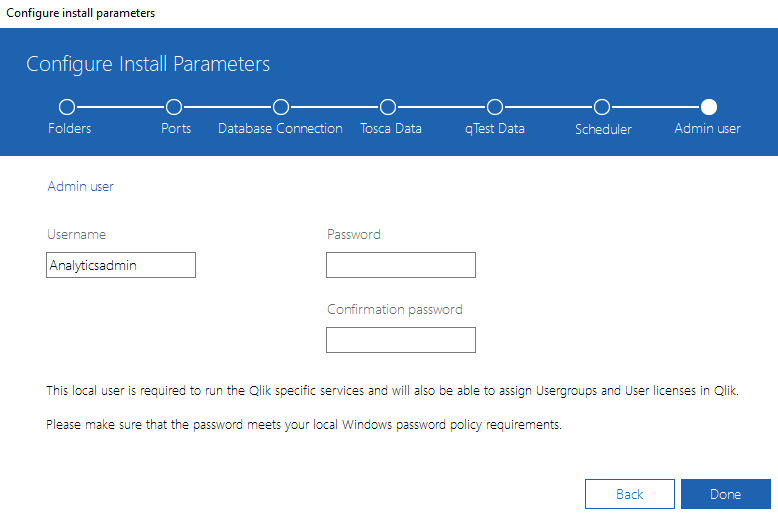
Changing the local Windows username may result in errors.
Tricentis recommends that you only change the password of the local Windows user if absolutely necessary.
Please note that if you change it, you must also update all Qlik services that run with these credentials in the Services extension of the Qlik Management Console.
Complete Installation
Once you have configured your installation, select Done. After the setup is completed, you can close the dialogue.
If the installation fails, please refer to the Install Troubleshooting Matrix.
After Installation: What to Expect
Your data size determines how long it will take for data to completely load into Tricentis Analytics. It is only after this data loads that Tricentis Analytics can be used.
Example: For a data volume of one million object properties, the Snapshotter/SyncApp needs around two hours to complete saving data into your Tricentis Analytics reporting database. The Tricentis Analytics Reload needs around 30 minutes to load data into the applications in Tricentis Analytics. Therefore, you should wait at least 3-4 hours before attempting to use Tricentis Analytics.
Refer to the following sections for information on the processes for qTest data and Tosca data, respectively:
For qTest Customers
After installation, your qTest data will have to sync with Tricentis Analytics. For qTest users, the qTest SyncApp will perform its Historical Data sync in order to load data from qTest and into your Tricentis Analytics reporting database. Afterward, the Tricentis Analytics Reload will sync data from your Tricentis Analytics reporting database into Tricentis Analytics.
Note: If you want to check the progress of moving Historical Data, you can do so by accessing this url:

For Tosca Customers
The Snapshotter will sync data from Tosca into your Tricentis Analytics reporting database. Afterward, the Tricentis Analytics Reload will sync data from your Tricentis Analytics reporting database into Tricentis Analytics.
For Customers without Tosca
If you are not using Tosca with Tricentis Analytics, it is recommended that the Snapshotter service is either modified or disabled to avoid generating QVD files. Refer to Using Tricentis Analytics without Tosca for procedures on modifying and disabling the Snapshotter service.
Force a Data Reload
Because the Tricentis Analytics Data Reload operates on a frequency as defined by the Scheduler during installation, the first sync between your reporting database and Tricentis Analytics will, by default, occur at the scheduled time. In the event that you would like to force an immediate data reload to check whether your data has populated successfully within Tricentis Analytics, please refer to Force a Data Reload.
Access Tricentis Analytics After Installation
After you have installed Tricentis Analytics, please refer to these articles on how to access your new tool: